Hanko Fullstack Integration Guide:About Hanko:Hanko is a modern open source authentication solution and the fastest way you integrate passkeys, 2FA, SSO, and more—with full control over your data. Move between self-hosted and Hanko Cloud anytime. No lock-in. Just Auth how it should be: secure, user friendly, and fully yours.What This Guide Covers: This comprehensive guide demonstrates integrating Hanko authentication into your fullstack application using the
@teamhanko/hanko-elements package. You’ll learn to set up authentication components, implement session management, secure routes with middleware, and handle user data across both client and server-side contexts.Key Technologies:- Modern fullstack framework with TypeScript,
- Server-side rendering capabilities
- Hanko Elements
- Hanko Cloud Console
- Session management
- Middleware protection
- Node.js installed on your system
- Basic knowledge of your chosen fullstack framework
- A Hanko Cloud account (sign up at https://cloud.hanko.io/signup)
- Install and configure Hanko Elements package for your framework
- Set up HankoAuth component with session event handling and navigation
- Create HankoProfile component for user credential management
- Implement logout functionality with proper session cleanup and redirects
- Secure routes using framework-specific middleware with session validation
- Retrieve user data both client-side and server-side using appropriate APIs
- Handle authentication redirects, error states, and edge cases
- Configure server-side rendering integration and hydration
- Customize component appearance and behavior for your application
Create a Remix application
Create a new Remix application using the official starter template. Run the following command to create a new Remix application:Install @teamhanko/hanko-elements
The Hanko Elements package provides pre-built authentication components (hanko-auth, hanko-profile) and a JavaScript SDK.
Install the package:
Set up your Hanko project
Create a Hanko project in the Cloud Console to get your API URL. Go to the Hanko Console and create a project for this application.Set the
APP URL to your development URL (typically http://localhost:5173/ for Remix).Add the Hanko API URL
Add your Hanko API URL to your environment file. In Remix, environment variables without a public prefix are server-side only. Retrieve the API URL from the Hanko Console and add it to your.env file:
.env
If you are self-hosting you need to provide the URL of your running Hanko
backend.
Create client-side utilities
The@teamhanko/hanko-elements package only works client-side. Use Remix’s .client.ts file convention to ensure code only runs in the browser.
Create a client-side utility file:
utils/hanko.client.ts
Create Hanko components
Create acomponents folder with two files: HankoAuth.tsx and HankoProfile.tsx.
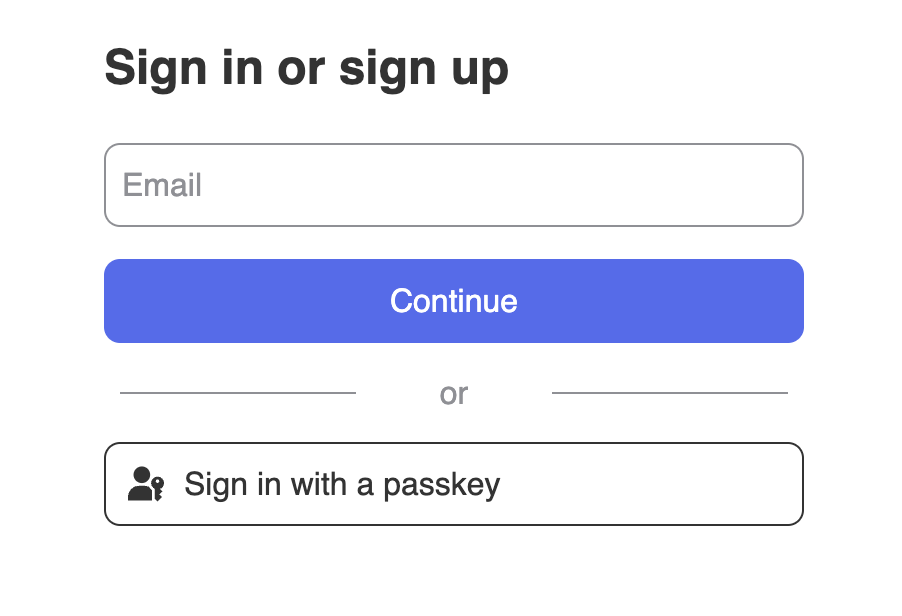
Hanko Auth
TheHankoAuth component provides login and registration functionality. It uses Remix’s loader to pass the API URL from server to client, and handles the onSessionCreated event for post-login navigation.
For more information see the Auth component documentation.
components/HankoAuth.tsx
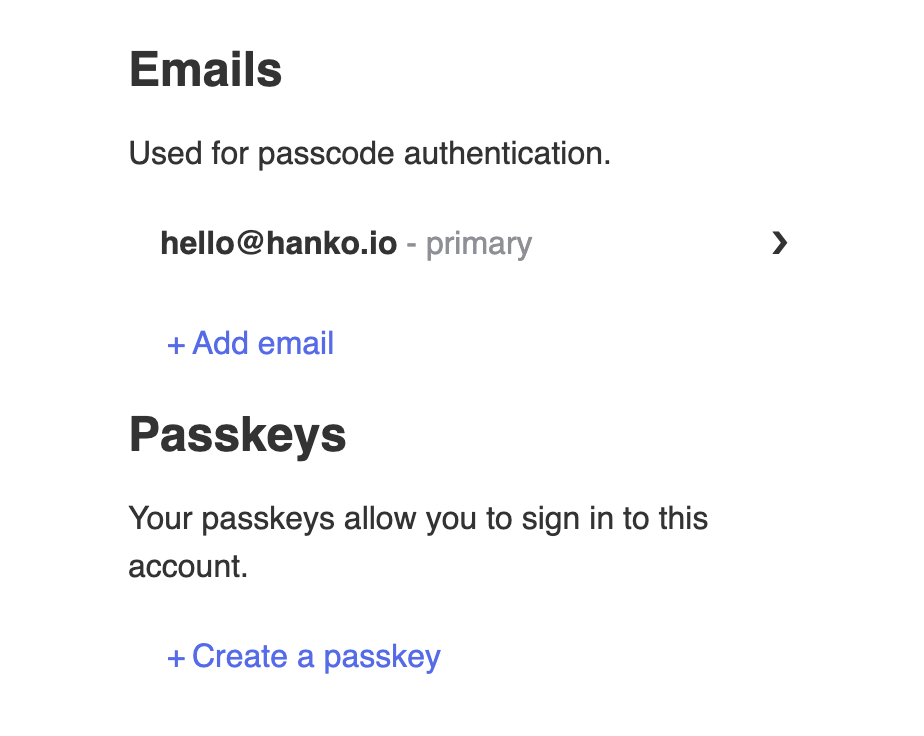
Hanko Profile
TheHankoProfile component allows users to manage their email addresses and passkeys.
For more information see the Profile component documentation.
components/HankoProfile.tsx
Setup your routes
Create your routes in the/routes folder. You’ll need _index.tsx for the login page and dashboard.tsx for the user dashboard.
Create the main login route:
routes/_index.tsx
routes/dashboard.tsx
/ to see the <HankoAuth>, and to /dashboard to see the <HankoProfile>.
They should look something like this👇
If
HankoAuth is not loading please restart the application as it might’ve not loaded the .env correctly the first time.HankoProfile will only look like the picture while you are logged in.Implement logout functionality
Create a logout button using the Hanko SDK’s logout method. CreateLogoutButton.tsx:
components/LogoutButton.tsx
Customize component styles
You can customize the appearance ofhanko-auth and hanko-profile components using CSS variables and parts. Refer to our customization guide.
Securing routes
Protect routes by validating session tokens in loader functions. Create a server-side authentication utility to handle session validation. Createapp/services/auth.server.ts:
app/services/auth.server.ts
app/routes/dashboard.tsx
Try it yourself
Remix example
Full source code available on our GitHub