1

Install passkey provider

Once you’ve initialized your Next app with NextAuth, install passkey provider and the webauthn-json package.

npm i @teamhanko/passkeys-next-auth-provider @github/webauthn-json
2

Get your tenant ID and API key

Get your tenant ID and API key from Hanko Cloud and add them to your .env.local file.

.env.local
PASSKEYS_API_KEY=your-api-key
NEXT_PUBLIC_PASSKEYS_TENANT_ID=your-tenant-id

If you’re self-hosting:

  1. make sure to pass the baseUrl to both tenant (in [...nextauth].ts) and signInWithPasskey() (in your component).
  2. get your tenant ID via the admin API
3

Add `PasskeyProvider`

app/api/auth/[...nextauth]/route.ts
import {
  tenant,
  PasskeyProvider,
} from "@teamhanko/passkeys-next-auth-provider";

export default NextAuth({
  providers: [
    PasskeyProvider({
      tenant: tenant({
        apiKey: process.env.PASSKEYS_API_KEY,
        tenantId: process.env.NEXT_PUBLIC_PASSKEYS_TENANT_ID,
      }),
      async authorize({ userId }) {
        const user = db.users.find(userId);

        // Do more stuff

        return {
          id: user.id,
          name: user.username,
        };
      },
    }),
  ],
});
4

Allow your users to register passkeys as a login method for their account

Your users will have to add passkeys to their account somehow. It’s up to you how and where you let them do this, but typically this would be a button on an “Account Settings” page.

On your backend, you’ll have to call tenant({ ... }).registration.initialize() and .registration.finalize() to create and store a passkey for your user.

On your frontend, you’ll have to call create() from @github/webauthn-json with the object .registration.initialize() returned.

create() will return a PublicKeyCredential object, which you’ll have to pass to .registration.finalize().

Backend:

lib/passkey-registration.ts
"use server";

// This is *your* server-side code; you need to implement this yourself.
// NextAuth takes care of logging in the user after they have registered their passkey.

import { authOptions } from "./app/api/auth/[...nextauth]/route.ts"; // Only required because of a NextAuth limitation
import { getServerSession } from "next-auth";
import { tenant } from "@teamhanko/passkeys-next-auth-provider";

const passkeyApi = tenant({
  apiKey: process.env.PASSKEYS_API_KEY,
  tenantId: process.env.NEXT_PUBLIC_PASSKEYS_TENANT_ID,
});

export async function startServerPasskeyRegistration() {
  const session = await getServerSession(authOptions);
  if (!session?.user?.id) throw new Error("Not logged in");

  const createOptions = await passkeyApi.registration.initialize({
    userId: session.user.id,
    username: session.user.name,
  });

  return createOptions;
}

export async function finishServerPasskeyRegistration(credential: any) {
  const session = await getServerSession(authOptions);
  if (!session) throw new Error("Not logged in");

  await passkeyApi.registration.finalize(credential);

  // Now the user has registered their passkey and can use it to log in.
  // You don't have to do anything else here.
}

Frontend:

components/PasskeyRegistrationButton.tsx
// This is your client-side code. NextAuth takes care of logging in the user after they have registered their passkey using registerPasskey function.

"use client"

import {
  finishServerPasskeyRegistration,
  startServerPasskeyRegistration,
} from "@/lib/passkey-registration";
import { create } from "@github/webauthn-json";

export default function RegisterNewPasskey() {
  async function registerPasskey() {
    const createOptions = await startServerPasskeyRegistration();

    // Open "register passkey" dialog
    const credential = await create(createOptions as any);

    await finishServerPasskeyRegistration(credential);

    // Now the user has registered their passkey and can use it to log in.
  }

  return (
    <button onClick={() => registerPasskey()}>Register a new passkey</button>
  );
}
5

Allow your users to log in with passkeys

Let’s add a button that triggers the “Sign in with passkey” dialog:

components/PasskeyLoginButton.tsx
"use client";

import { signInWithPasskey } from "@teamhanko/passkeys-next-auth-provider/client";

export default LoginButton() {
	return (
		<button onClick={() => signInWithPasskey({ tenantId: process.env.NEXT_PUBLIC_PASSKEYS_TENANT_ID })}>
			Sign in with passkey
		</button>
	);
}
6

Optional: Autofill support

If you don’t want to add a button just for passkeys, you can add autofill support to your username (or email) fields:
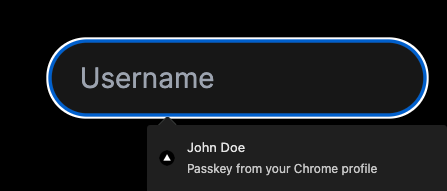
Clicking on any passkey in the autofill popup will immediately log the user in, going through the same flow as if they had clicked the “Sign in with passkey” button earlier in this guide.

To add autofill support:

  • add autoComplete="username webauthn" to your username field
  • call signInWithPasskey.conditional() when the login form loads

Example:

"use client";

import { signInWithPasskey } from "@teamhanko/passkeys-next-auth-provider/client";

export default function LoginForm() {
  // Call signInWithPasskey.conditional() once, when LoginForm mounts.
  //
  // .conditional() returns a cleanup function.
  // Please make sure to return it from useEffect:
  useEffect(() => {
    return signInWithPasskey.conditional({
      tenantId: process.env.NEXT_PUBLIC_PASSKEYS_TENANT_ID,
    });
  }, []);

  return (
    <form>
      {/* Add "webauthn" to input autoComplete: */}
      <input autoComplete="username webauthn" />
      <input type="password" placeholder="Password" />
      <button type="submit">Log in</button>
    </form>
  );
}