> ## Documentation Index
> Fetch the complete documentation index at: https://docs.hanko.io/llms.txt
> Use this file to discover all available pages before exploring further.
# Add Passkey Login to your Next.js App using NextAuth and Hanko
> This guide will show you how to add Passkey Login to your Next.js App using NextAuth and Hanko
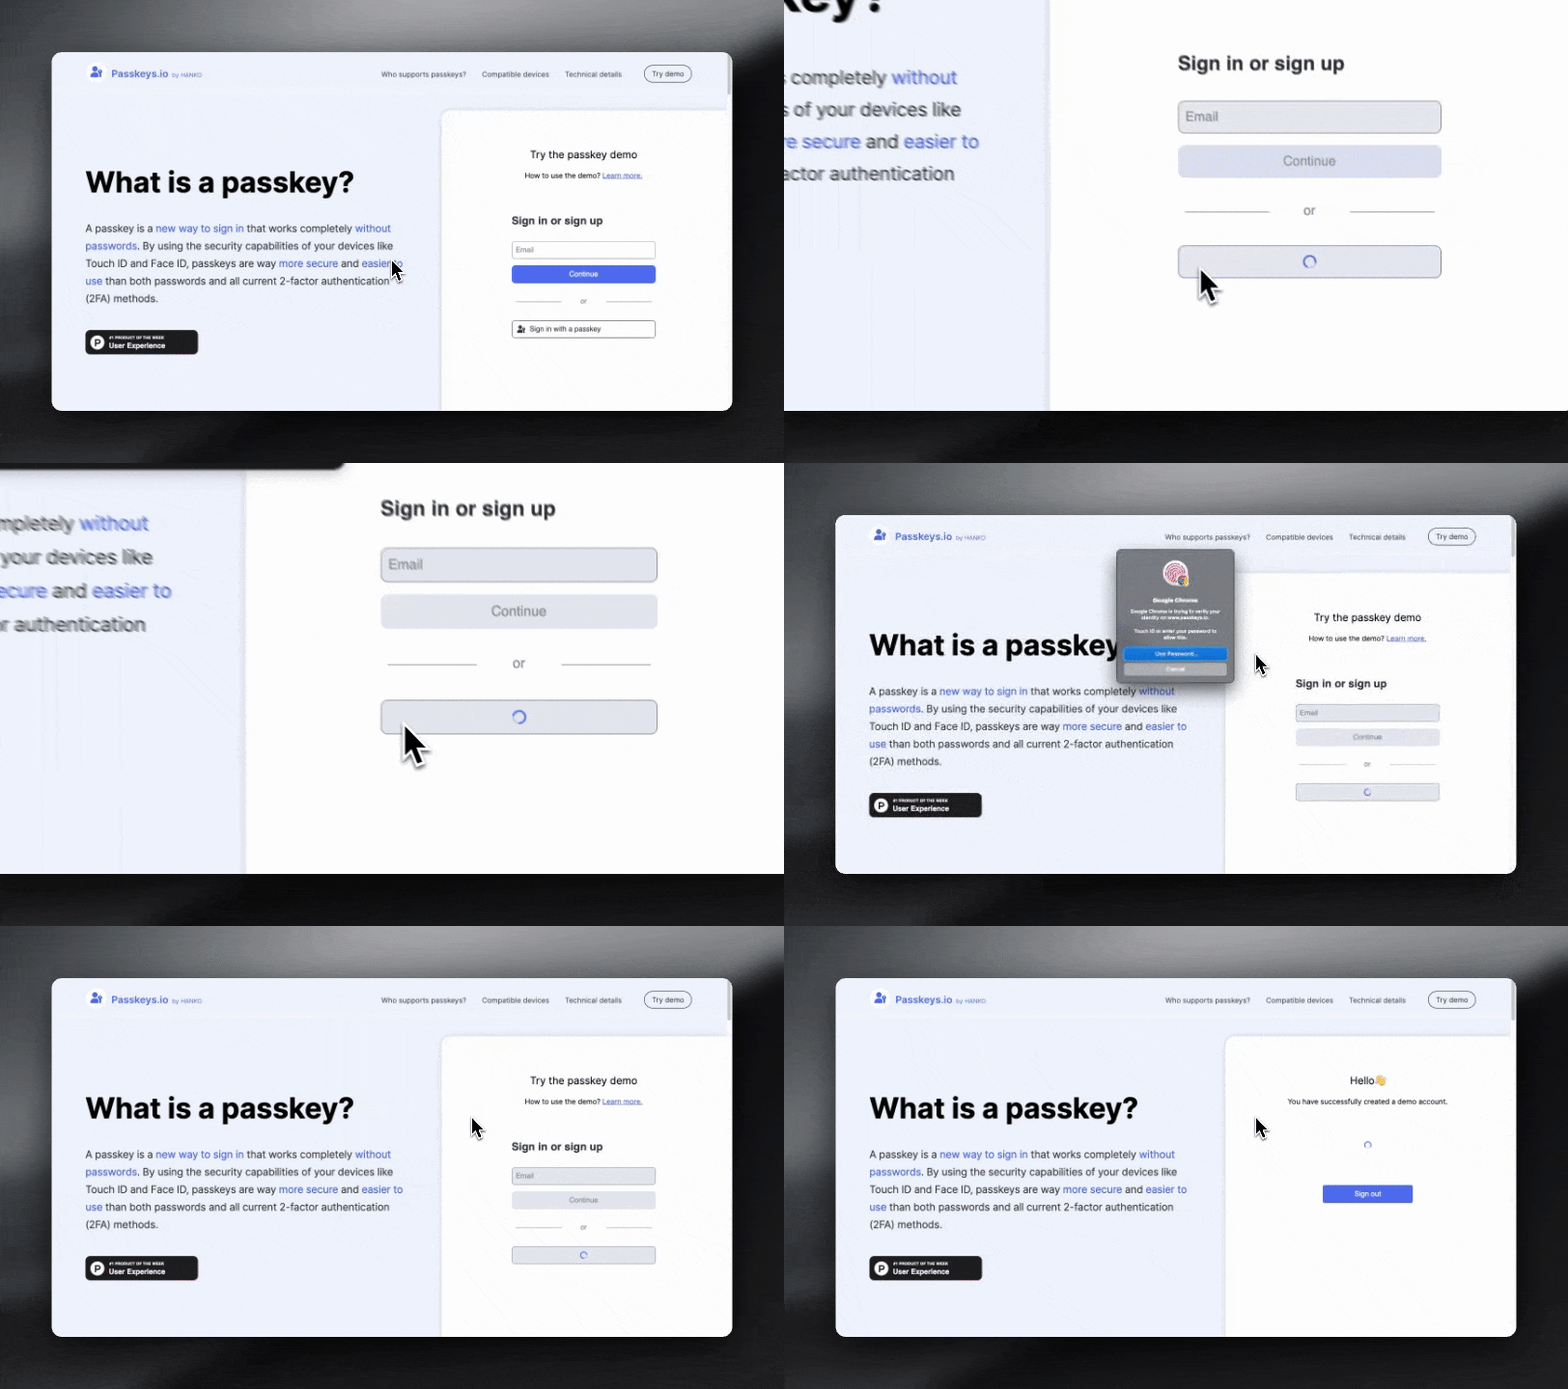
[Passkey](https://www.passkeys.io/) login is a cool new way to sign in without needing any passwords. It uses Touch ID or Face ID on your device to authenticate, which makes it way more secure and easier to use than old-school passwords and even those two-factor authentication methods we're used to.
Typically, to add passkeys to any app, you'd need two things:
* a backend to handle the authentication flow and store data about your user's passkeys
* a couple of functions on your frontend to bring up & handle the "Sign in with passkey" dialog
If you're using Next.js, you can easily do both of these things with NextAuth and our accompanying provider `@teamhanko/passkeys-next-auth-provider.`
Our open-source passkey server is an API you can call *from your (Next.js) backend* to handle the authentication flow (and storing all relevant data about your user's passkeys).
`@teamhanko/passkeys-next-auth-provider` is a NextAuth provider that calls this API for you, and lets you bring up the "Sign in with passkey" with a single function call.
`@github/webauthn-json` is an optional package that makes it easier to work with the WebAuthn API on your frontend.
Let's get to building. You can either follow the video or go through the guide below.
After initializing your Next.js and configuring NextAuth you'll need to get the Hanko API key secret and Tenant ID. Navigate over to [Hanko Cloud](https://cloud.hanko.io/) to grab those.
## Get the API key and Tenant ID from Hanko
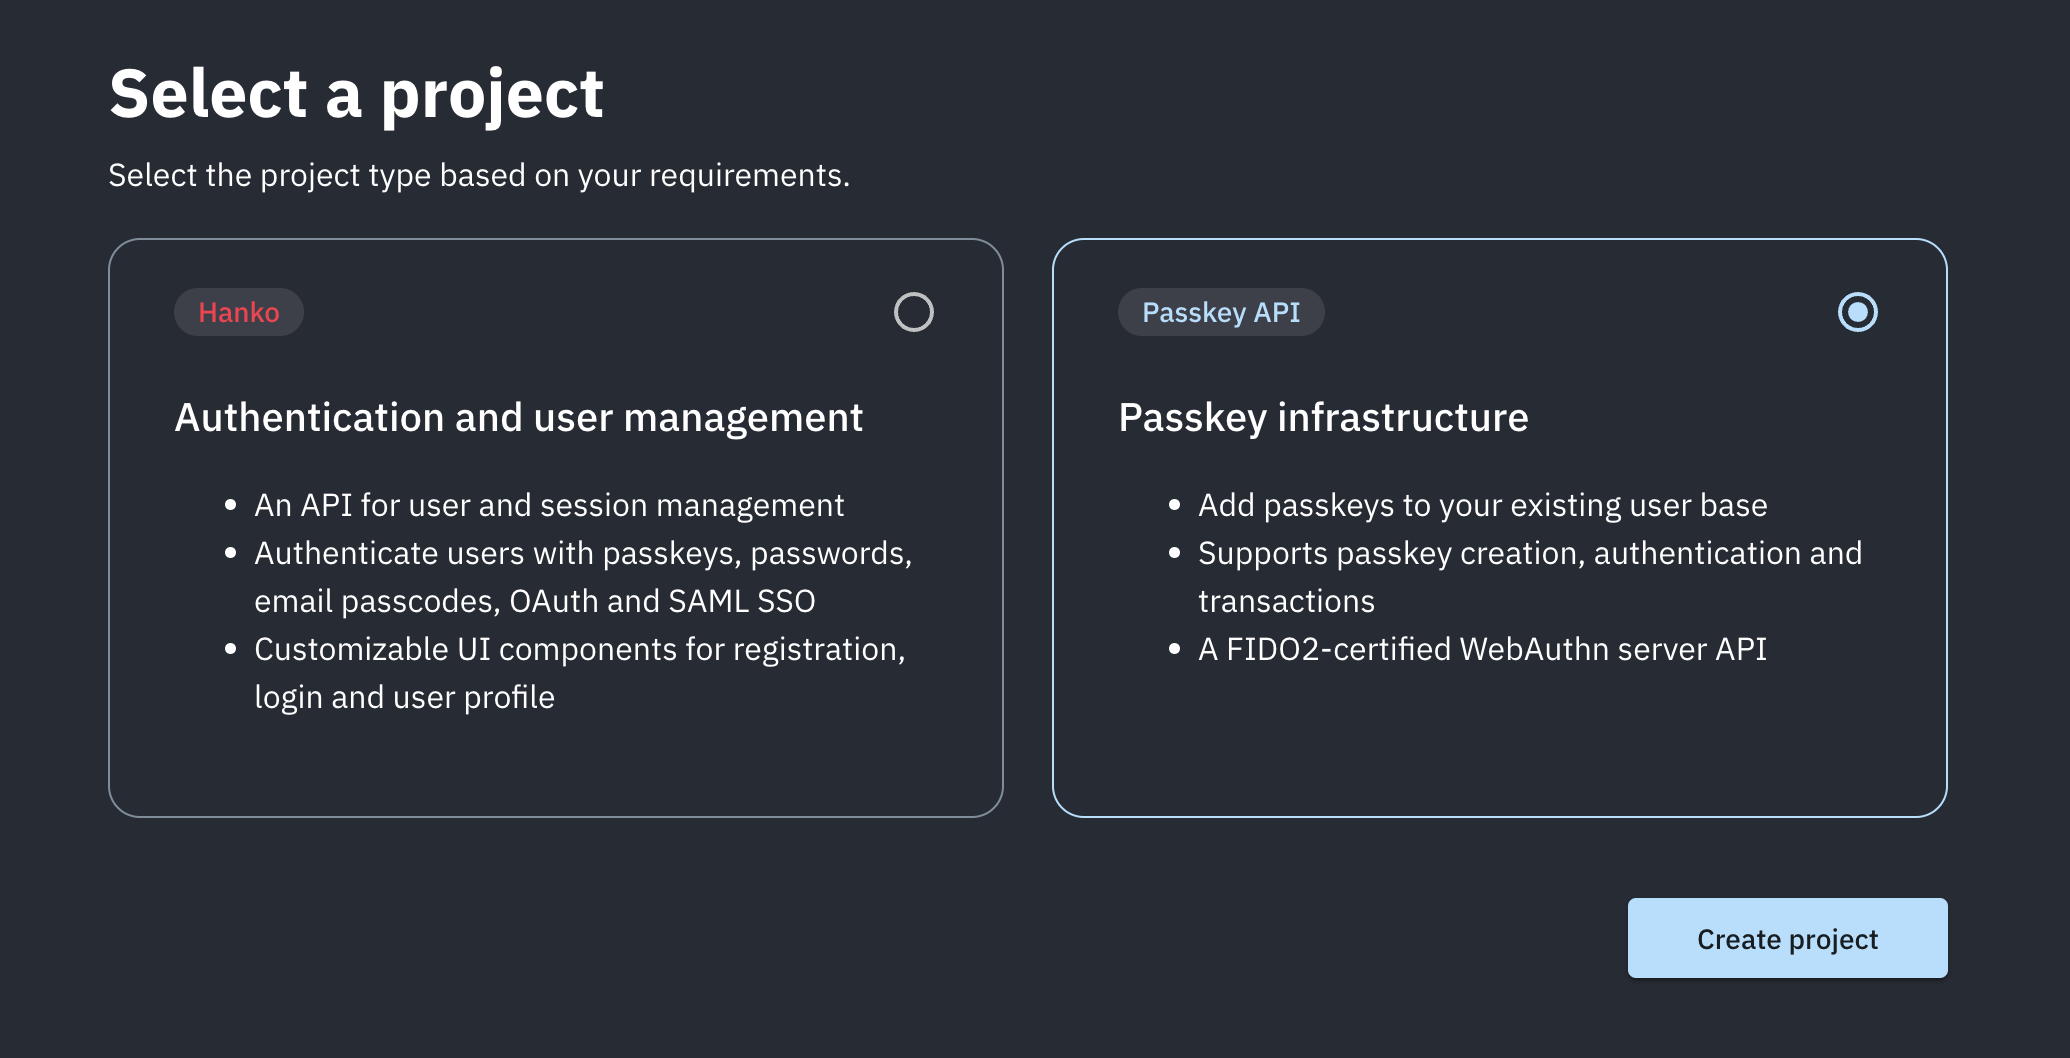
After creating your account on [Hanko](https://www.hanko.io/) and setting up the organization, go ahead and select 'Create new project,' and then choose 'Passkey infrastructure' and 'Create project'.
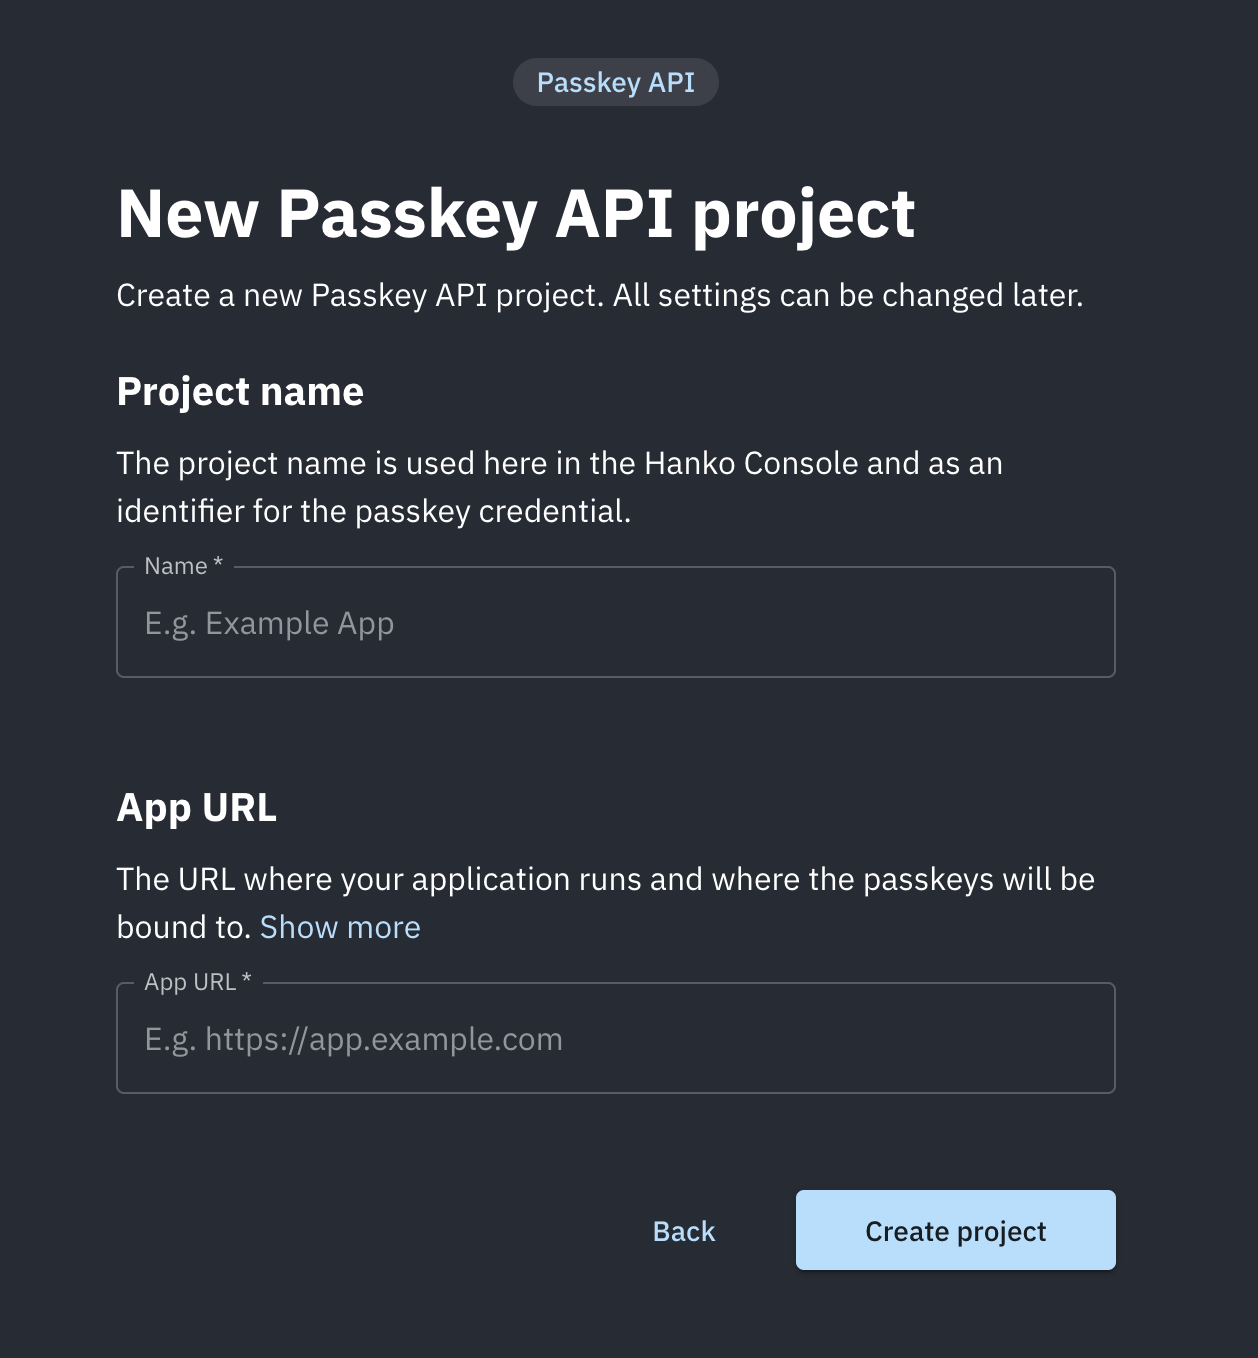
Provide your Project name and URL and click on 'Create project'.
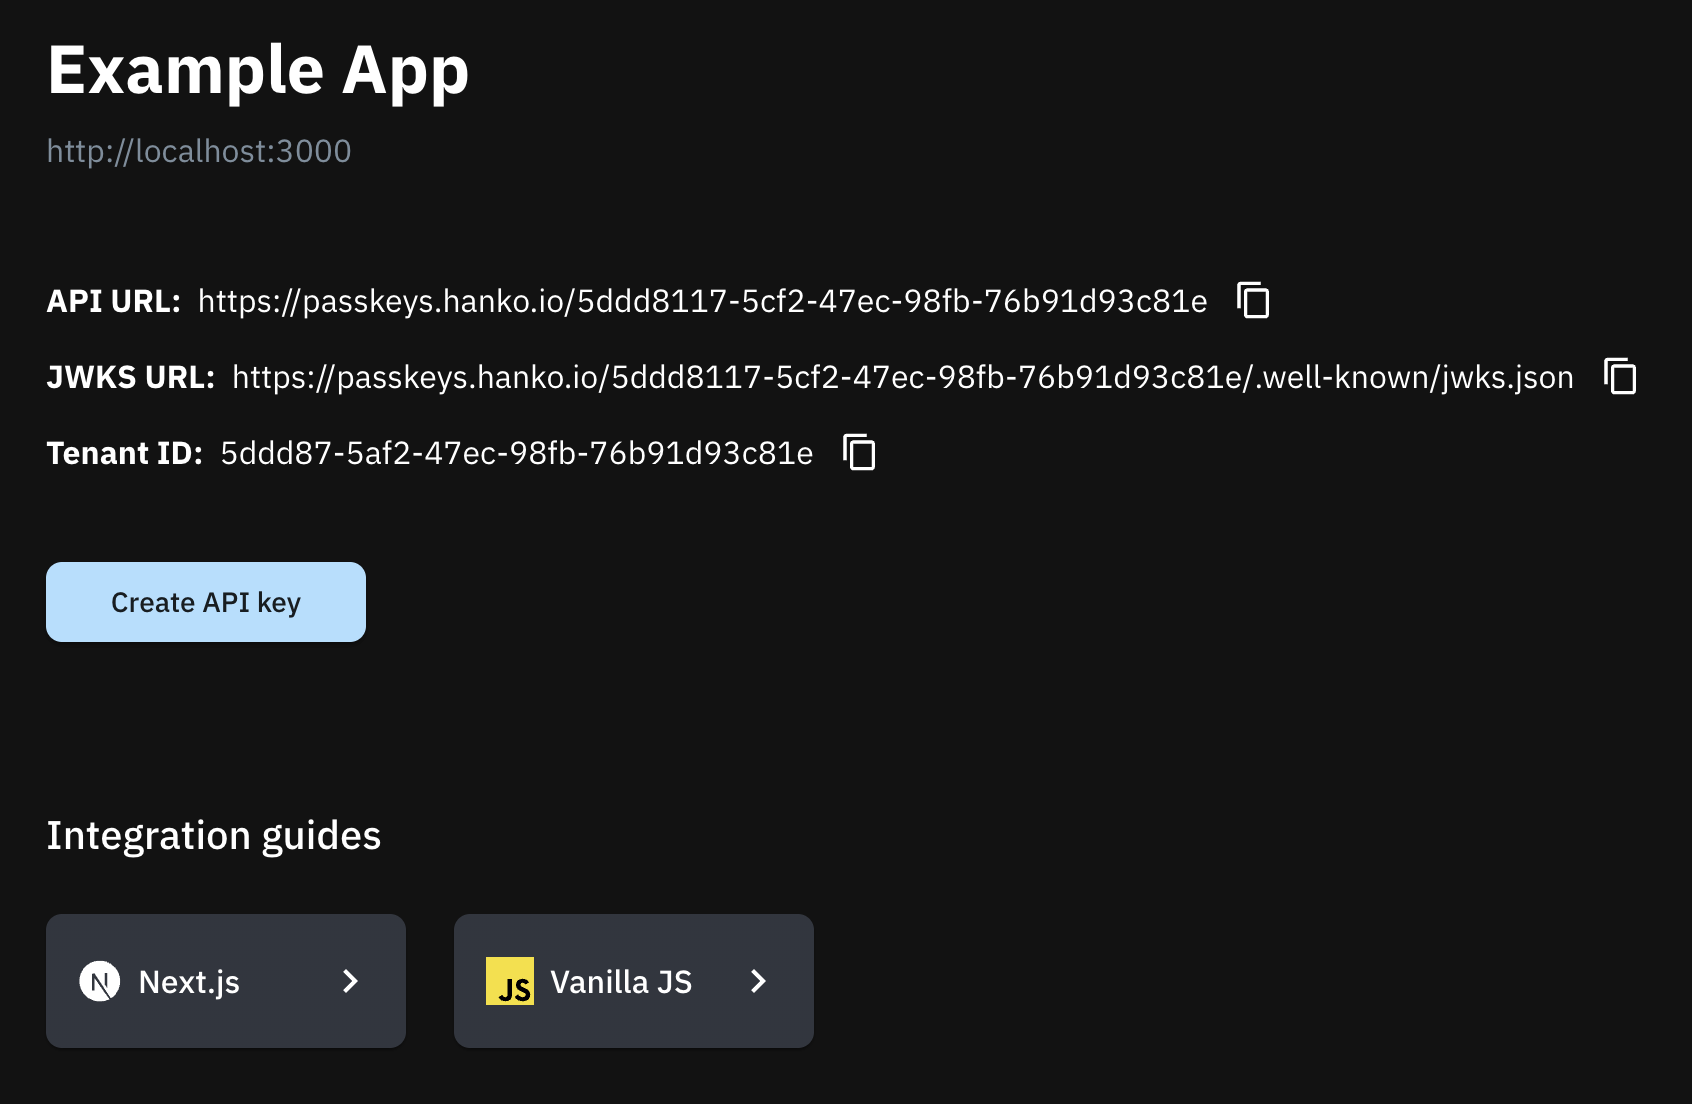
Copy the 'Tenant ID', create an API key, and add it to your `.env` file.
```bash theme={null}
PASSKEYS_API_KEY="your-passkey-api-secret"
NEXT_PUBLIC_PASSKEYS_TENANT_ID="your-tenant-id"
```
## Install the NextAuth Passkey provider
Install the passkey provider for NextAuth from Hanko and `webauthn-json` package by GitHub.
```bash theme={null}
npm add @teamhanko/passkeys-next-auth-provider @github/webauthn-json
```
## Add the Passkey provider to NextAuth Config
```ts auth.ts theme={null}
PasskeyProvider({
tenant: tenant({
apiKey: process.env.PASSKEYS_API_KEY!,
tenantId: process.env.NEXT_PUBLIC_PASSKEYS_TENANT_ID!,
}),
async authorize({ userId }) {
const user = await prisma.user.findUnique({ where: { id: userId } });
if (!user) return null;
return user;
},
}),
```
As we're using Prisma Adapter by NextAuth, we'll need to also to use `session: { strategy: "jwt" }` and modify the session to get id from `token.sub`. This is how the complete code for `auth.ts` the file looks after adding Hanko passkey provider.
Note that, if you don't plan to use any adapters, you just need to add the Passkey provider and don't modify anything.
```ts auth.ts theme={null}
import type { NextAuthOptions } from "next-auth";
import GitHubProvider from "next-auth/providers/github";
import EmailProvider from "next-auth/providers/email";
import { PrismaAdapter } from "@auth/prisma-adapter";
import {
tenant,
PasskeyProvider,
} from "@teamhanko/passkeys-next-auth-provider";
import prisma from "./db";
export const authOptions = {
providers: [
GitHubProvider({
clientId: process.env.GITHUB_ID!,
clientSecret: process.env.GITHUB_SECRET_ID!,
allowDangerousEmailAccountLinking: true,
}),
EmailProvider({
server: {
host: process.env.EMAIL_SERVER_HOST,
port: process.env.EMAIL_SERVER_PORT,
auth: {
user: process.env.EMAIL_SERVER_USER,
pass: process.env.EMAIL_SERVER_PASSWORD,
},
},
from: process.env.EMAIL_FROM,
}),
PasskeyProvider({
tenant: tenant({
apiKey: process.env.PASSKEYS_API_KEY!,
tenantId: process.env.NEXT_PUBLIC_PASSKEYS_TENANT_ID!,
}),
async authorize({ userId }) {
const user = await prisma.user.findUnique({ where: { id: userId } });
if (!user) return null;
return user;
},
}),
],
adapter: PrismaAdapter(prisma),
session: { strategy: "jwt" },
callbacks: {
session: ({ session, token }) => {
if (token) {
return {
...session,
user: {
...session.user,
id: token.sub,
},
};
} else {
return session;
}
},
},
} satisfies NextAuthOptions;
```
## Allow your users to register passkey as a login method
Your users will have to add passkeys to their account somehow. It’s up to you how and where you let them do this, but typically this would be a button on an “Account Settings” page.
On your backend, you’ll have to call `tenant({ ... }).registration.initialize()` and `.registration.finalize()` to create and store a passkey for your user.
On your frontend, you’ll have to call `create()` from `@github/webauthn-json` with the object `.registration.initialize()` returned.
`create()` will return a `PublicKeyCredential` object, which you’ll have to pass to `.registration.finalize()`.
Here we have created a new file named `passkey.ts`, inside of the server directory.
```ts theme={null}
"use server"
import { getServerSession } from "next-auth";
import { tenant } from "@teamhanko/passkeys-next-auth-provider";
import prisma from "./db";
import { authOptions } from "./auth";
const passkeyApi = tenant({
apiKey: process.env.PASSKEYS_API_KEY!,
tenantId: process.env.NEXT_PUBLIC_PASSKEYS_TENANT_ID!,
});
export async function startServerPasskeyRegistration() {
const session = await getServerSession(authOptions);
const sessionUser = session?.user;
const user = await prisma.user.findUnique({
where: { email: sessionUser?.email as string },
select: { id: true, name: true },
});
const createOptions = await passkeyApi.registration.initialize({
userId: user!.id,
username: user!.name || "",
});
return createOptions;
}
export async function finishServerPasskeyRegistration(credential: any) {
const session = await getServerSession(authOptions);
if (!session) throw new Error("Not logged in");
await passkeyApi.registration.finalize(credential);
}
```
Alright, now let's get to creating a 'Passkey register' button. This is what kicks off the whole Passkey registration process for that user account.
```tsx theme={null}
"use client"
import { finishServerPasskeyRegistration, startServerPasskeyRegistration } from '@/lib/passkey';
import { Button } from './ui/button';
import Passkey from './icons/passkey';
import {
create,
type CredentialCreationOptionsJSON,
} from "@github/webauthn-json";
const RegisterNewPasskey = () => {
async function registerPasskey() {
const createOptions = await startServerPasskeyRegistration();
const credential = await create(createOptions as CredentialCreationOptionsJSON);
await finishServerPasskeyRegistration(credential);
}
return (
)
}
export default RegisterNewPasskey
```
## Add a button to allow your users to log in with a passkey
Now that the passkey is successfully registered, let's add a 'Sign in with Passkey' button. This will allow users to easily login using their passkey.
```tsx theme={null}
"use client"
import Passkey from "./icons/passkey";
import { Button } from "./ui/button";
import { signInWithPasskey } from "@teamhanko/passkeys-next-auth-provider/client";
const SignInWithPasskey = () => {
return (
)
}
export default SignInWithPasskey
```
And that's it! You now have a working Passkey login, making the authentication process much easier for your users 🚀
If you want to take a closer look or try it out for yourself, feel free to check out our GitHub repo.
}
>
Full source code available on our GitHub
 Typically, to add passkeys to any app, you'd need two things:
* a backend to handle the authentication flow and store data about your user's passkeys
* a couple of functions on your frontend to bring up & handle the "Sign in with passkey" dialog
If you're using Next.js, you can easily do both of these things with NextAuth and our accompanying provider `@teamhanko/passkeys-next-auth-provider.`
Our open-source passkey server is an API you can call *from your (Next.js) backend* to handle the authentication flow (and storing all relevant data about your user's passkeys).
`@teamhanko/passkeys-next-auth-provider` is a NextAuth provider that calls this API for you, and lets you bring up the "Sign in with passkey" with a single function call.
`@github/webauthn-json` is an optional package that makes it easier to work with the WebAuthn API on your frontend.
Let's get to building. You can either follow the video or go through the guide below.
After initializing your Next.js and configuring NextAuth you'll need to get the Hanko API key secret and Tenant ID. Navigate over to [Hanko Cloud](https://cloud.hanko.io/) to grab those.
## Get the API key and Tenant ID from Hanko
After creating your account on [Hanko](https://www.hanko.io/) and setting up the organization, go ahead and select 'Create new project,' and then choose 'Passkey infrastructure' and 'Create project'.
Typically, to add passkeys to any app, you'd need two things:
* a backend to handle the authentication flow and store data about your user's passkeys
* a couple of functions on your frontend to bring up & handle the "Sign in with passkey" dialog
If you're using Next.js, you can easily do both of these things with NextAuth and our accompanying provider `@teamhanko/passkeys-next-auth-provider.`
Our open-source passkey server is an API you can call *from your (Next.js) backend* to handle the authentication flow (and storing all relevant data about your user's passkeys).
`@teamhanko/passkeys-next-auth-provider` is a NextAuth provider that calls this API for you, and lets you bring up the "Sign in with passkey" with a single function call.
`@github/webauthn-json` is an optional package that makes it easier to work with the WebAuthn API on your frontend.
Let's get to building. You can either follow the video or go through the guide below.
After initializing your Next.js and configuring NextAuth you'll need to get the Hanko API key secret and Tenant ID. Navigate over to [Hanko Cloud](https://cloud.hanko.io/) to grab those.
## Get the API key and Tenant ID from Hanko
After creating your account on [Hanko](https://www.hanko.io/) and setting up the organization, go ahead and select 'Create new project,' and then choose 'Passkey infrastructure' and 'Create project'.
 Provide your Project name and URL and click on 'Create project'.
 Copy the 'Tenant ID', create an API key, and add it to your `.env` file.
 ```bash theme={null}
PASSKEYS_API_KEY="your-passkey-api-secret"
NEXT_PUBLIC_PASSKEYS_TENANT_ID="your-tenant-id"
```
## Install the NextAuth Passkey provider
Install the passkey provider for NextAuth from Hanko and `webauthn-json` package by GitHub.
```bash theme={null}
npm add @teamhanko/passkeys-next-auth-provider @github/webauthn-json
```
## Add the Passkey provider to NextAuth Config
```ts auth.ts theme={null}
PasskeyProvider({
tenant: tenant({
apiKey: process.env.PASSKEYS_API_KEY!,
tenantId: process.env.NEXT_PUBLIC_PASSKEYS_TENANT_ID!,
}),
async authorize({ userId }) {
const user = await prisma.user.findUnique({ where: { id: userId } });
if (!user) return null;
return user;
},
}),
```
As we're using Prisma Adapter by NextAuth, we'll need to also to use `session: { strategy: "jwt" }` and modify the session to get id from `token.sub`. This is how the complete code for `auth.ts` the file looks after adding Hanko passkey provider.
Note that, if you don't plan to use any adapters, you just need to add the Passkey provider and don't modify anything.
```ts auth.ts theme={null}
import type { NextAuthOptions } from "next-auth";
import GitHubProvider from "next-auth/providers/github";
import EmailProvider from "next-auth/providers/email";
import { PrismaAdapter } from "@auth/prisma-adapter";
import {
tenant,
PasskeyProvider,
} from "@teamhanko/passkeys-next-auth-provider";
import prisma from "./db";
export const authOptions = {
providers: [
GitHubProvider({
clientId: process.env.GITHUB_ID!,
clientSecret: process.env.GITHUB_SECRET_ID!,
allowDangerousEmailAccountLinking: true,
}),
EmailProvider({
server: {
host: process.env.EMAIL_SERVER_HOST,
port: process.env.EMAIL_SERVER_PORT,
auth: {
user: process.env.EMAIL_SERVER_USER,
pass: process.env.EMAIL_SERVER_PASSWORD,
},
},
from: process.env.EMAIL_FROM,
}),
PasskeyProvider({
tenant: tenant({
apiKey: process.env.PASSKEYS_API_KEY!,
tenantId: process.env.NEXT_PUBLIC_PASSKEYS_TENANT_ID!,
}),
async authorize({ userId }) {
const user = await prisma.user.findUnique({ where: { id: userId } });
if (!user) return null;
return user;
},
}),
],
adapter: PrismaAdapter(prisma),
session: { strategy: "jwt" },
callbacks: {
session: ({ session, token }) => {
if (token) {
return {
...session,
user: {
...session.user,
id: token.sub,
},
};
} else {
return session;
}
},
},
} satisfies NextAuthOptions;
```
## Allow your users to register passkey as a login method
Your users will have to add passkeys to their account somehow. It’s up to you how and where you let them do this, but typically this would be a button on an “Account Settings” page.
On your backend, you’ll have to call `tenant({ ... }).registration.initialize()` and `.registration.finalize()` to create and store a passkey for your user.
On your frontend, you’ll have to call `create()` from `@github/webauthn-json` with the object `.registration.initialize()` returned.
`create()` will return a `PublicKeyCredential` object, which you’ll have to pass to `.registration.finalize()`.
Here we have created a new file named `passkey.ts`, inside of the server directory.
```ts theme={null}
"use server"
import { getServerSession } from "next-auth";
import { tenant } from "@teamhanko/passkeys-next-auth-provider";
import prisma from "./db";
import { authOptions } from "./auth";
const passkeyApi = tenant({
apiKey: process.env.PASSKEYS_API_KEY!,
tenantId: process.env.NEXT_PUBLIC_PASSKEYS_TENANT_ID!,
});
export async function startServerPasskeyRegistration() {
const session = await getServerSession(authOptions);
const sessionUser = session?.user;
const user = await prisma.user.findUnique({
where: { email: sessionUser?.email as string },
select: { id: true, name: true },
});
const createOptions = await passkeyApi.registration.initialize({
userId: user!.id,
username: user!.name || "",
});
return createOptions;
}
export async function finishServerPasskeyRegistration(credential: any) {
const session = await getServerSession(authOptions);
if (!session) throw new Error("Not logged in");
await passkeyApi.registration.finalize(credential);
}
```
Alright, now let's get to creating a 'Passkey register' button. This is what kicks off the whole Passkey registration process for that user account.
```tsx theme={null}
"use client"
import { finishServerPasskeyRegistration, startServerPasskeyRegistration } from '@/lib/passkey';
import { Button } from './ui/button';
import Passkey from './icons/passkey';
import {
create,
type CredentialCreationOptionsJSON,
} from "@github/webauthn-json";
const RegisterNewPasskey = () => {
async function registerPasskey() {
const createOptions = await startServerPasskeyRegistration();
const credential = await create(createOptions as CredentialCreationOptionsJSON);
await finishServerPasskeyRegistration(credential);
}
return (
)
}
export default RegisterNewPasskey
```
## Add a button to allow your users to log in with a passkey
Now that the passkey is successfully registered, let's add a 'Sign in with Passkey' button. This will allow users to easily login using their passkey.
```tsx theme={null}
"use client"
import Passkey from "./icons/passkey";
import { Button } from "./ui/button";
import { signInWithPasskey } from "@teamhanko/passkeys-next-auth-provider/client";
const SignInWithPasskey = () => {
return (
)
}
export default SignInWithPasskey
```
And that's it! You now have a working Passkey login, making the authentication process much easier for your users 🚀
If you want to take a closer look or try it out for yourself, feel free to check out our GitHub repo.
```bash theme={null}
PASSKEYS_API_KEY="your-passkey-api-secret"
NEXT_PUBLIC_PASSKEYS_TENANT_ID="your-tenant-id"
```
## Install the NextAuth Passkey provider
Install the passkey provider for NextAuth from Hanko and `webauthn-json` package by GitHub.
```bash theme={null}
npm add @teamhanko/passkeys-next-auth-provider @github/webauthn-json
```
## Add the Passkey provider to NextAuth Config
```ts auth.ts theme={null}
PasskeyProvider({
tenant: tenant({
apiKey: process.env.PASSKEYS_API_KEY!,
tenantId: process.env.NEXT_PUBLIC_PASSKEYS_TENANT_ID!,
}),
async authorize({ userId }) {
const user = await prisma.user.findUnique({ where: { id: userId } });
if (!user) return null;
return user;
},
}),
```
As we're using Prisma Adapter by NextAuth, we'll need to also to use `session: { strategy: "jwt" }` and modify the session to get id from `token.sub`. This is how the complete code for `auth.ts` the file looks after adding Hanko passkey provider.
Note that, if you don't plan to use any adapters, you just need to add the Passkey provider and don't modify anything.
```ts auth.ts theme={null}
import type { NextAuthOptions } from "next-auth";
import GitHubProvider from "next-auth/providers/github";
import EmailProvider from "next-auth/providers/email";
import { PrismaAdapter } from "@auth/prisma-adapter";
import {
tenant,
PasskeyProvider,
} from "@teamhanko/passkeys-next-auth-provider";
import prisma from "./db";
export const authOptions = {
providers: [
GitHubProvider({
clientId: process.env.GITHUB_ID!,
clientSecret: process.env.GITHUB_SECRET_ID!,
allowDangerousEmailAccountLinking: true,
}),
EmailProvider({
server: {
host: process.env.EMAIL_SERVER_HOST,
port: process.env.EMAIL_SERVER_PORT,
auth: {
user: process.env.EMAIL_SERVER_USER,
pass: process.env.EMAIL_SERVER_PASSWORD,
},
},
from: process.env.EMAIL_FROM,
}),
PasskeyProvider({
tenant: tenant({
apiKey: process.env.PASSKEYS_API_KEY!,
tenantId: process.env.NEXT_PUBLIC_PASSKEYS_TENANT_ID!,
}),
async authorize({ userId }) {
const user = await prisma.user.findUnique({ where: { id: userId } });
if (!user) return null;
return user;
},
}),
],
adapter: PrismaAdapter(prisma),
session: { strategy: "jwt" },
callbacks: {
session: ({ session, token }) => {
if (token) {
return {
...session,
user: {
...session.user,
id: token.sub,
},
};
} else {
return session;
}
},
},
} satisfies NextAuthOptions;
```
## Allow your users to register passkey as a login method
Your users will have to add passkeys to their account somehow. It’s up to you how and where you let them do this, but typically this would be a button on an “Account Settings” page.
On your backend, you’ll have to call `tenant({ ... }).registration.initialize()` and `.registration.finalize()` to create and store a passkey for your user.
On your frontend, you’ll have to call `create()` from `@github/webauthn-json` with the object `.registration.initialize()` returned.
`create()` will return a `PublicKeyCredential` object, which you’ll have to pass to `.registration.finalize()`.
Here we have created a new file named `passkey.ts`, inside of the server directory.
```ts theme={null}
"use server"
import { getServerSession } from "next-auth";
import { tenant } from "@teamhanko/passkeys-next-auth-provider";
import prisma from "./db";
import { authOptions } from "./auth";
const passkeyApi = tenant({
apiKey: process.env.PASSKEYS_API_KEY!,
tenantId: process.env.NEXT_PUBLIC_PASSKEYS_TENANT_ID!,
});
export async function startServerPasskeyRegistration() {
const session = await getServerSession(authOptions);
const sessionUser = session?.user;
const user = await prisma.user.findUnique({
where: { email: sessionUser?.email as string },
select: { id: true, name: true },
});
const createOptions = await passkeyApi.registration.initialize({
userId: user!.id,
username: user!.name || "",
});
return createOptions;
}
export async function finishServerPasskeyRegistration(credential: any) {
const session = await getServerSession(authOptions);
if (!session) throw new Error("Not logged in");
await passkeyApi.registration.finalize(credential);
}
```
Alright, now let's get to creating a 'Passkey register' button. This is what kicks off the whole Passkey registration process for that user account.
```tsx theme={null}
"use client"
import { finishServerPasskeyRegistration, startServerPasskeyRegistration } from '@/lib/passkey';
import { Button } from './ui/button';
import Passkey from './icons/passkey';
import {
create,
type CredentialCreationOptionsJSON,
} from "@github/webauthn-json";
const RegisterNewPasskey = () => {
async function registerPasskey() {
const createOptions = await startServerPasskeyRegistration();
const credential = await create(createOptions as CredentialCreationOptionsJSON);
await finishServerPasskeyRegistration(credential);
}
return (
)
}
export default RegisterNewPasskey
```
## Add a button to allow your users to log in with a passkey
Now that the passkey is successfully registered, let's add a 'Sign in with Passkey' button. This will allow users to easily login using their passkey.
```tsx theme={null}
"use client"
import Passkey from "./icons/passkey";
import { Button } from "./ui/button";
import { signInWithPasskey } from "@teamhanko/passkeys-next-auth-provider/client";
const SignInWithPasskey = () => {
return (
)
}
export default SignInWithPasskey
```
And that's it! You now have a working Passkey login, making the authentication process much easier for your users 🚀
If you want to take a closer look or try it out for yourself, feel free to check out our GitHub repo.