> ## Documentation Index
> Fetch the complete documentation index at: https://docs.hanko.io/llms.txt
> Use this file to discover all available pages before exploring further.
# Sign in with GitHub
> Step-by-step guide to integrating Sign in with GitHub using Hanko. Enable secure authentication and seamless onboarding for your app's users.
**Hanko GitHub OAuth Integration Guide**:
**About Hanko**:
Hanko is a modern open source authentication solution and the fastest way you integrate passkeys, 2FA, SSO, and more—with full control over your data. Move between self-hosted and Hanko Cloud anytime. No lock-in. Just Auth how it should be: secure, user friendly, and fully yours.
**What This Guide Covers**: This guide demonstrates how to integrate GitHub OAuth authentication with Hanko, allowing users to sign in using their GitHub accounts. You'll learn to create a GitHub OAuth app, configure authentication settings, and implement GitHub login in your application.
**Key Technologies**:
* OAuth 2.0 authentication protocol
* GitHub OAuth Apps and API
* JWT (JSON Web Tokens) for secure session management
* RESTful API integration
* Frontend SDK integration
**Prerequisites**:
* Active Hanko Cloud account with a configured project
* GitHub account for developer access
* Basic understanding of OAuth 2.0 authentication flow
* Frontend application ready for integration
**Tasks You'll Complete**:
* Create and configure a GitHub OAuth application
* Set up redirect URLs and obtain client credentials
* Configure GitHub OAuth credentials in Hanko Console
* Implement GitHub authentication in your frontend application
* Handle authentication success and error states
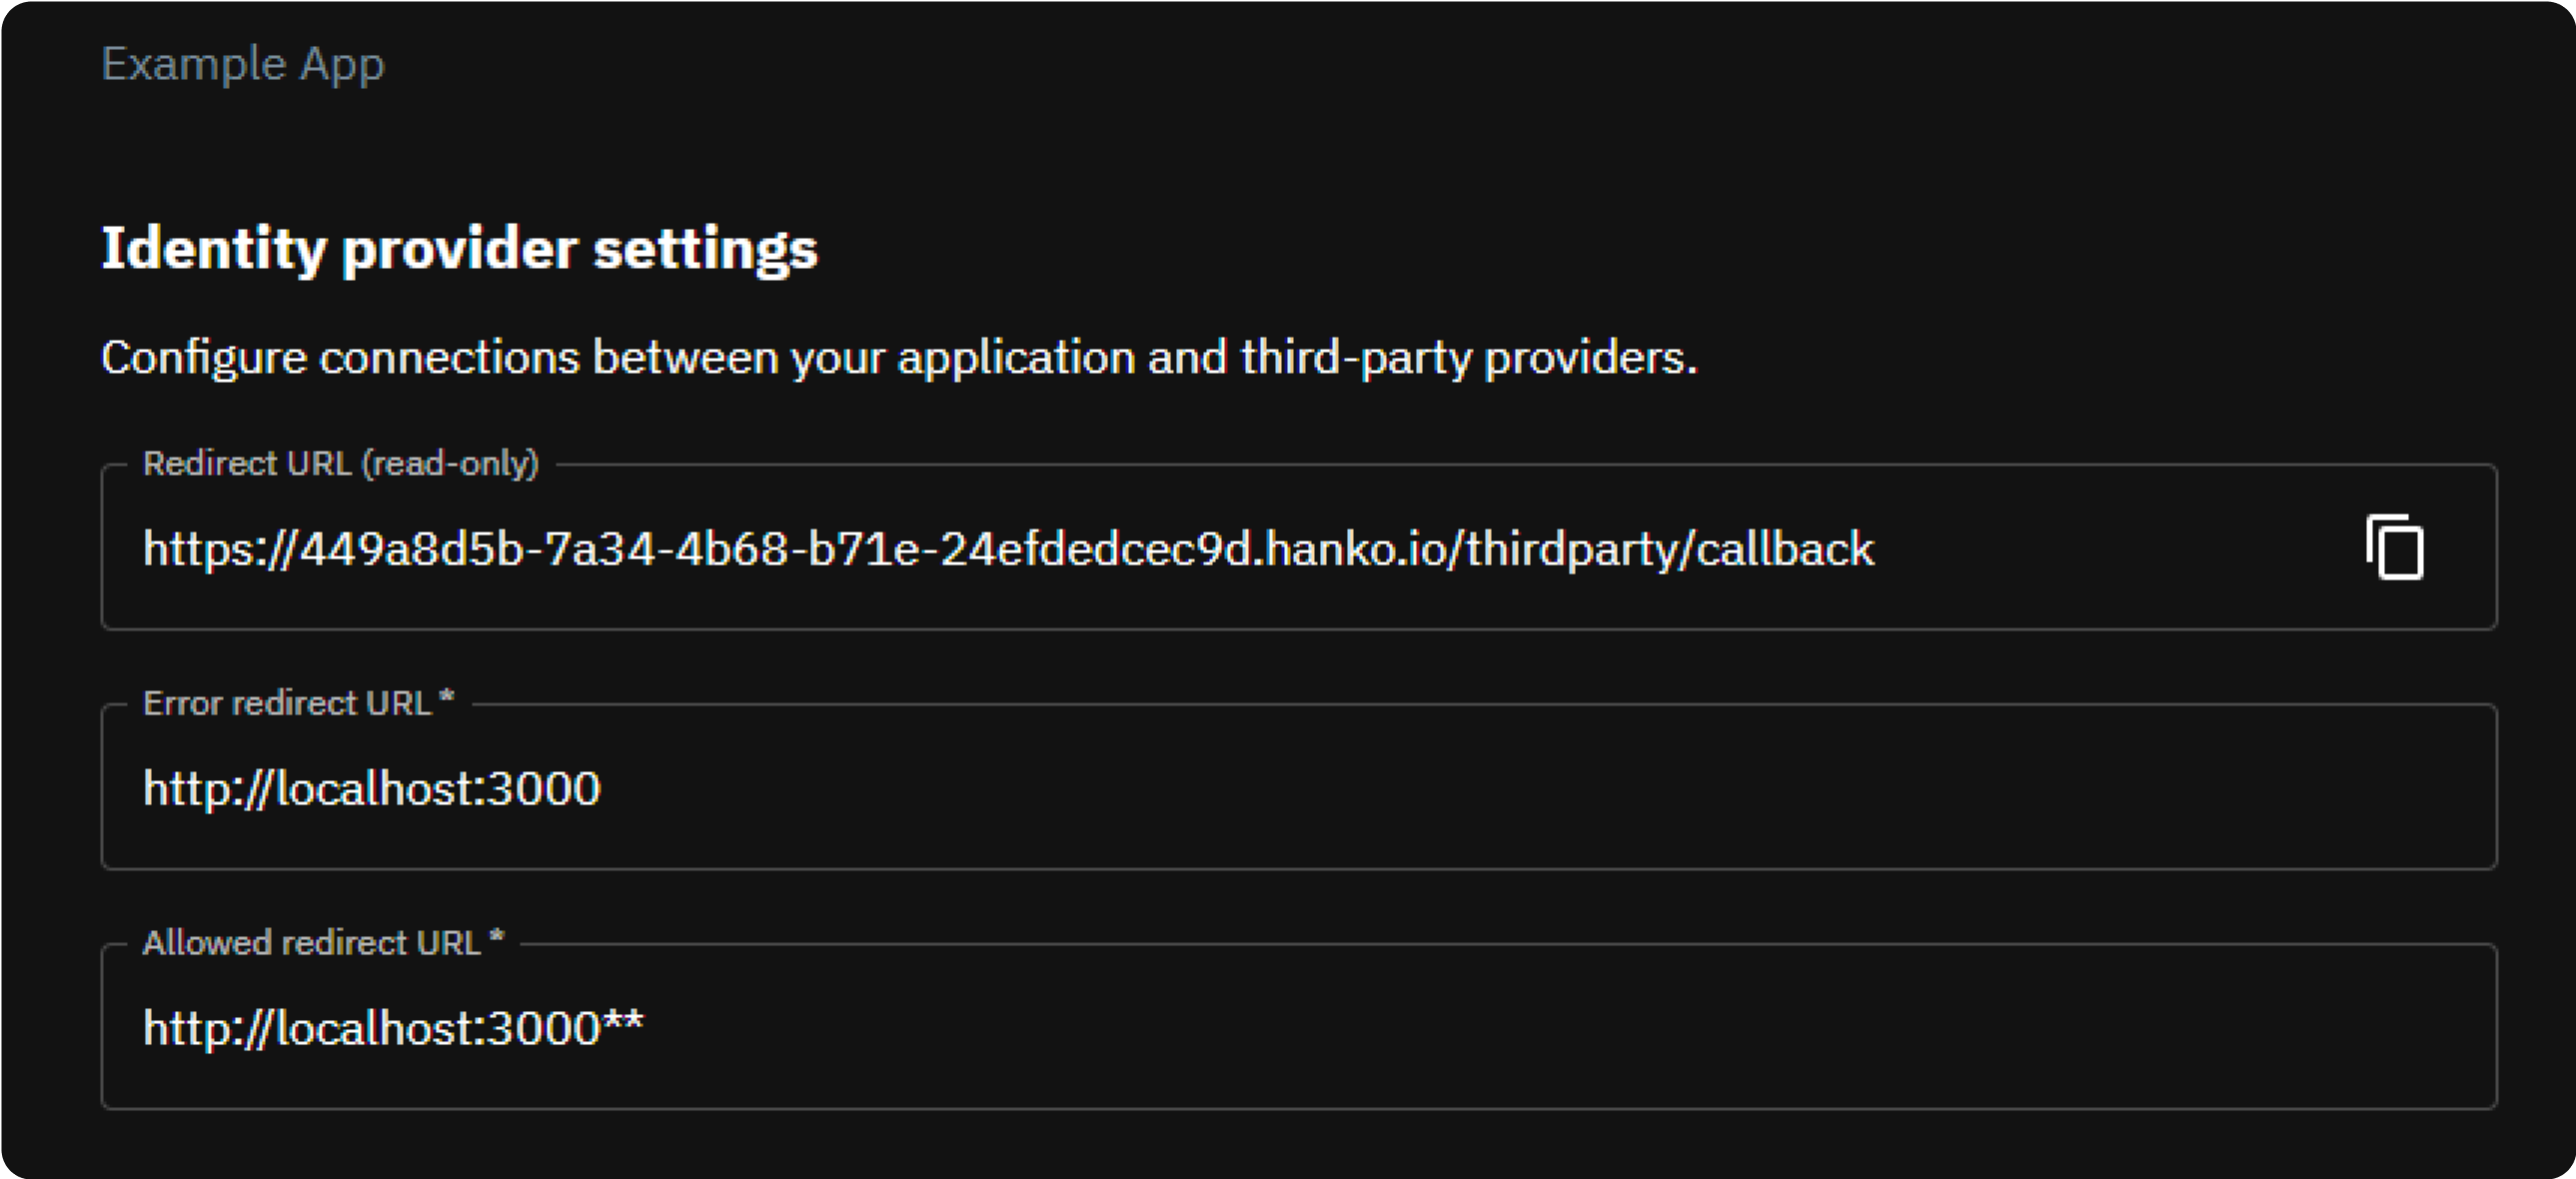
* First, obtain the redirect URL from [Hanko Console](https://cloud.hanko.io/), as you'll need it for GitHub configuration. Sign in to Hanko and select your project. Navigate to 'Settings' in the left sidebar and then to 'Identity Providers'. Copy the 'Redirect URL' from here.
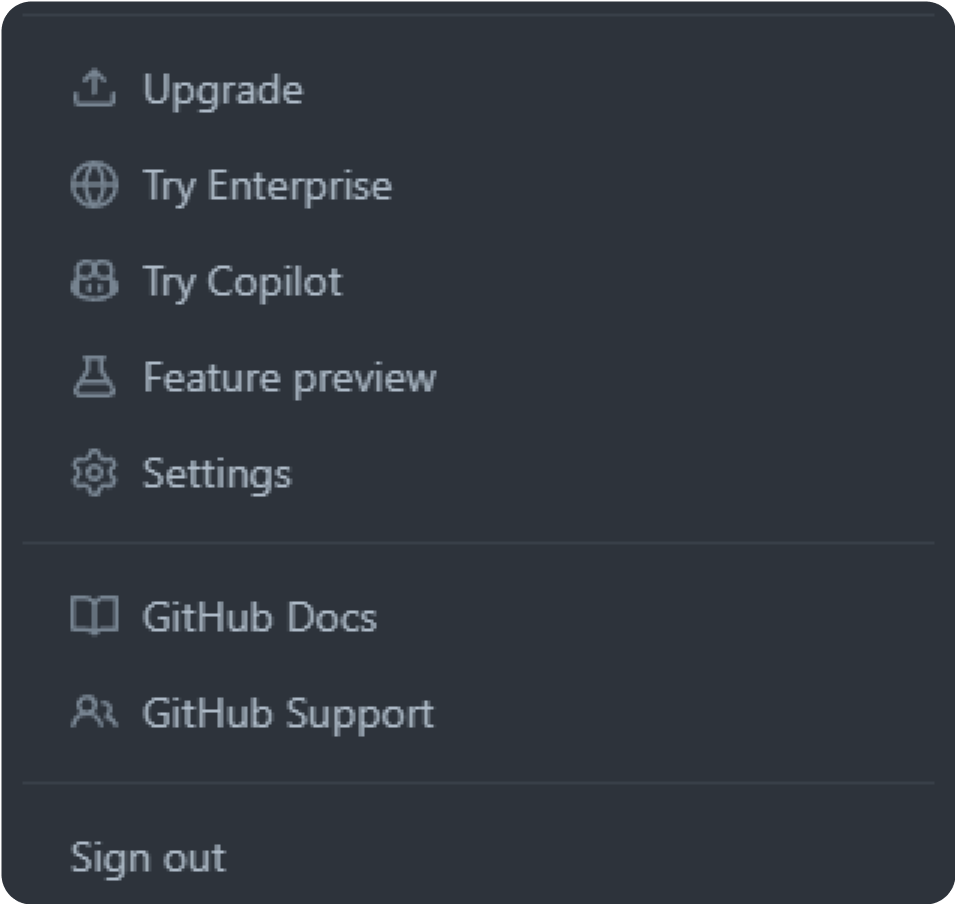
 * Navigate to GitHub and click on your profile photo at the top right corner.
* Select 'Settings' at the bottom of the sidebar menu.
* Navigate to GitHub and click on your profile photo at the top right corner.
* Select 'Settings' at the bottom of the sidebar menu.
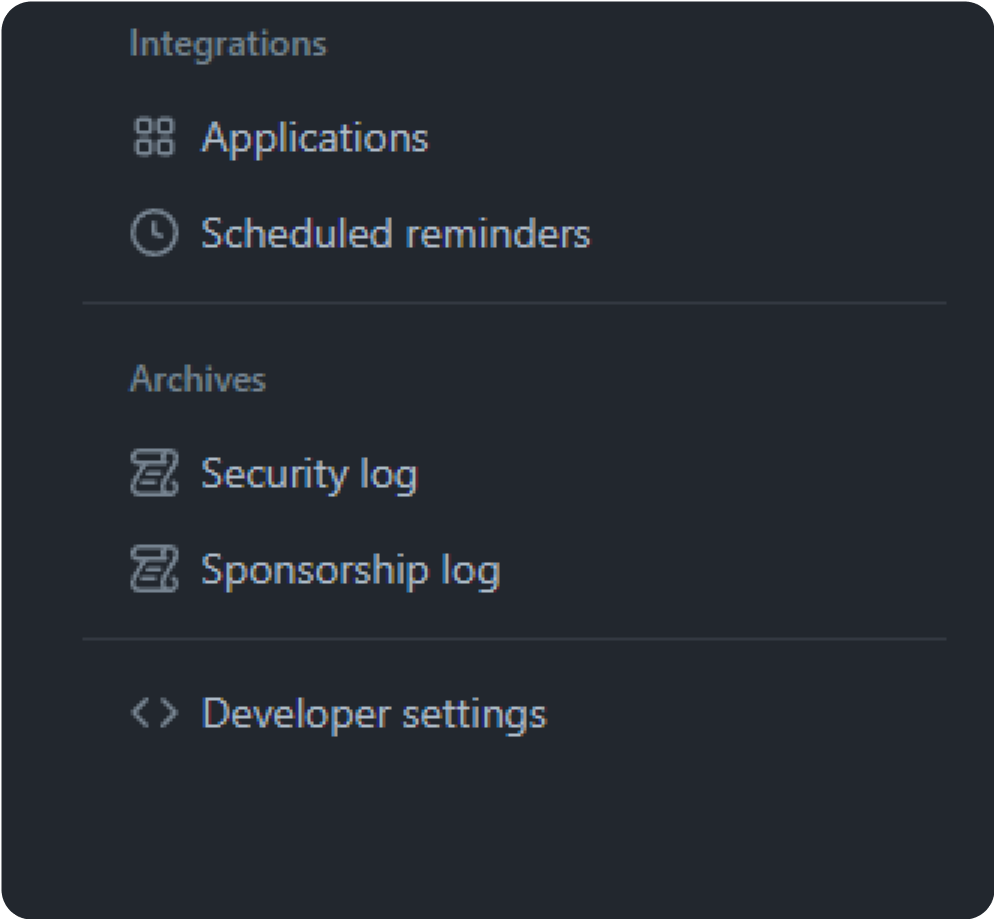
 * Scroll down and select 'Developer Settings' in the left sidebar.
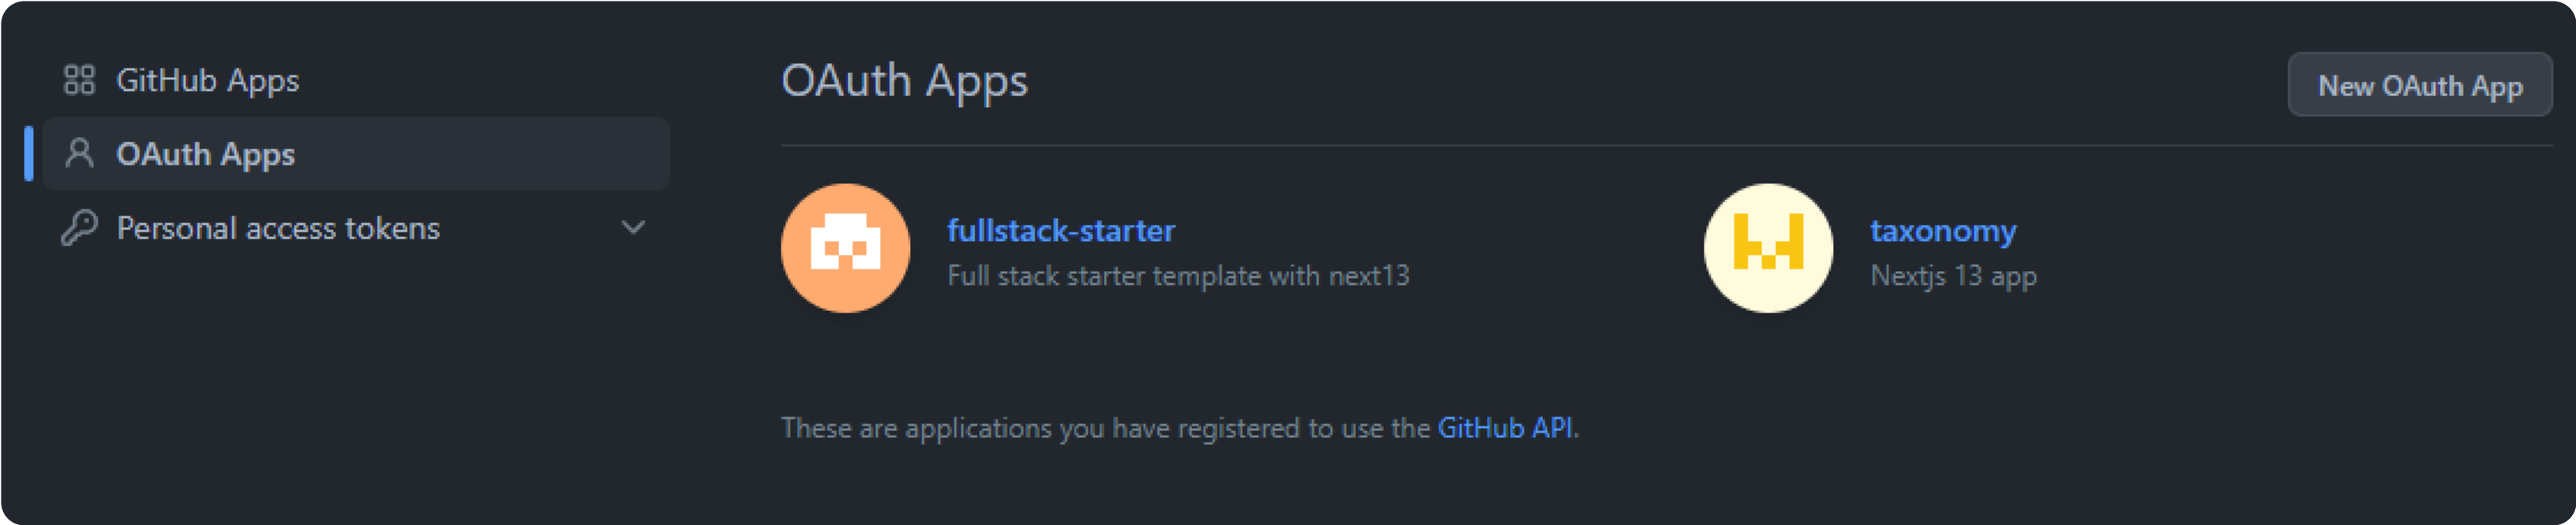
 * Choose 'OAuth Apps' followed by 'New OAuth App'. This opens the registration form for creating your OAuth application.
 The redirect URL is crucial. It guides GitHub on where to redirect users
post-authentication. It's a blend of Hanko API's base URL and the
/thirdparty/callback endpoint. The exact Hanko API base URL (and hence
your redirect URL) hinges on your Hanko setup: whether you use Hanko Cloud
or have a self-hosted Hanko API.
* Return to the OAuth app registration form, fill in the required details, and paste the copied redirect URL into the 'Application Callback URL' field. Complete the registration by clicking 'Register application'.
The redirect URL is crucial. It guides GitHub on where to redirect users
post-authentication. It's a blend of Hanko API's base URL and the
/thirdparty/callback endpoint. The exact Hanko API base URL (and hence
your redirect URL) hinges on your Hanko setup: whether you use Hanko Cloud
or have a self-hosted Hanko API.
* Return to the OAuth app registration form, fill in the required details, and paste the copied redirect URL into the 'Application Callback URL' field. Complete the registration by clicking 'Register application'.
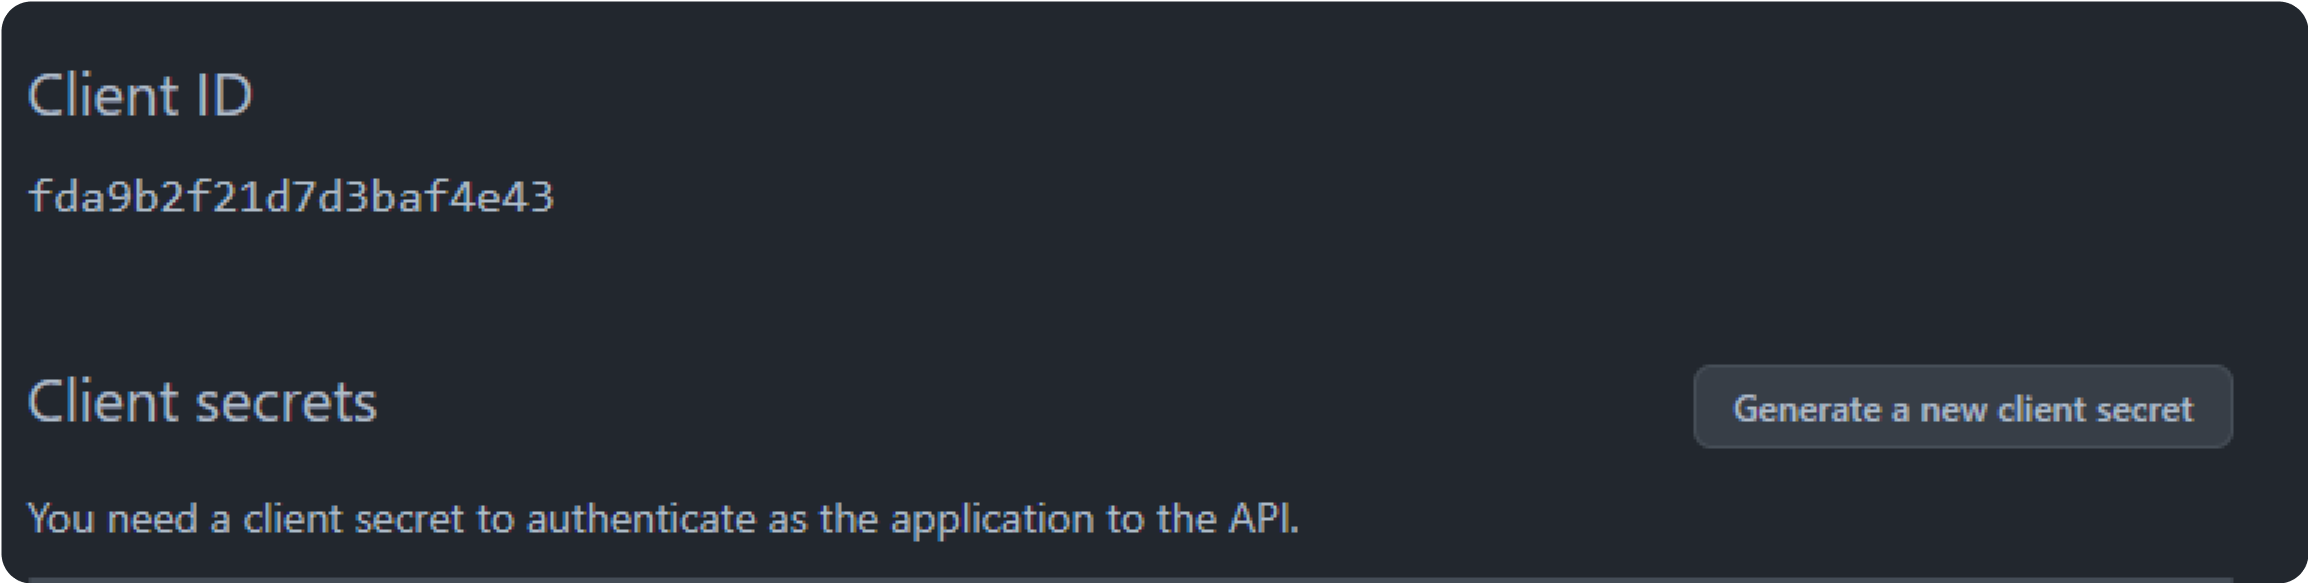
 * You'll now see an overview of your OAuth app. Note down the provided 'Client ID'. Generate a 'Client Secret' by selecting 'Generate a new client secret'. Copy both values, as you'll need them in the next step.
 * Return to Identity providers in Hanko and under 'Identity provider settings' configure the following:
* **Error Redirect URL**: This URL, on your frontend, is where the Hanko API redirects if an error occurs during third-party sign-in. With hanko-elements web components, it should link to the page embedding the web component to process errors correctly.
* **Allowed Redirect URL**: A URL on your frontend that the Hanko API can redirect to after a successful third-party authentication. Using hanko-elements web components? Make it the URL of the embedding page.
Supports wildcard matching through globbing:
* `https://*.example.com` matches `https://foo.example.com` and `https://bar.example.com`.
* `https://foo.example.com/*` matches URLs like `https://foo.example.com/page1` and `https://foo.example.com/page2`.
* Use \*\* to act as a super-wildcard/match-all.
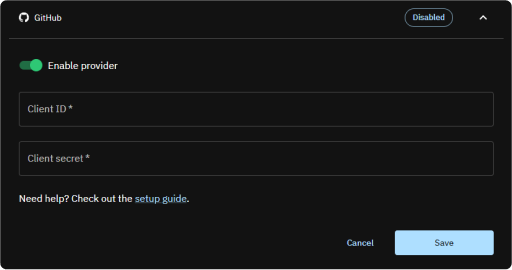
* In the 'Providers' section, select GitHub and enable its toggle switch.
* Input the earlier noted 'Client ID' and 'Client Secret', then click 'Save'.
* Return to Identity providers in Hanko and under 'Identity provider settings' configure the following:
* **Error Redirect URL**: This URL, on your frontend, is where the Hanko API redirects if an error occurs during third-party sign-in. With hanko-elements web components, it should link to the page embedding the web component to process errors correctly.
* **Allowed Redirect URL**: A URL on your frontend that the Hanko API can redirect to after a successful third-party authentication. Using hanko-elements web components? Make it the URL of the embedding page.
Supports wildcard matching through globbing:
* `https://*.example.com` matches `https://foo.example.com` and `https://bar.example.com`.
* `https://foo.example.com/*` matches URLs like `https://foo.example.com/page1` and `https://foo.example.com/page2`.
* Use \*\* to act as a super-wildcard/match-all.
* In the 'Providers' section, select GitHub and enable its toggle switch.
* Input the earlier noted 'Client ID' and 'Client Secret', then click 'Save'.
 Whether you choose to use the pre-designed UI from the `@teamhanko/hanko-elements` package or opt for a custom UI with the `@teamhanko/hanko-frontend-sdk` will determine your approach to frontend integration.
* Integrate the `` component from `hanko-elements` based on our frontend guides. If everything is good, the component will display a button for signing in with 'Github' in login view.
Make sure to configure the page the web component is embedded on as your error redirect URL as well as an allowed redirect URL.
Post successful GitHub authentication, the backend sets a session cookie and errors during authentication are displayed within the component accordingly.
* For a custom UI, initialize third party sign-in using `@teamhanko/hanko-frontend-sdk`.
* Create Hanko client instance and call `thirdParty.auth` with github as the provider.
```js theme={null}
import { Hanko } from "@teamhanko/hanko-frontend-sdk";
const hanko = new Hanko("");
async function signInWithGitHub() {
try {
await hanko.thirdParty.auth("github", "");
} catch (error) {
// handle error
}
}
```
* On successful authentication, the API redirects you to the given redirect URL. The URL query includes a one time token that must be exchanged for a JWT. Use the `token.validate` method on your client to validate the token:
```js theme={null}
import { Hanko } from "@teamhanko/hanko-frontend-sdk";
const hanko = new Hanko("");
async function onLoad() {
try {
await hanko.token.validate();
} catch (error) {
// handle error
}
// you should now have a JWT cookie set
}
```
On success, the API issues a JWT which is then set by the SDK as a cookie (hanko). All other SDK methods can now use the cookie to make authenticated requests to the API.
Whether you choose to use the pre-designed UI from the `@teamhanko/hanko-elements` package or opt for a custom UI with the `@teamhanko/hanko-frontend-sdk` will determine your approach to frontend integration.
* Integrate the `` component from `hanko-elements` based on our frontend guides. If everything is good, the component will display a button for signing in with 'Github' in login view.
Make sure to configure the page the web component is embedded on as your error redirect URL as well as an allowed redirect URL.
Post successful GitHub authentication, the backend sets a session cookie and errors during authentication are displayed within the component accordingly.
* For a custom UI, initialize third party sign-in using `@teamhanko/hanko-frontend-sdk`.
* Create Hanko client instance and call `thirdParty.auth` with github as the provider.
```js theme={null}
import { Hanko } from "@teamhanko/hanko-frontend-sdk";
const hanko = new Hanko("");
async function signInWithGitHub() {
try {
await hanko.thirdParty.auth("github", "");
} catch (error) {
// handle error
}
}
```
* On successful authentication, the API redirects you to the given redirect URL. The URL query includes a one time token that must be exchanged for a JWT. Use the `token.validate` method on your client to validate the token:
```js theme={null}
import { Hanko } from "@teamhanko/hanko-frontend-sdk";
const hanko = new Hanko("");
async function onLoad() {
try {
await hanko.token.validate();
} catch (error) {
// handle error
}
// you should now have a JWT cookie set
}
```
On success, the API issues a JWT which is then set by the SDK as a cookie (hanko). All other SDK methods can now use the cookie to make authenticated requests to the API.