> ## Documentation Index
> Fetch the complete documentation index at: https://docs.hanko.io/llms.txt
> Use this file to discover all available pages before exploring further.
# Sign in with Facebook
> Step-by-step guide to integrating Sign in with Facebook using Hanko. Enable secure authentication and seamless onboarding for your app's users.
**Hanko Facebook OAuth Integration Guide**:
**About Hanko**:
Hanko is a modern open source authentication solution and the fastest way you integrate passkeys, 2FA, SSO, and more—with full control over your data. Move between self-hosted and Hanko Cloud anytime. No lock-in. Just Auth how it should be: secure, user friendly, and fully yours.
**What This Guide Covers**: This guide demonstrates how to integrate Facebook Login OAuth authentication with Hanko, enabling users to sign in using their Facebook accounts. You'll learn to create a Facebook app, configure OAuth settings, and implement Facebook authentication in your application.
**Key Technologies**:
* OAuth 2.0 authentication protocol
* Facebook Login API and Graph API
* JWT (JSON Web Tokens) for secure session management
* Facebook App Review process
* RESTful API integration
**Prerequisites**:
* Active Hanko Cloud account with a configured project
* Facebook developer account and access to Facebook Developer Portal
* Basic understanding of OAuth 2.0 authentication flow
* Frontend application ready for integration
**Tasks You'll Complete**:
* Create and configure a Facebook application in the developer portal
* Set up Facebook Login with required permissions and redirect URLs
* Configure Facebook OAuth credentials in Hanko Console
* Implement Facebook authentication in your frontend application
* Understand Facebook app publishing requirements
## Prerequisites
Before starting this integration, ensure you have:
1. A Hanko Cloud account and project. [Set up your account here](https://docs.hanko.io/setup-hanko-cloud) if you haven't already.
2. A Facebook developer account. Visit the [Facebook developer portal](https://developers.facebook.com/) and select `Login` to create an account.
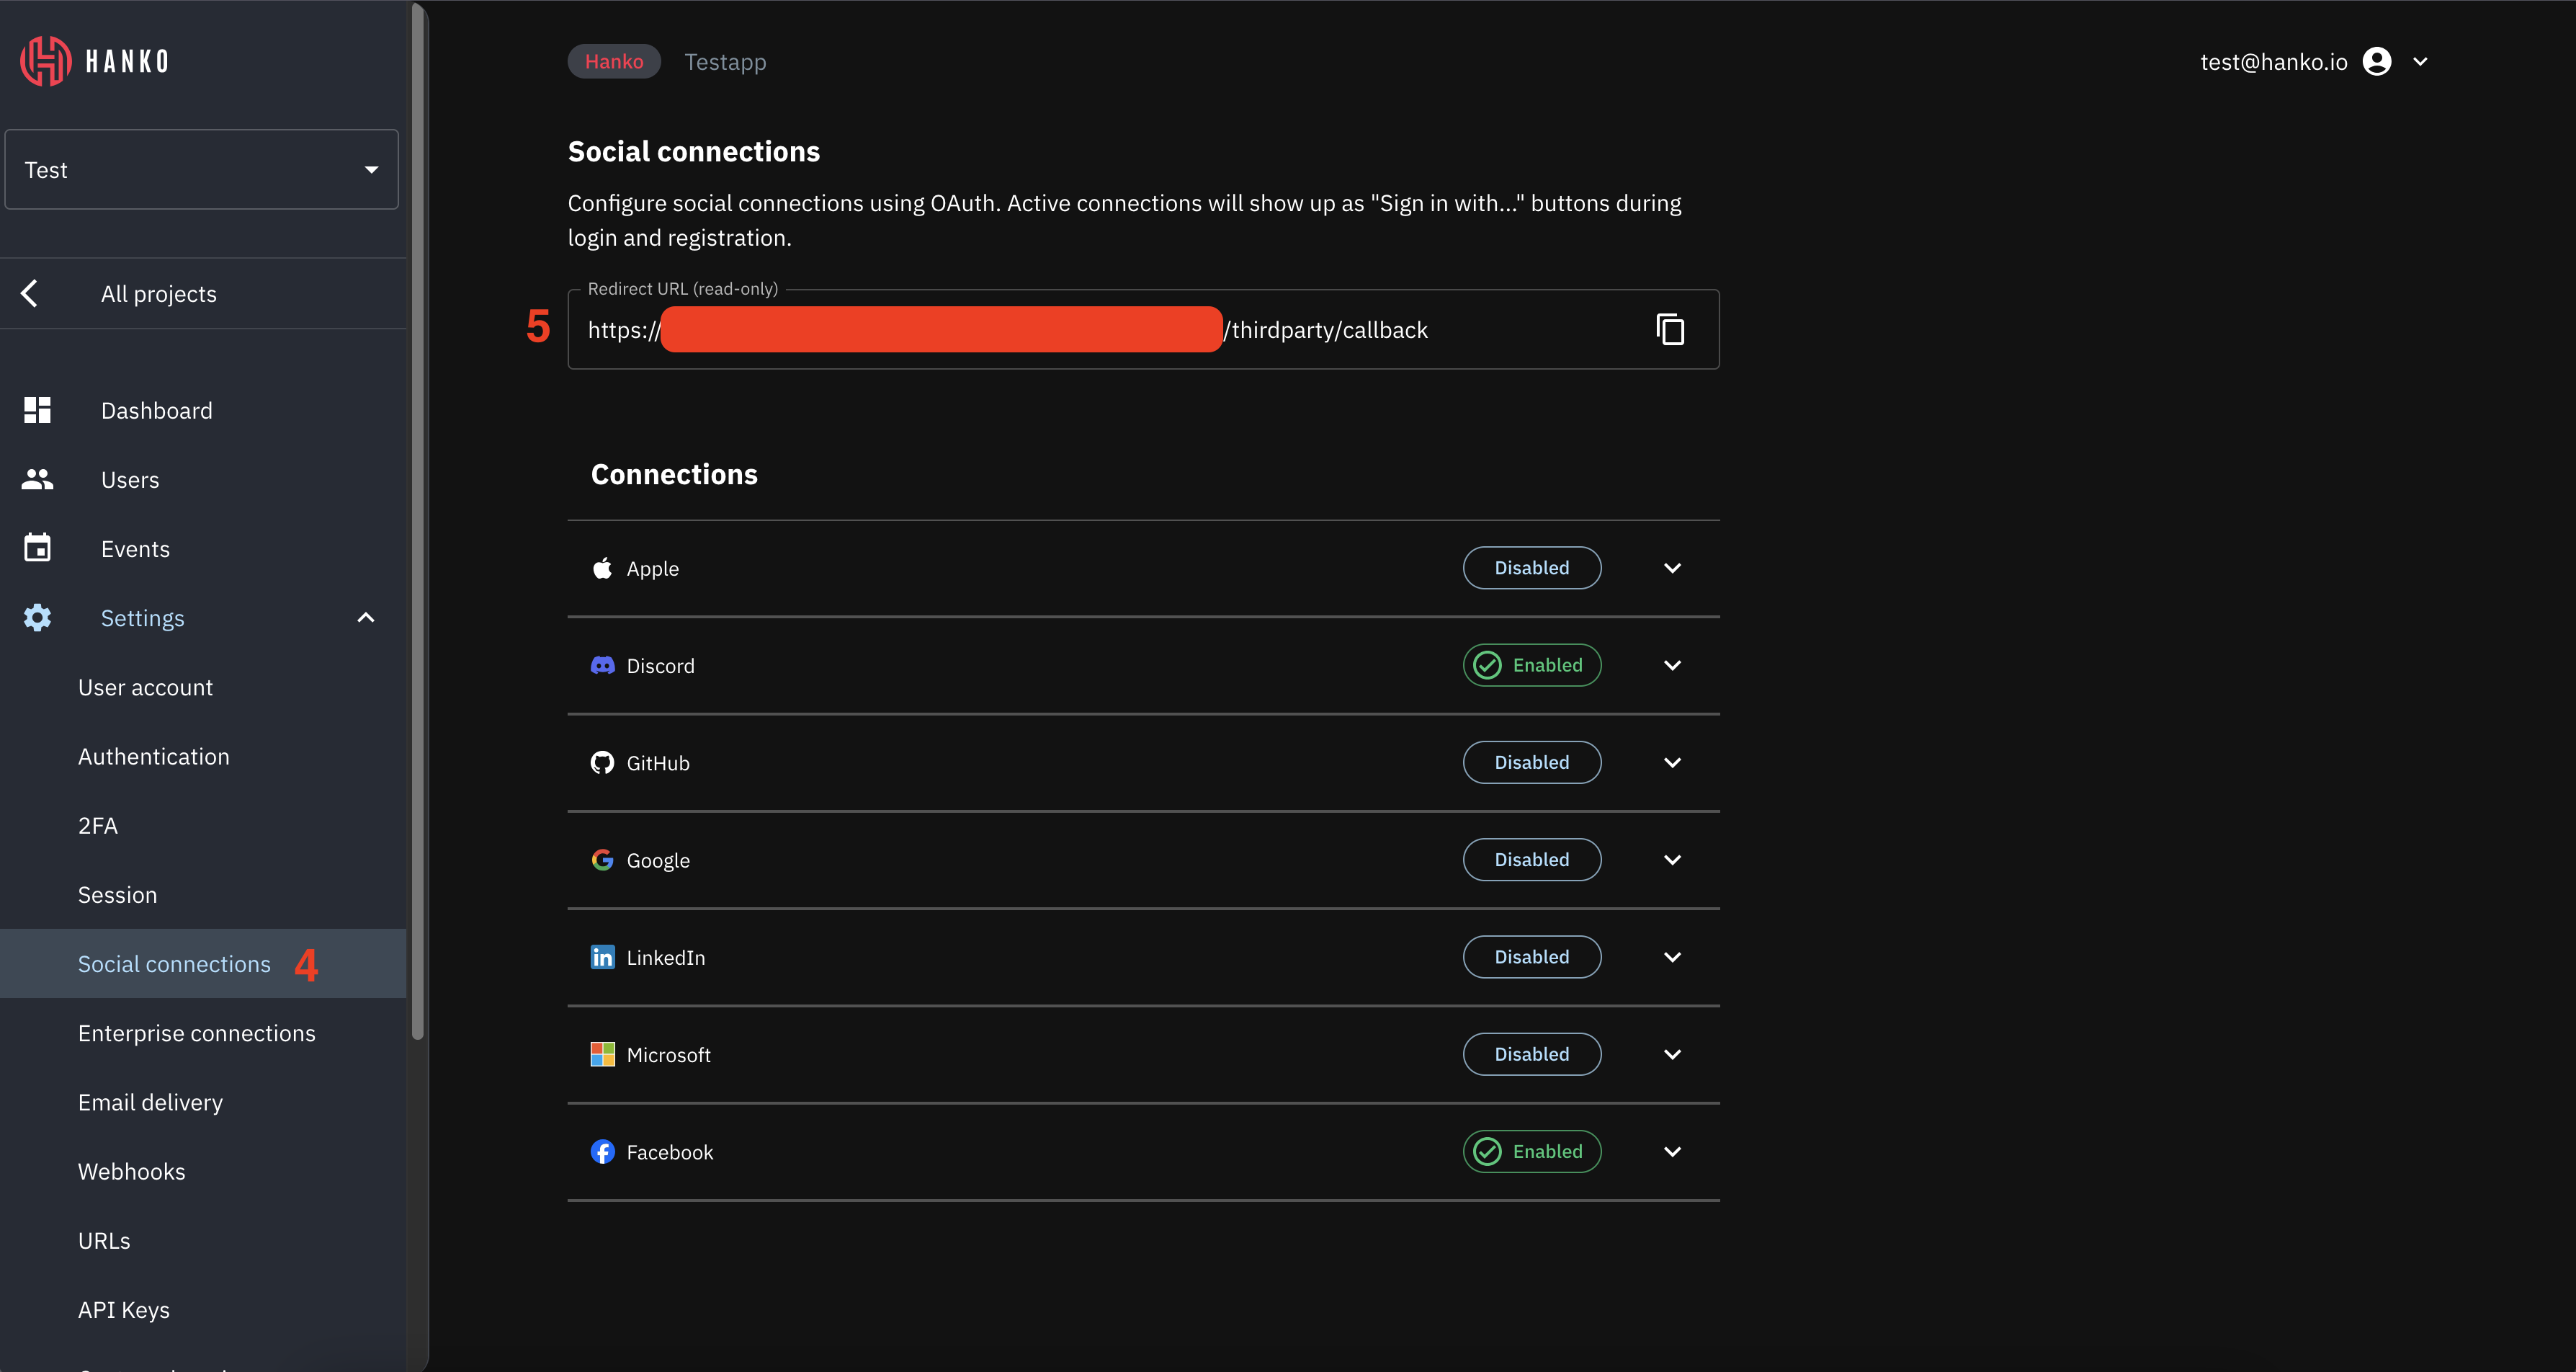
## Get your provider redirect URL
You'll need to configure a redirect URL in your Facebook application. This URL determines where Facebook redirects users after successful authentication. The redirect URL combines your Hanko API base URL with the [`/thirdparty/callback`](/api-reference/public/third-party/third-party-provider-callback) endpoint.
To find your redirect URL:
1. Sign in to [cloud.hanko.io](https://cloud.hanko.io).
2. Select your `Organization`.
3. Select your `Project`.
4. In the left sidebar, click `Settings`, then select `Social connections`.
5. Find your redirect URL in the `Redirect URL` input.
 You need the redirect URL for [creating a new Facebook application](#create-a-new-facebook-application) in the next step.
## Create a Facebook application
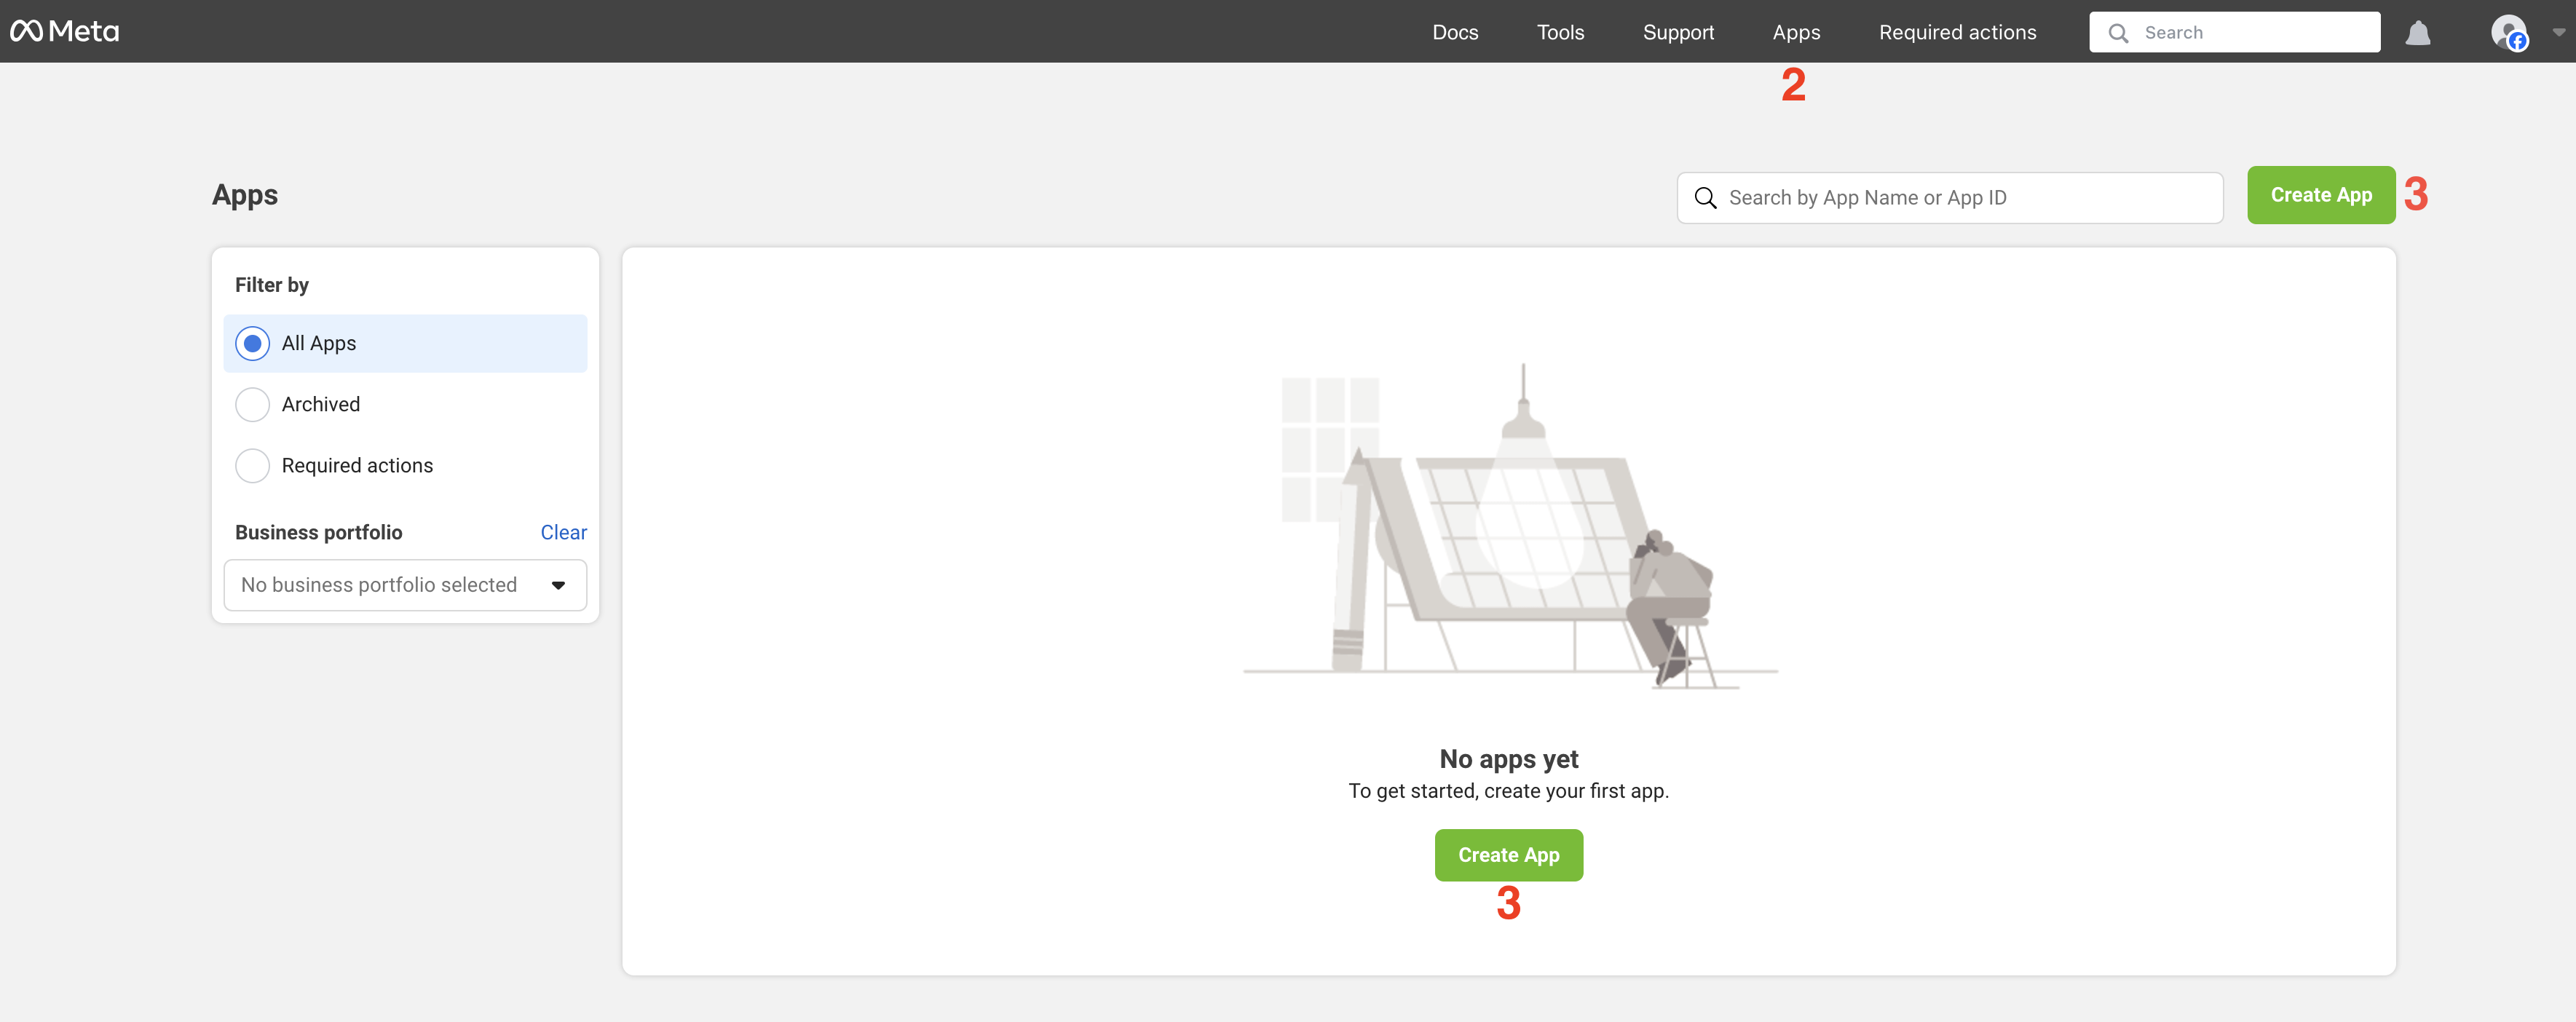
1. Navigate to and log in to the [Facebook developer portal](https://developers.facebook.com).
2. In the top navigation, select `Apps`.
3. Click `Create app` in the center of the page or on the top right.
You need the redirect URL for [creating a new Facebook application](#create-a-new-facebook-application) in the next step.
## Create a Facebook application
1. Navigate to and log in to the [Facebook developer portal](https://developers.facebook.com).
2. In the top navigation, select `Apps`.
3. Click `Create app` in the center of the page or on the top right.
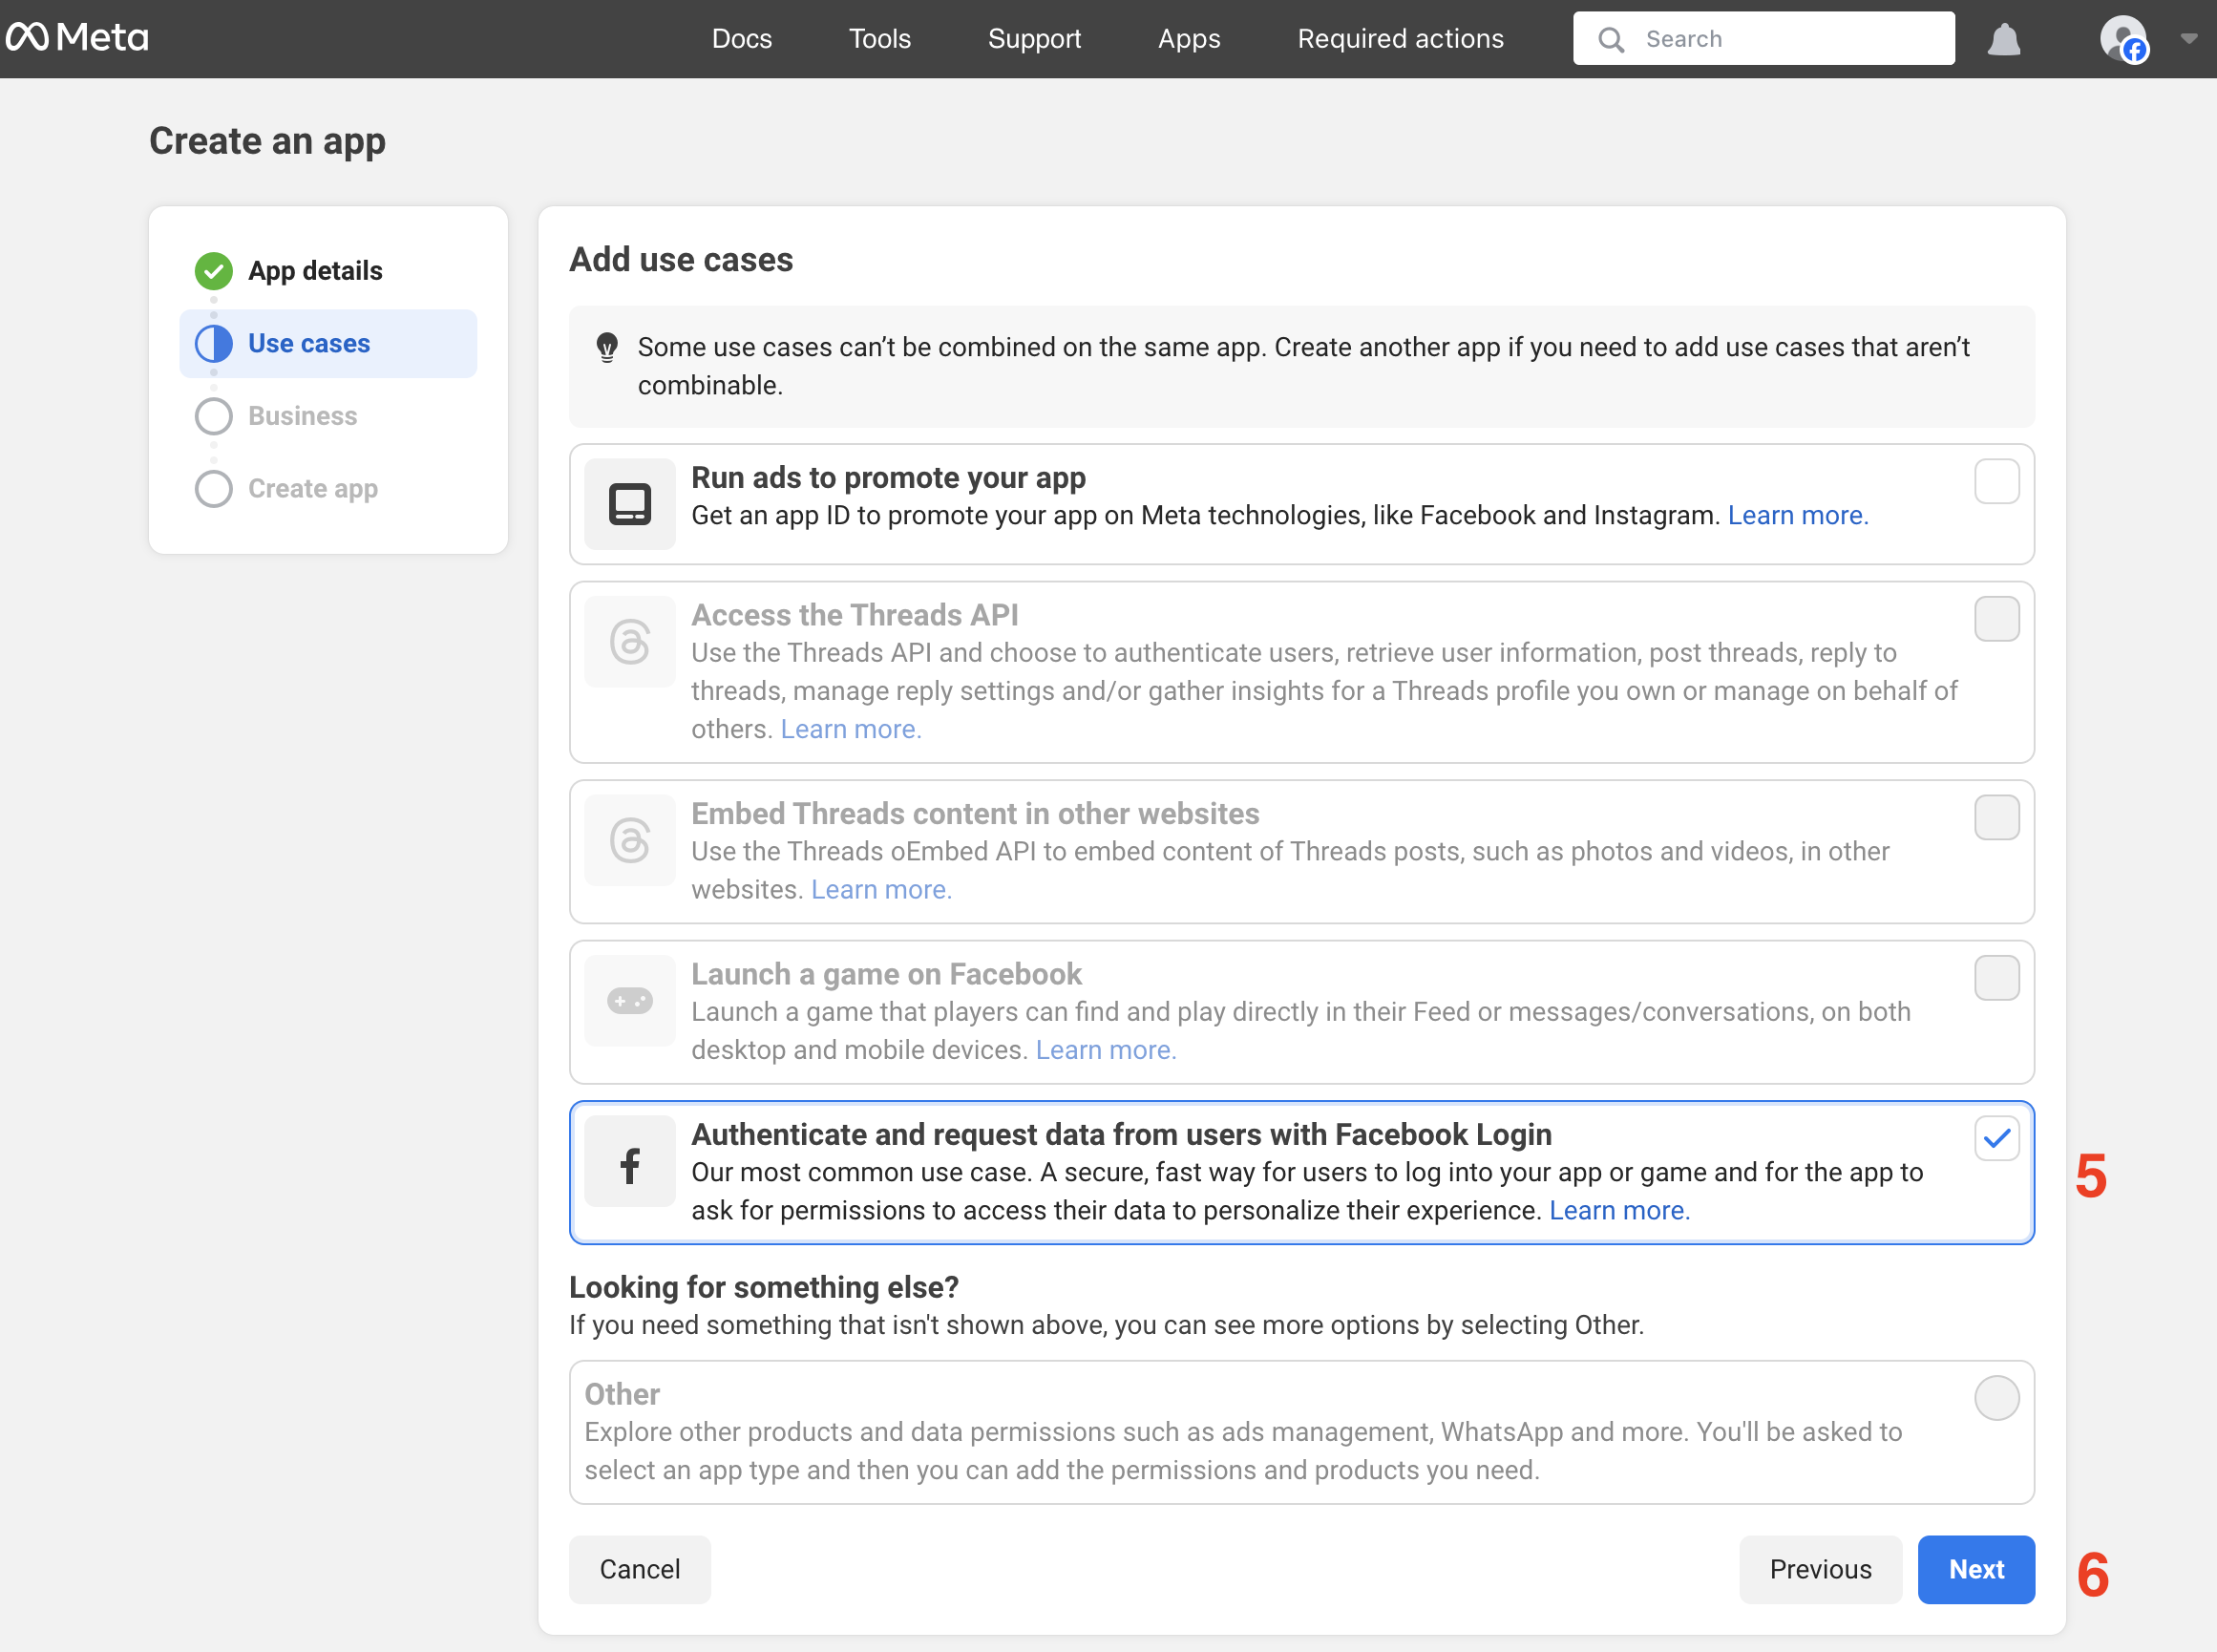
 4. Enter your app details and click `Next`.
 5. On the `Use cases` view, select `Authenticate and request data from users with Facebook Login`.
6. Click `Next`.
5. On the `Use cases` view, select `Authenticate and request data from users with Facebook Login`.
6. Click `Next`.
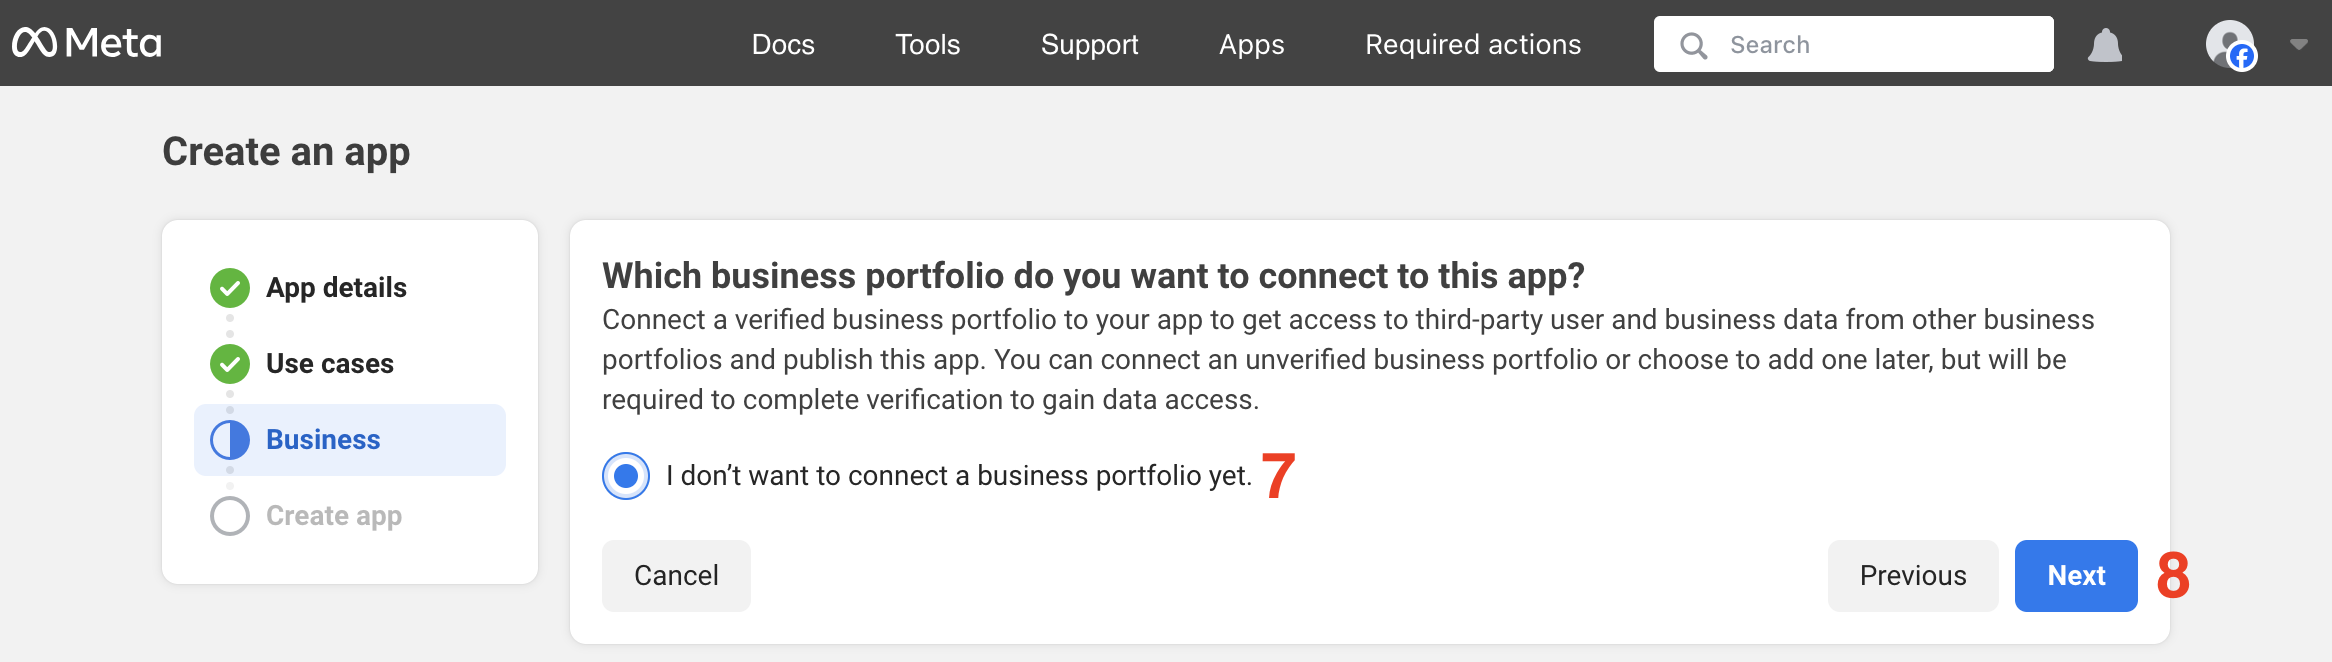
 7. On the `Business` view, select `I don't want to connect a business portfolio yet` (or connect your existing business portfolio if available).
8. Click `Next`.
7. On the `Business` view, select `I don't want to connect a business portfolio yet` (or connect your existing business portfolio if available).
8. Click `Next`.
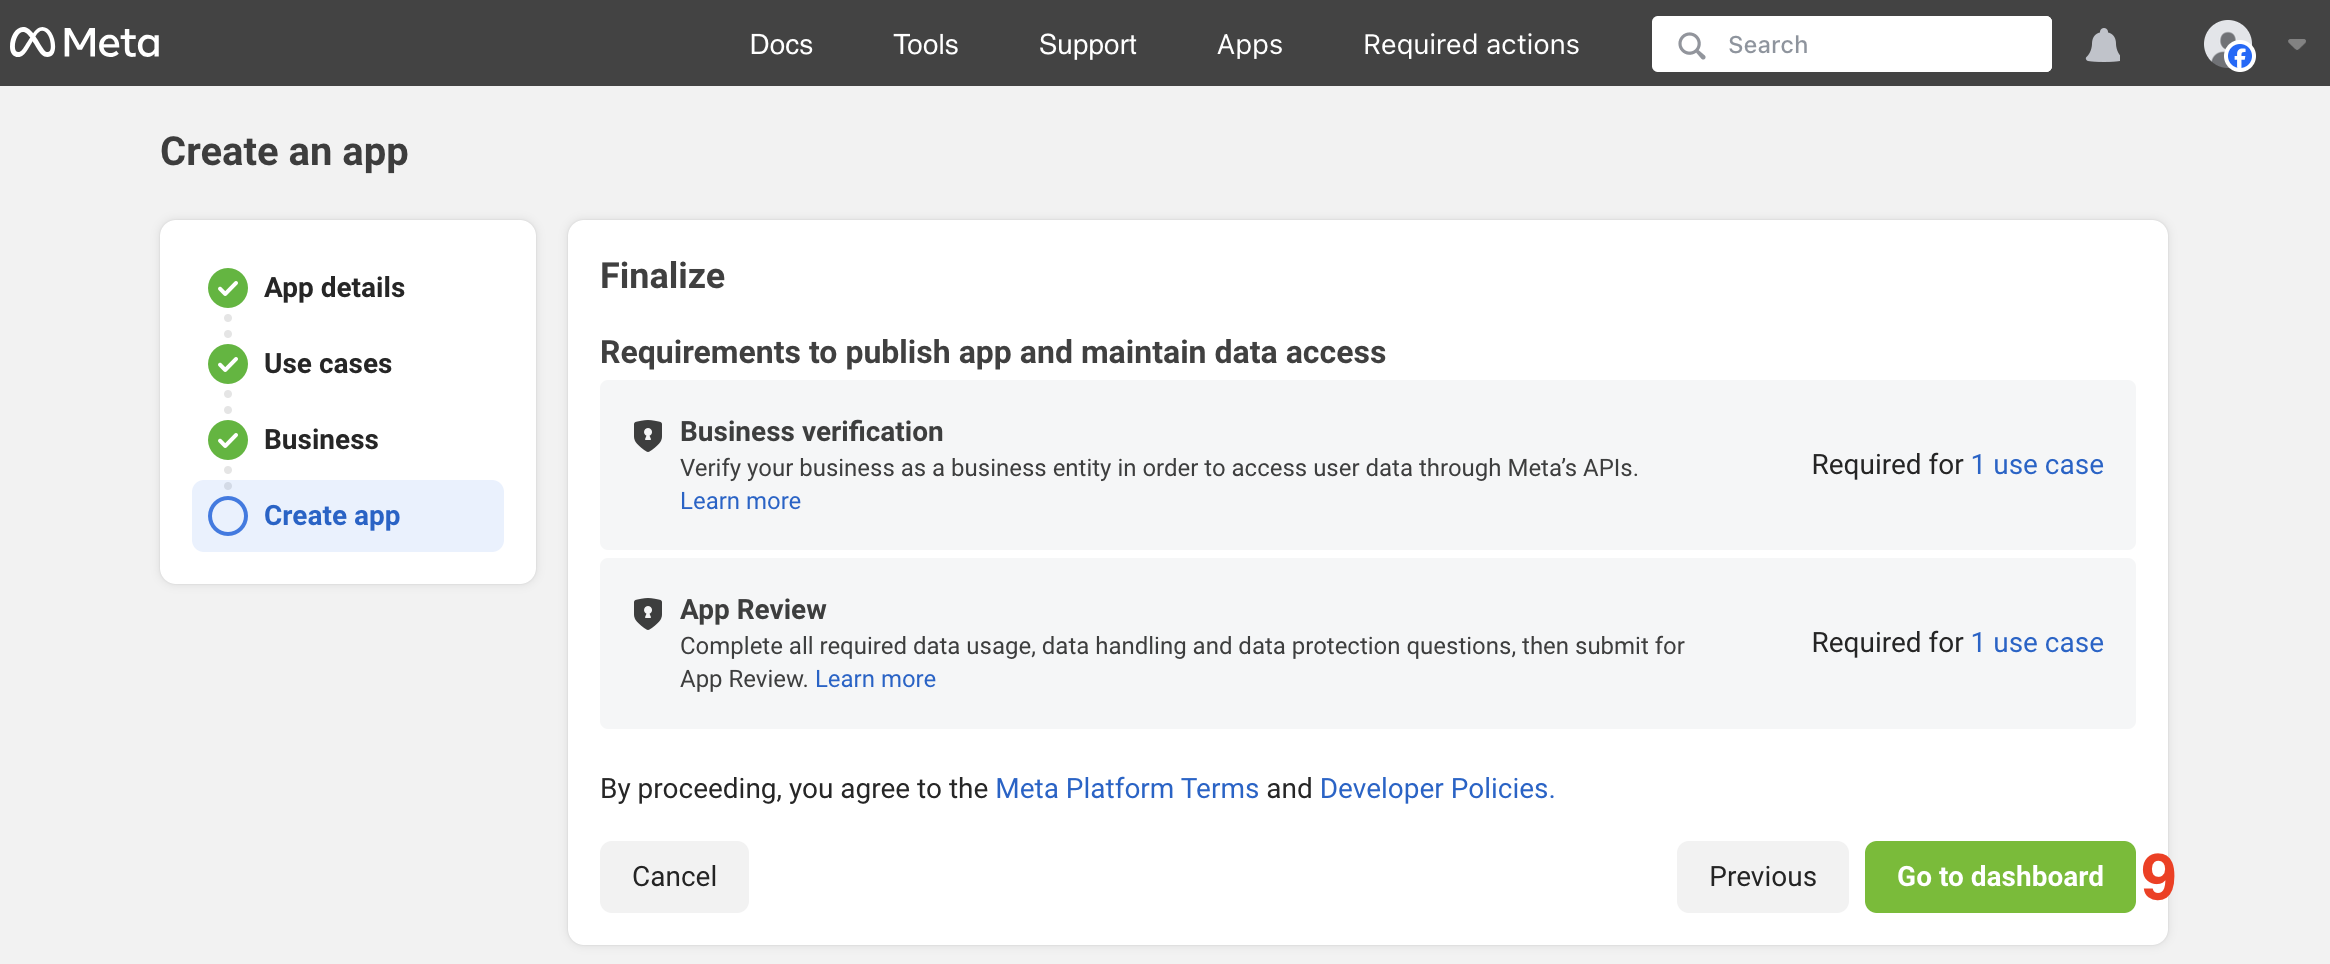
 9. On the `Create app` view, click `Go to dashboard`.
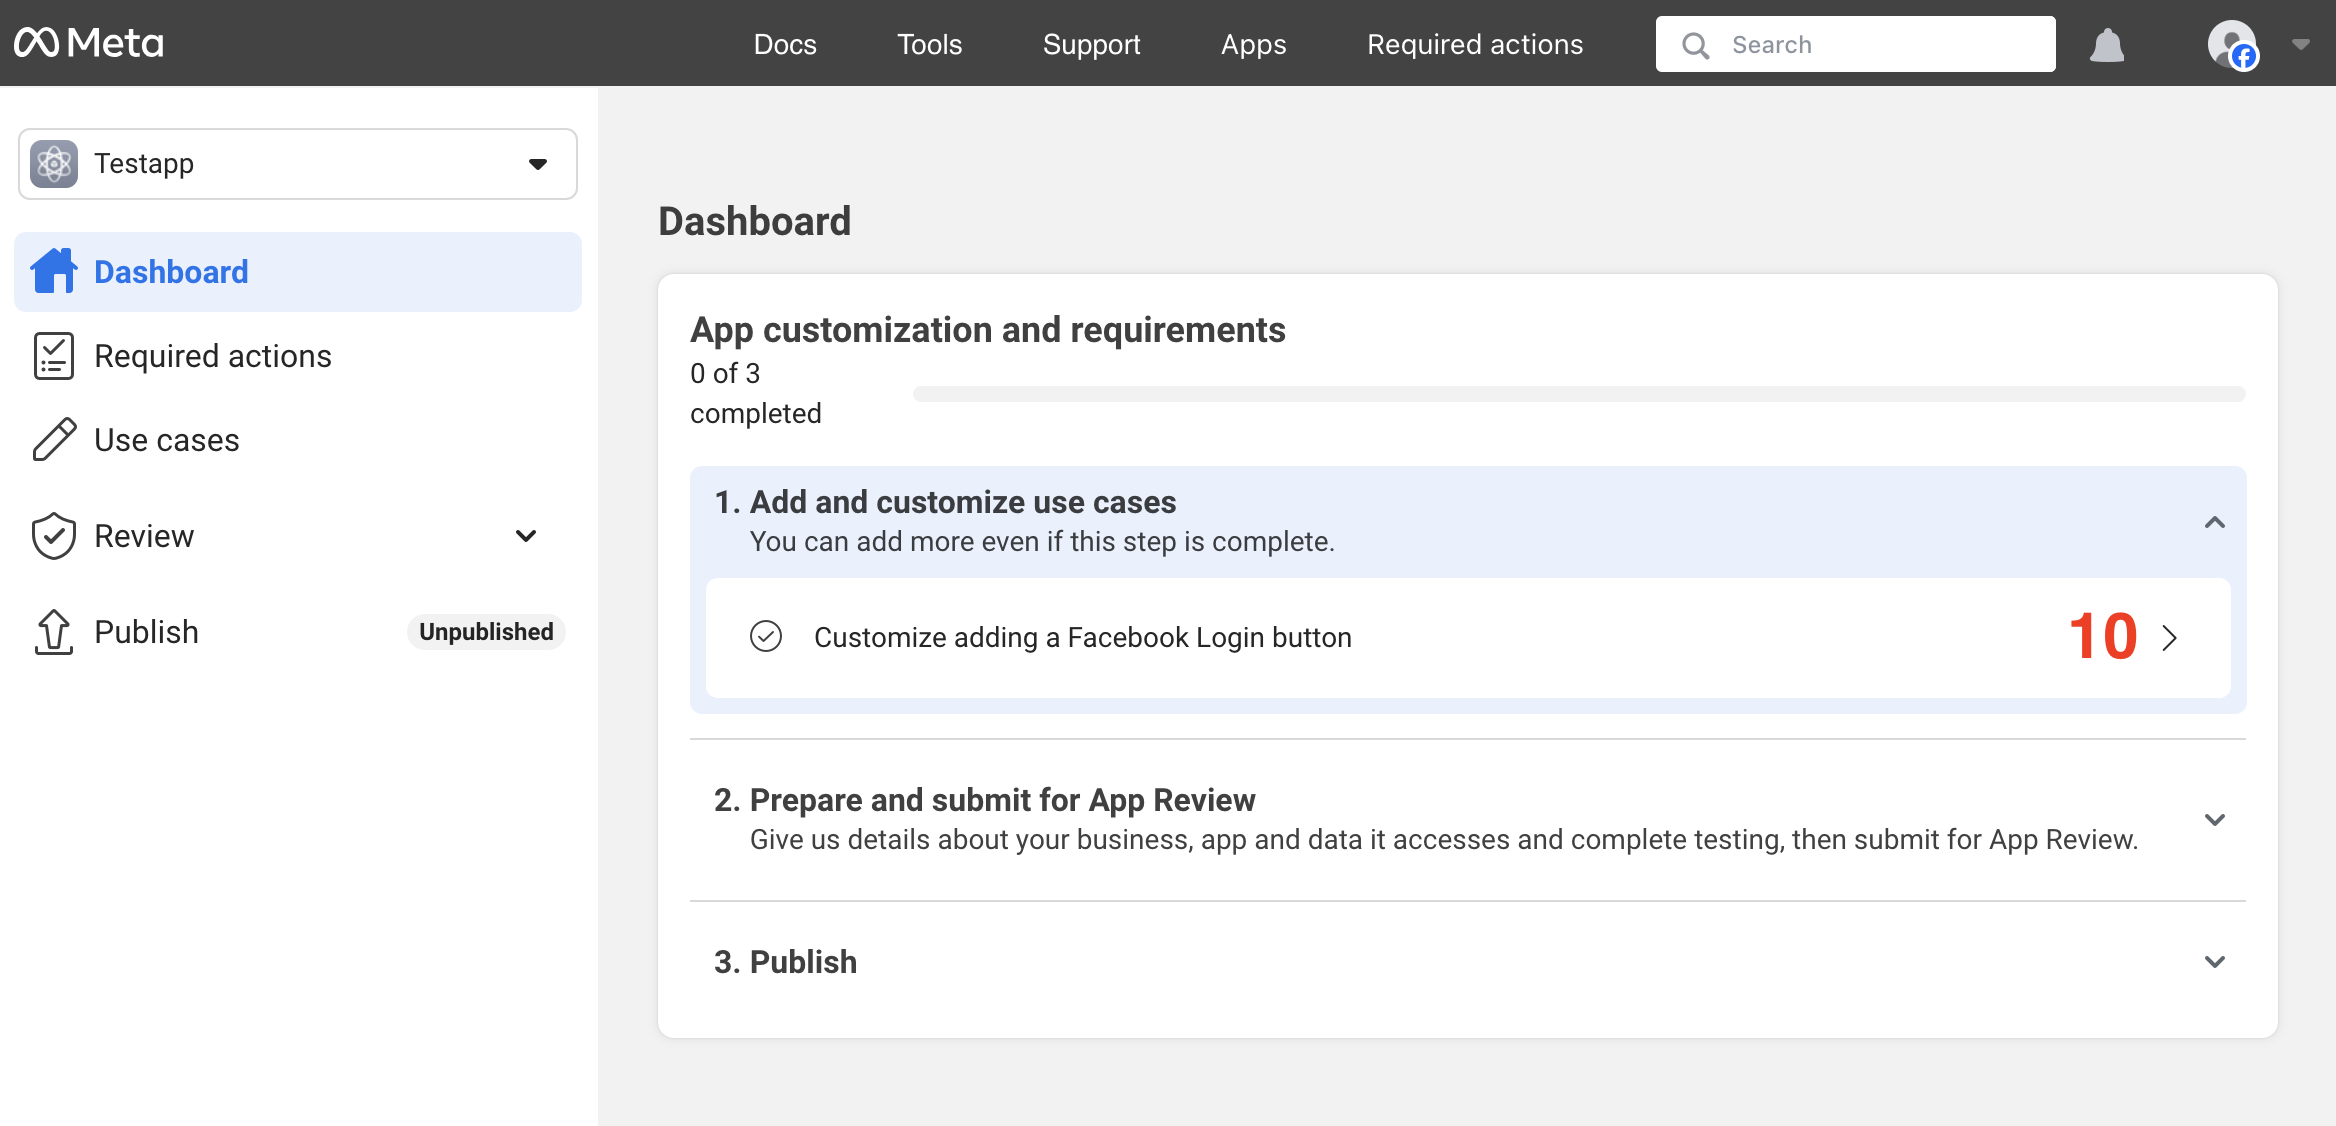
 10. On the app dashboard, click `Customize adding a Facebook Login button` in the `Add and customize use cases` section.
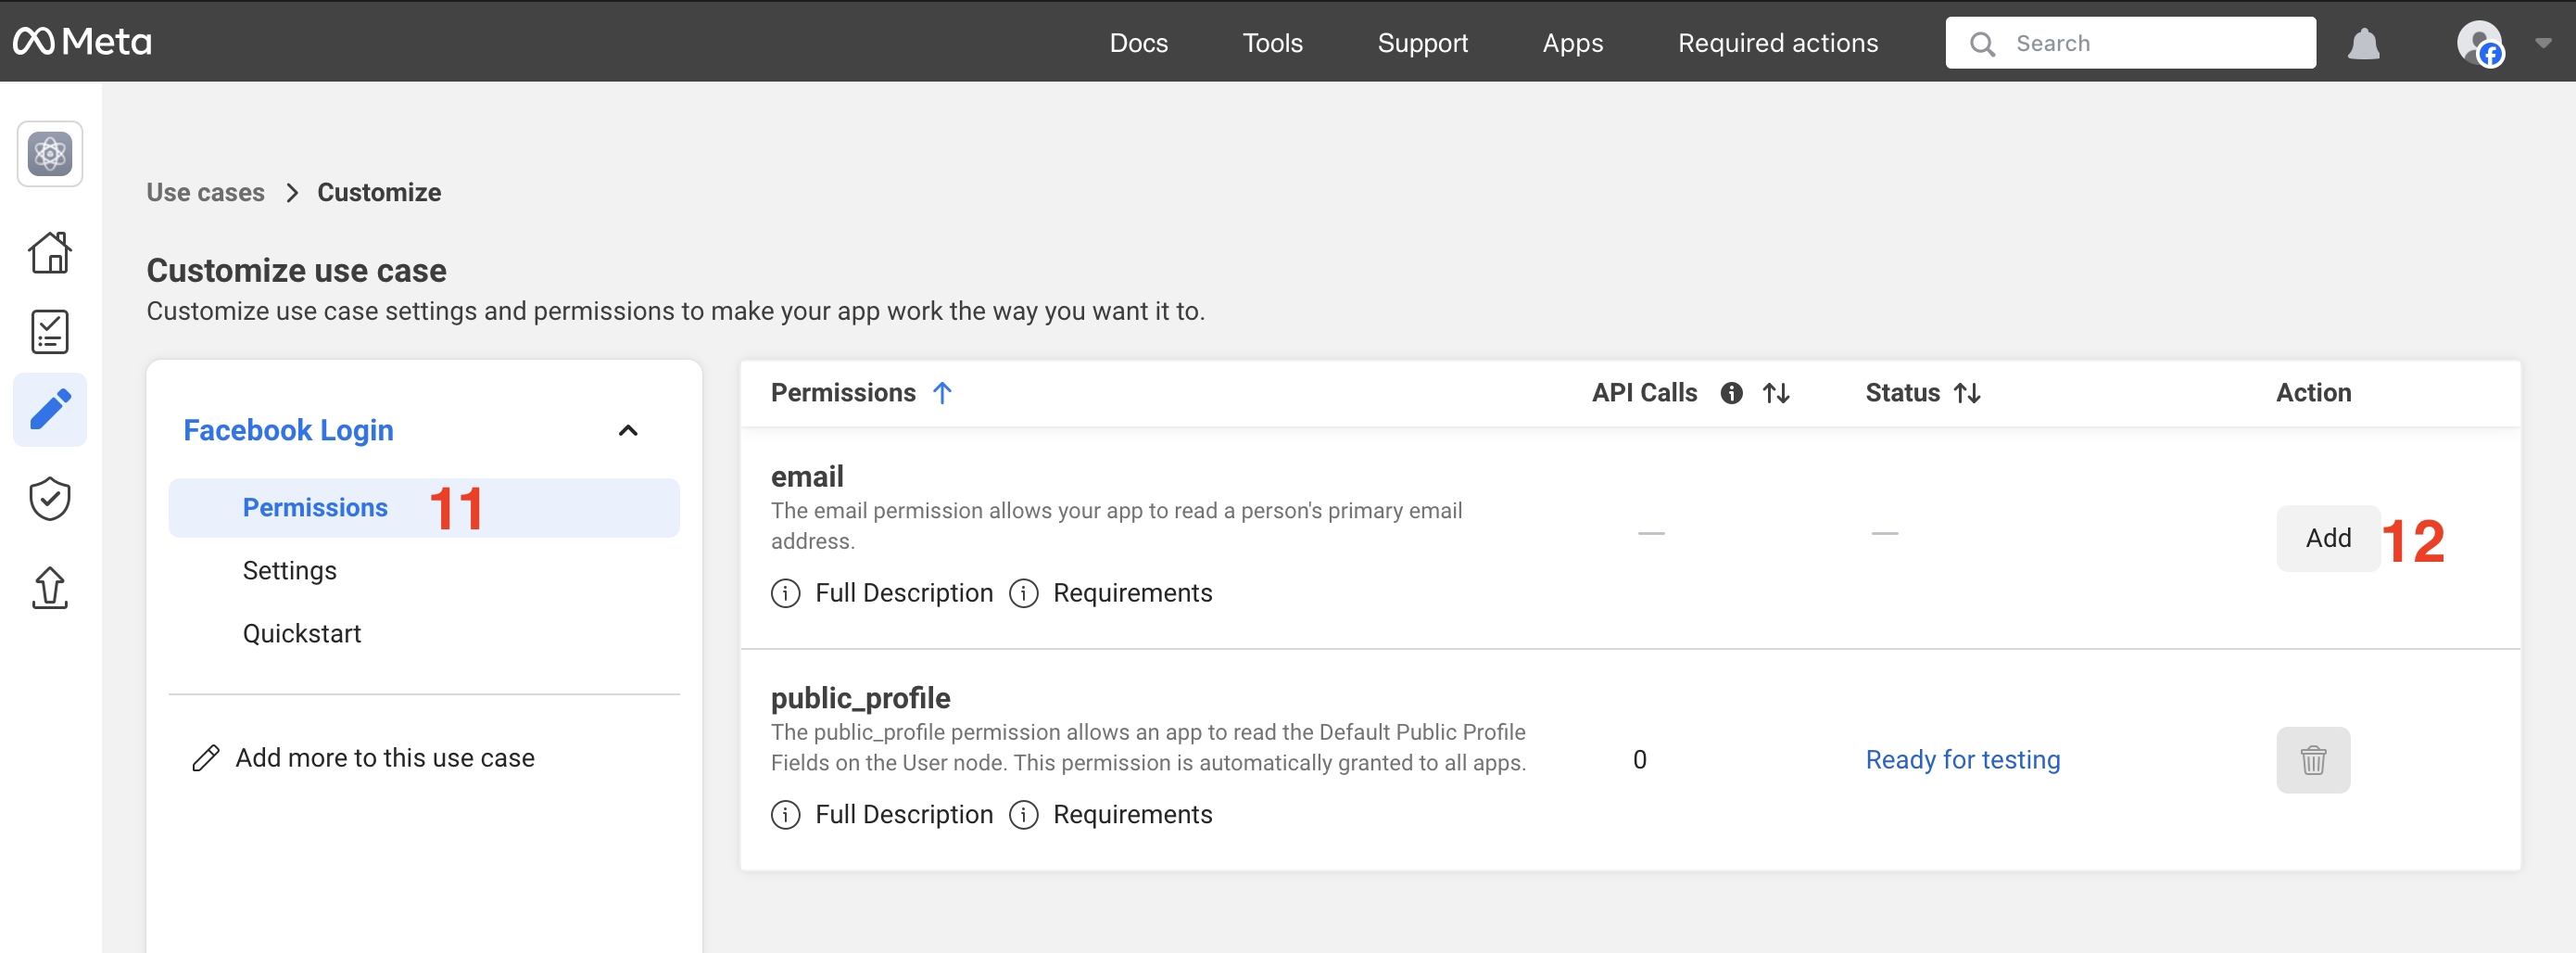
 11. In the `Customize use case` view, select `Permissions` in the left sidebar.
12. Click the `add` button for the `email` permission in the permissions table to enable email access.
11. In the `Customize use case` view, select `Permissions` in the left sidebar.
12. Click the `add` button for the `email` permission in the permissions table to enable email access.
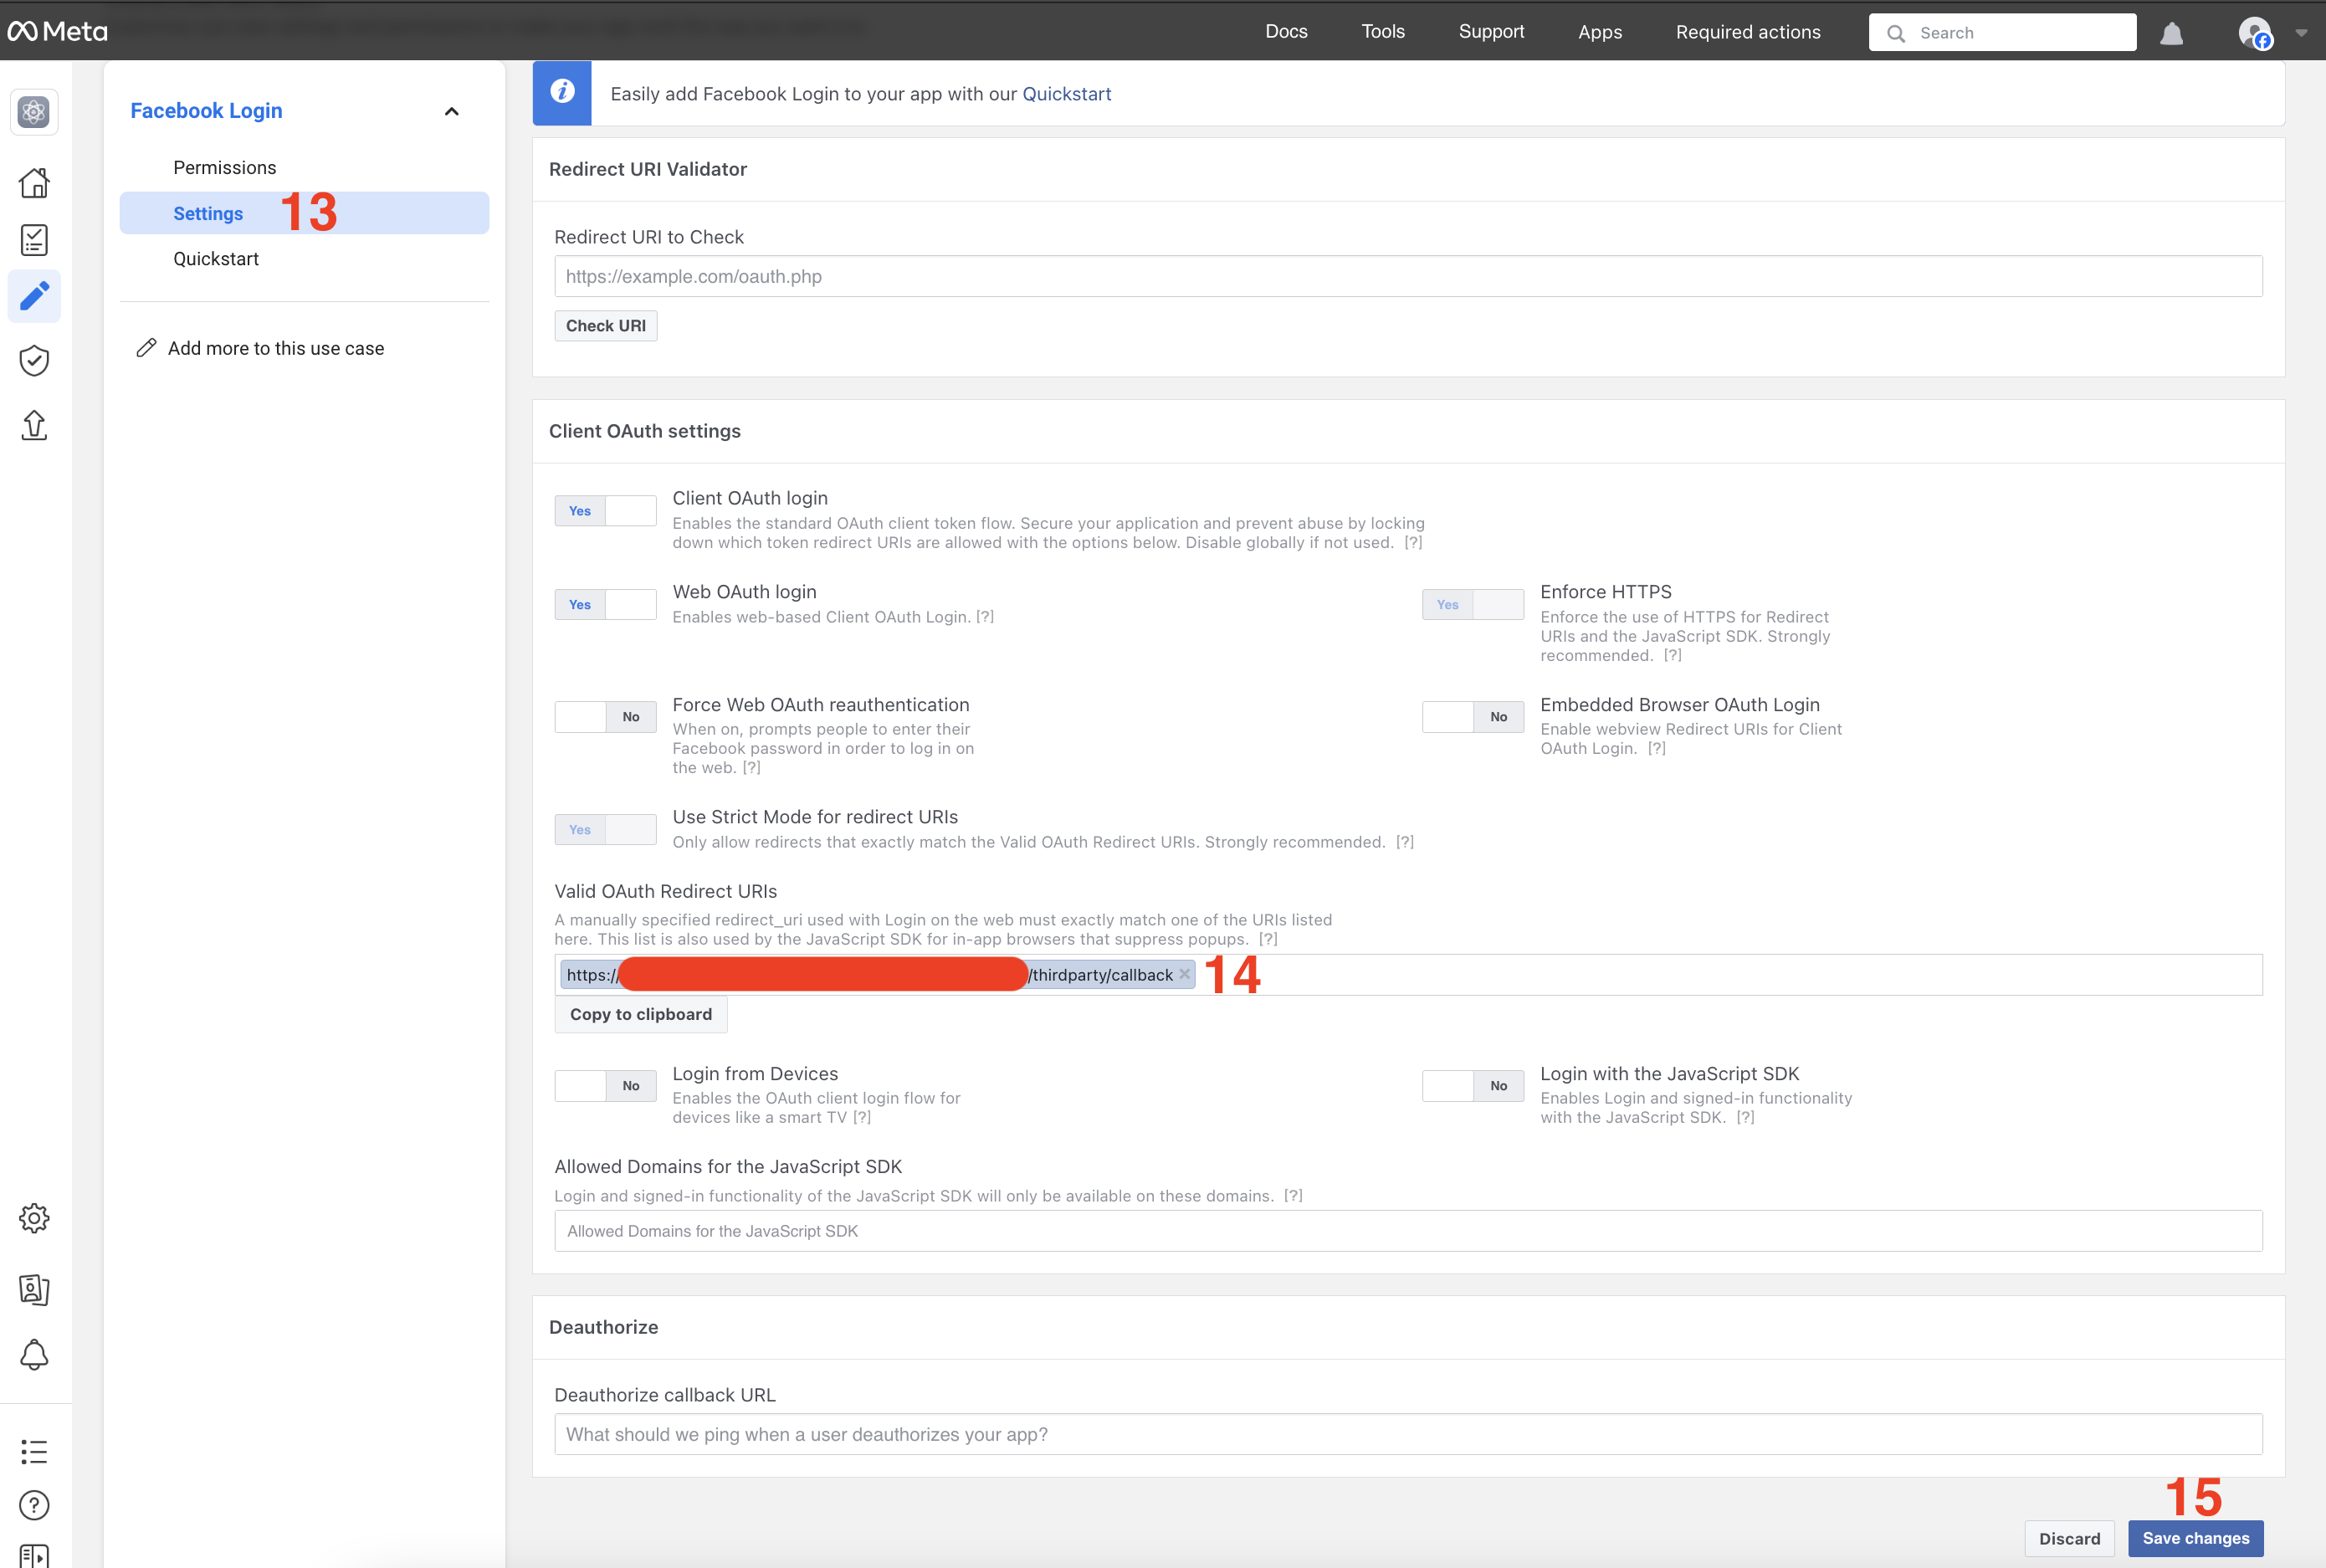
 13. In the `Customize use case` view, select `Settings` in the left sidebar.
14. Under `Valid OAuth Redirect URIs`, add the redirect URL you [retrieved from the Hanko Console](#get-your-provider-redirect-url).
13. In the `Customize use case` view, select `Settings` in the left sidebar.
14. Under `Valid OAuth Redirect URIs`, add the redirect URL you [retrieved from the Hanko Console](#get-your-provider-redirect-url).
 When testing locally, you don't need to add localhost redirect URLs as Facebook automatically allows all `http://localhost` redirects.
## Get your client ID and secret
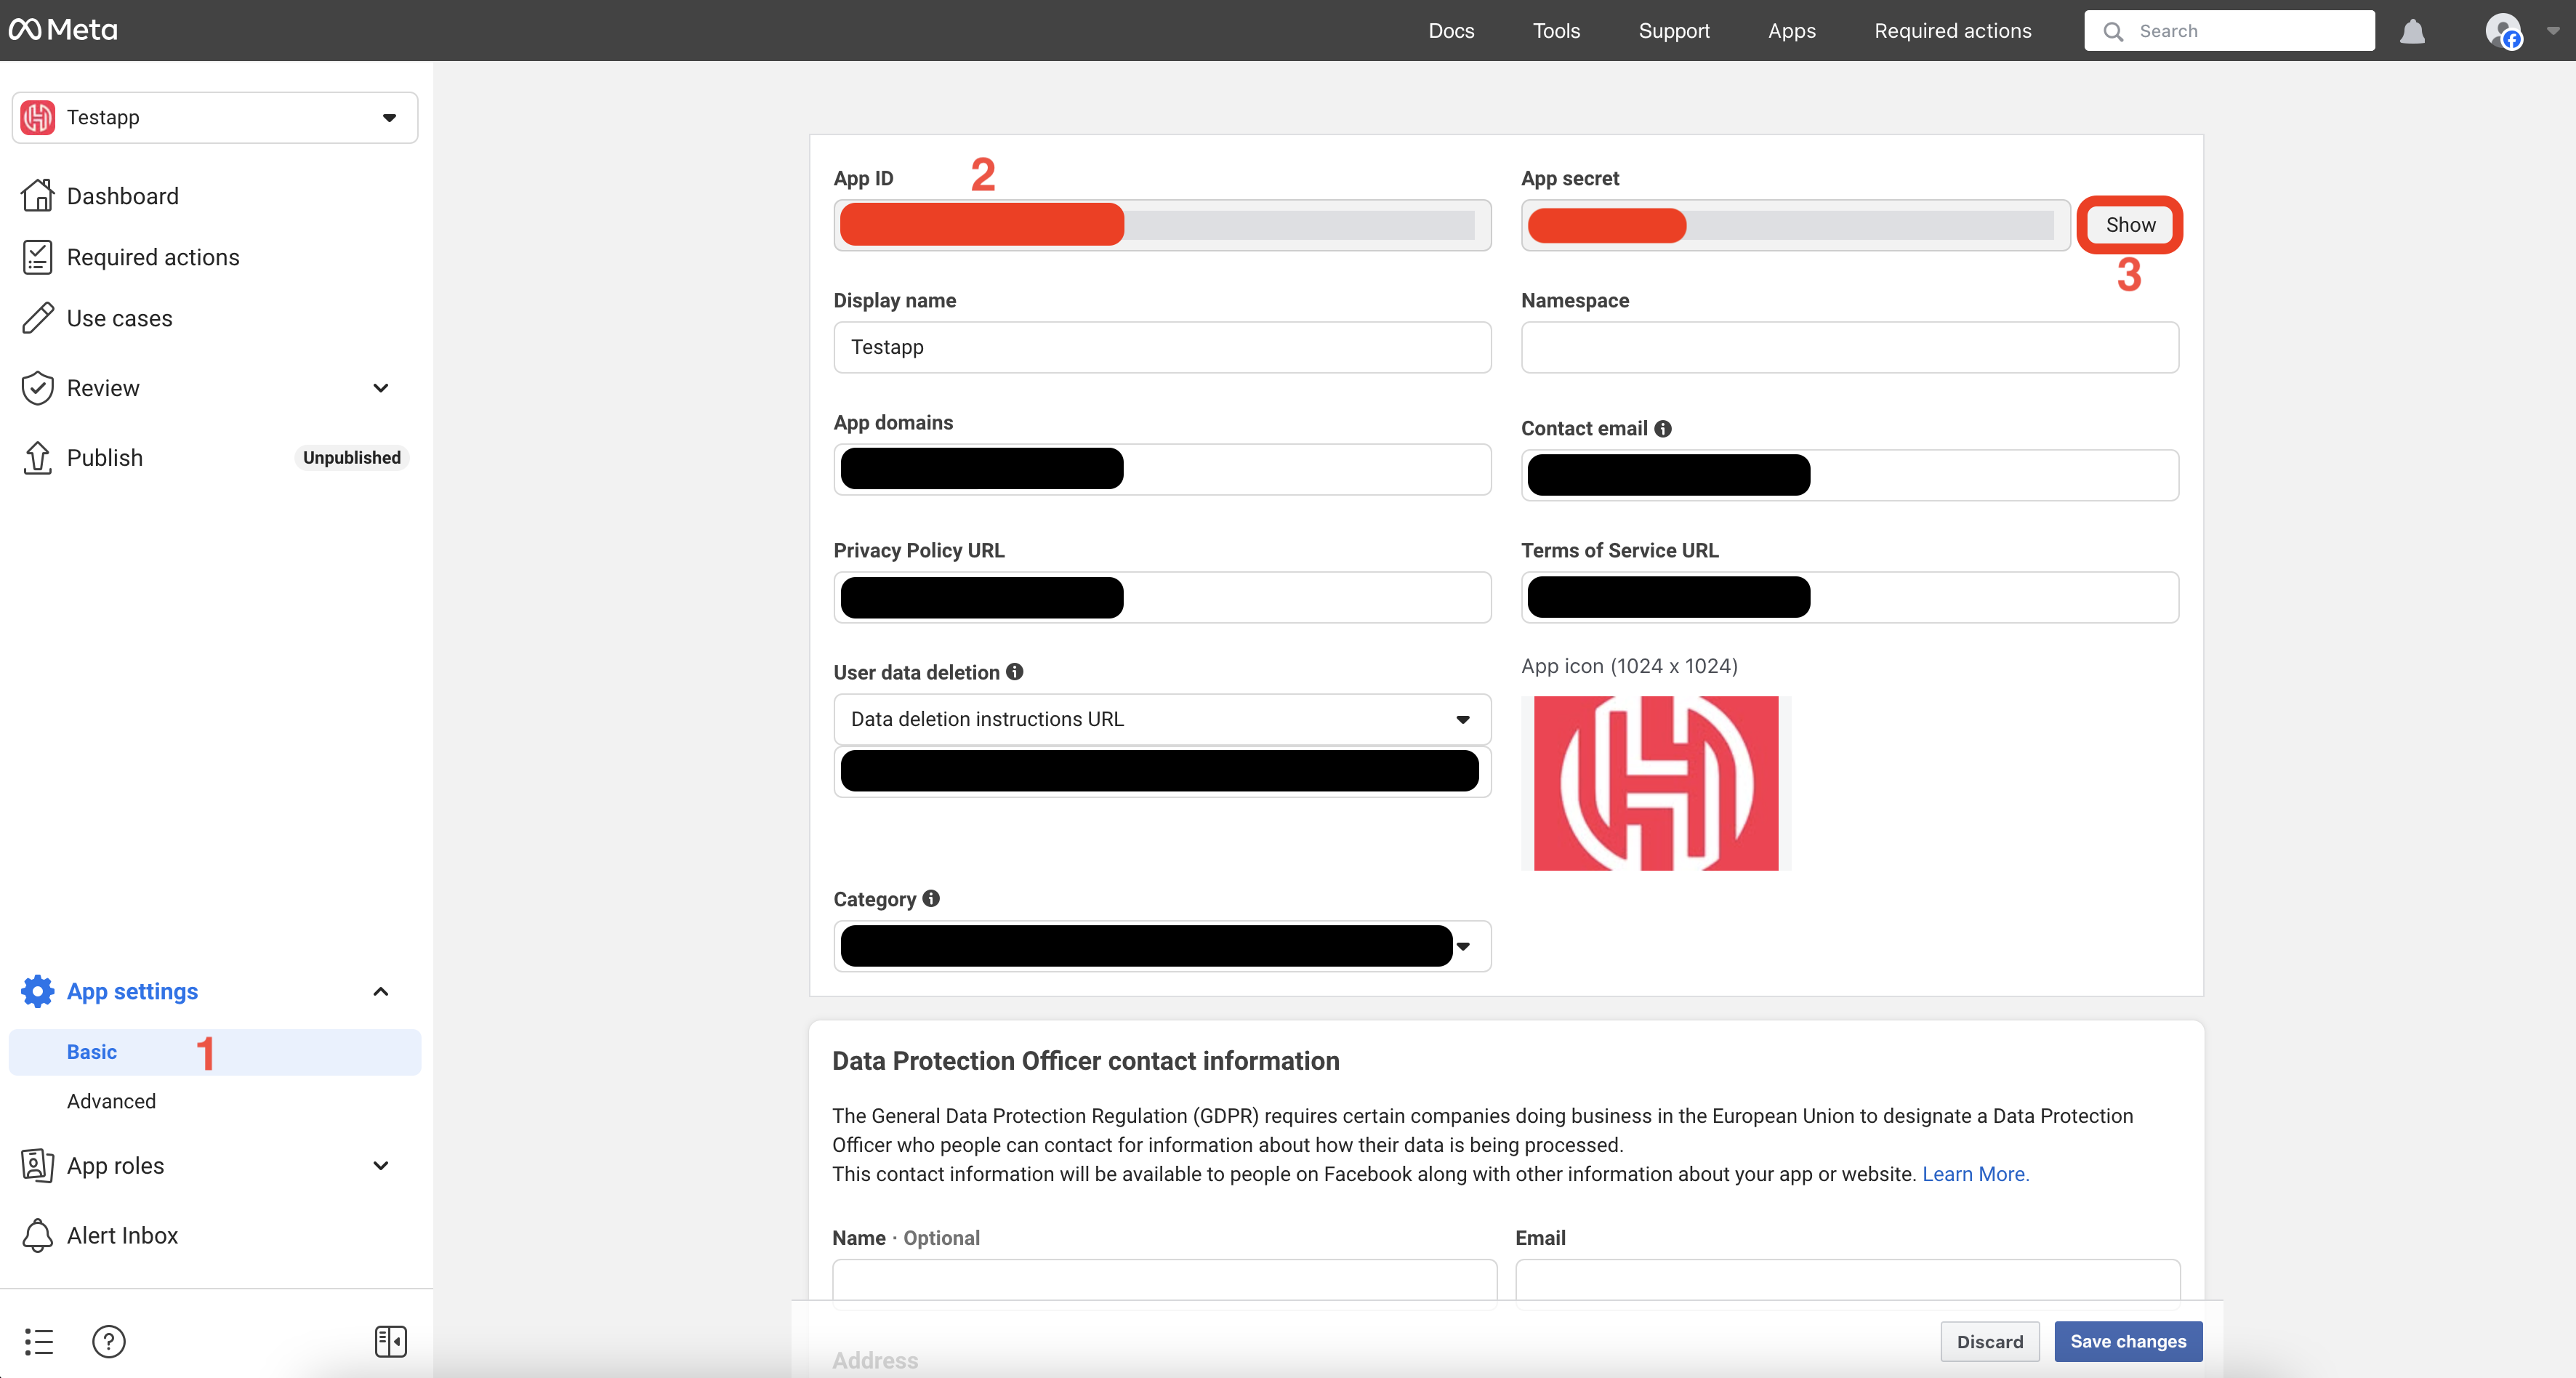
1. Navigate to the `App settings` > `Basic` for your app.
2. Copy the `App ID`.
3. `Show` and copy the `App Secret`.
When testing locally, you don't need to add localhost redirect URLs as Facebook automatically allows all `http://localhost` redirects.
## Get your client ID and secret
1. Navigate to the `App settings` > `Basic` for your app.
2. Copy the `App ID`.
3. `Show` and copy the `App Secret`.
 ## Configure Facebook credentials in Hanko
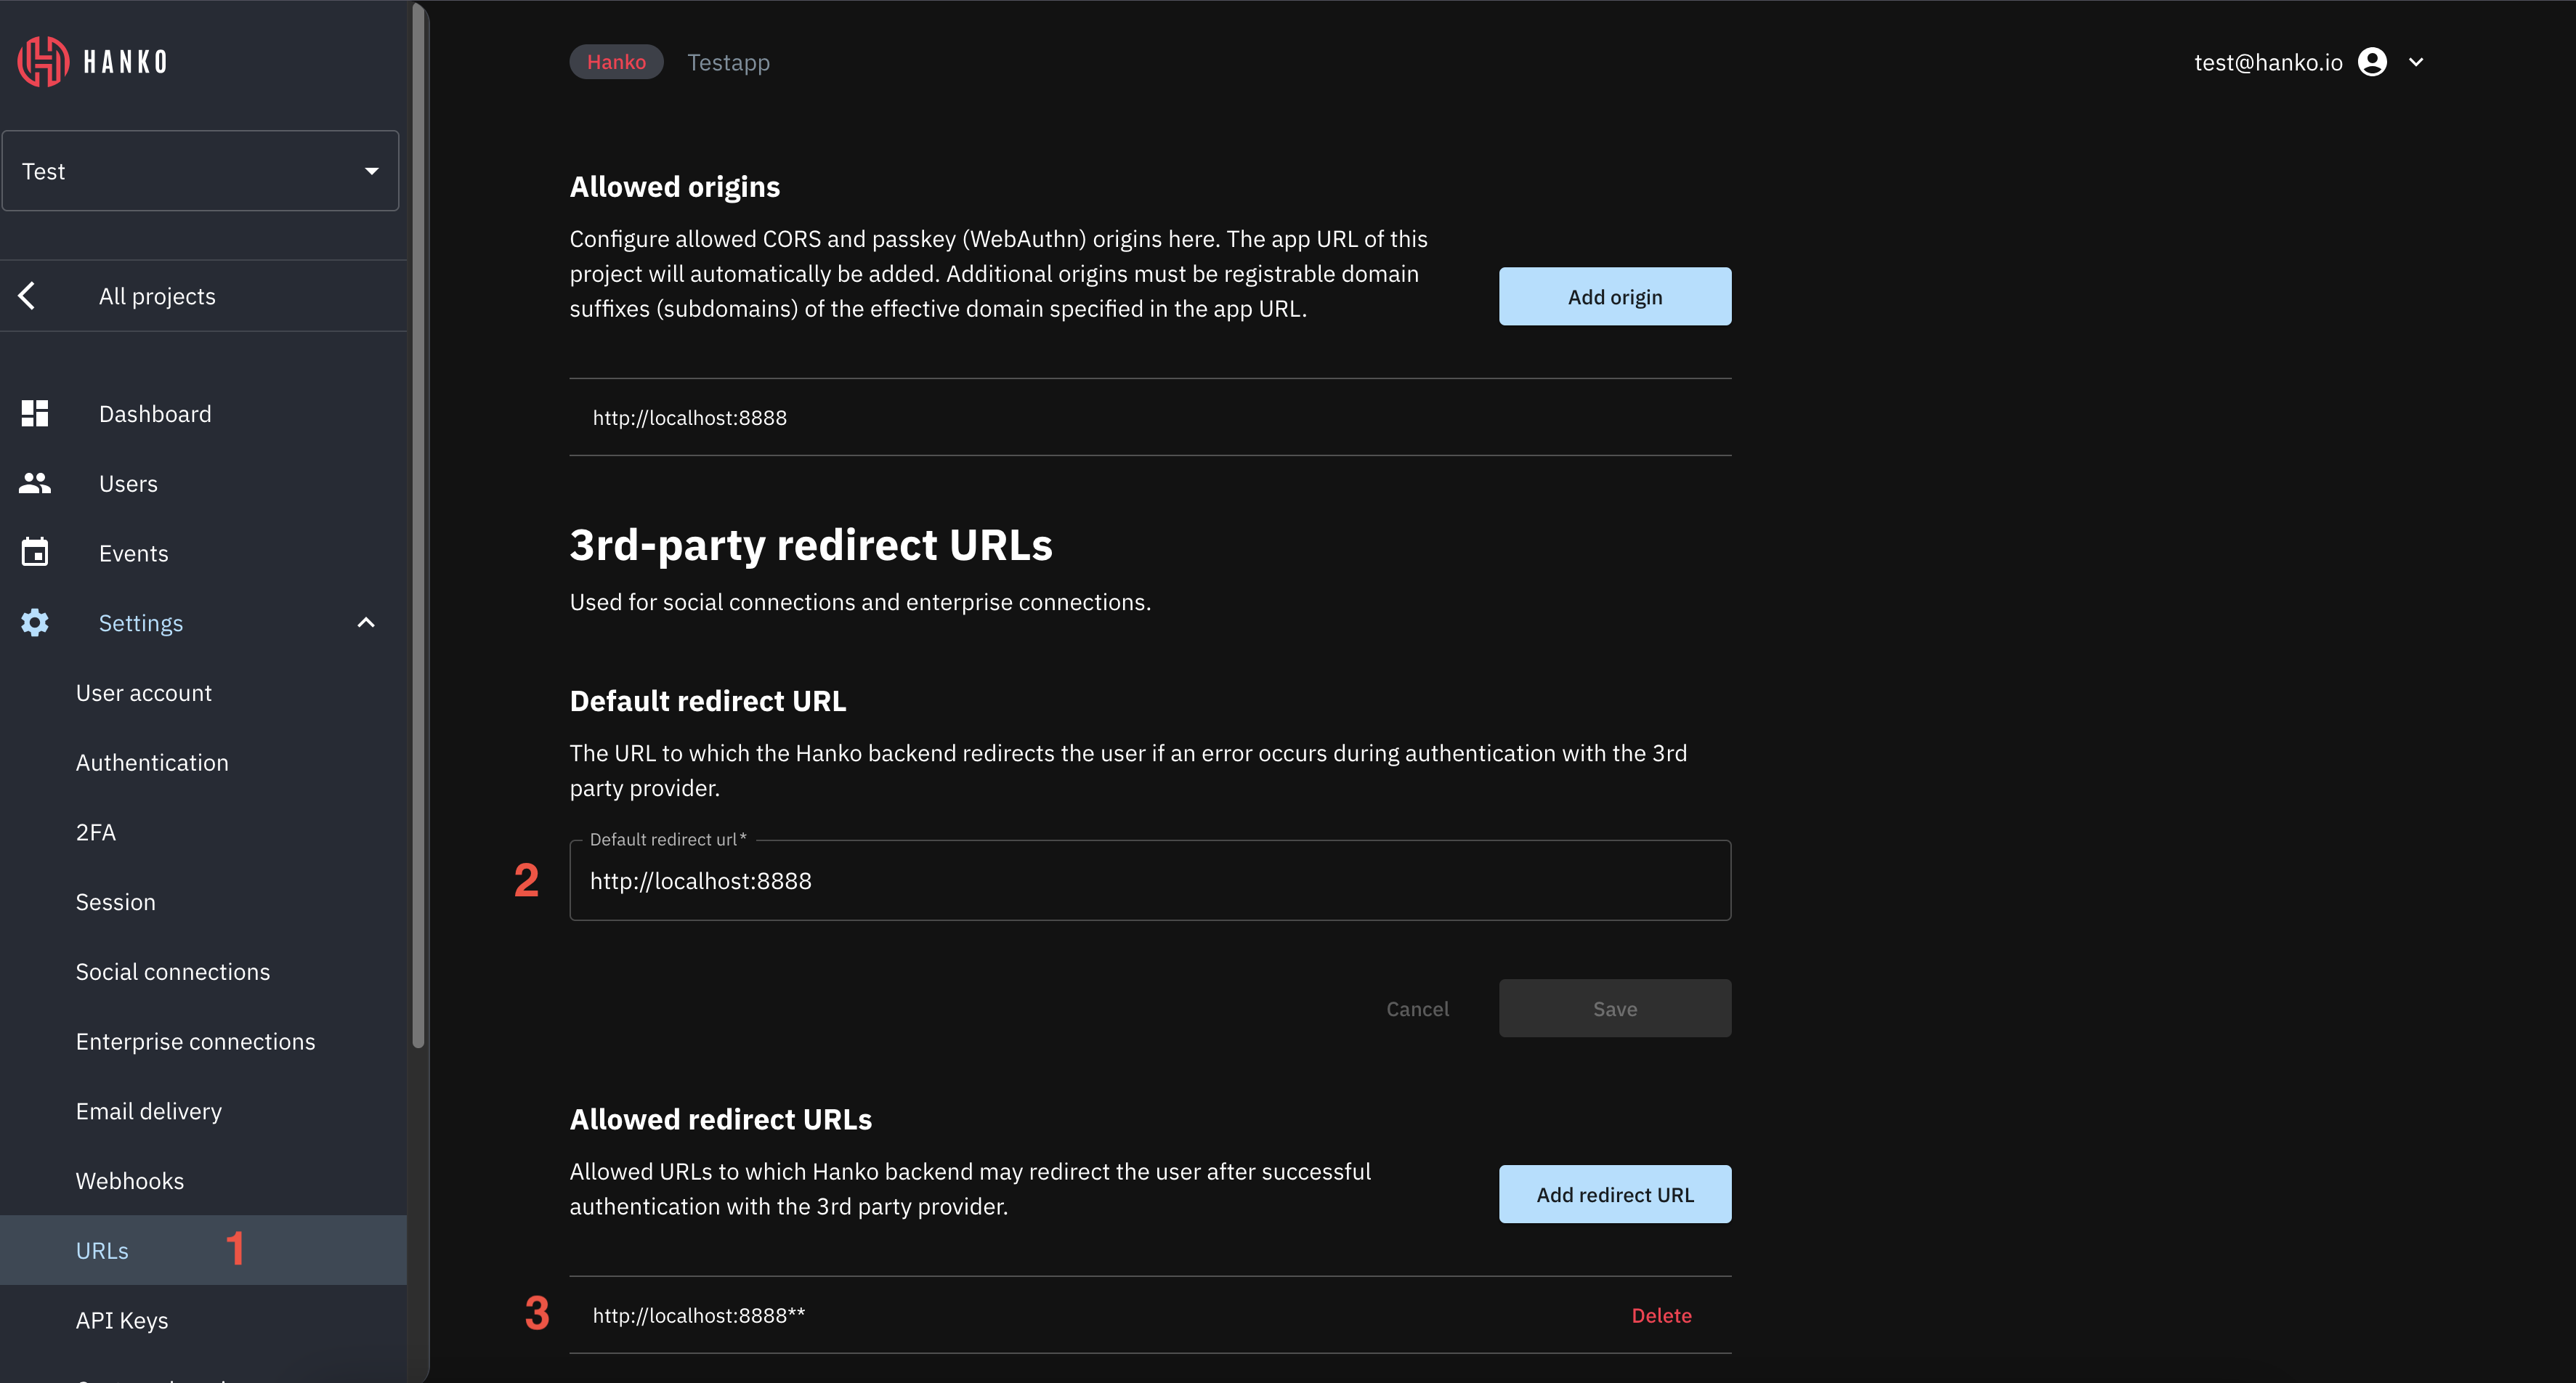
1. In the Hanko Cloud Console, navigate to your project `Settings` and select `URLs`.
2. Configure a **Default Redirect URL** - the frontend URL where Hanko redirects users if authentication fails. For applications using `hanko-elements` web components, this should be the page containing the component to handle errors properly.
3. Configure your **Allowed Redirect URL**s - the frontend URLs where Hanko can redirect users after successful authentication. For `hanko-elements` applications, this should be the page containing the authentication component.
The allowed redirect URL supports wildcard matching through globbing:
* `https://*.example.com` matches `https://foo.example.com` and `https://bar.example.com`.
* `https://foo.example.com/*` matches URLs like `https://foo.example.com/page1` and `https://foo.example.com/page2`.
* Use \*\* to act as a super-wildcard/match-all.
## Configure Facebook credentials in Hanko
1. In the Hanko Cloud Console, navigate to your project `Settings` and select `URLs`.
2. Configure a **Default Redirect URL** - the frontend URL where Hanko redirects users if authentication fails. For applications using `hanko-elements` web components, this should be the page containing the component to handle errors properly.
3. Configure your **Allowed Redirect URL**s - the frontend URLs where Hanko can redirect users after successful authentication. For `hanko-elements` applications, this should be the page containing the authentication component.
The allowed redirect URL supports wildcard matching through globbing:
* `https://*.example.com` matches `https://foo.example.com` and `https://bar.example.com`.
* `https://foo.example.com/*` matches URLs like `https://foo.example.com/page1` and `https://foo.example.com/page2`.
* Use \*\* to act as a super-wildcard/match-all.
 4. Navigate to your project `Settings` and select `Social connections`.
5. In the `Providers` section, find `Facebook` and expand its configuration.
6. Enable the Facebook provider using the toggle switch.
7. Enter the Facebook `App ID` as the `Client ID`.
8. Enter the Facebook `App Secret` as the `Client Secret`.
9. Click `Save` to apply your configuration.
4. Navigate to your project `Settings` and select `Social connections`.
5. In the `Providers` section, find `Facebook` and expand its configuration.
6. Enable the Facebook provider using the toggle switch.
7. Enter the Facebook `App ID` as the `Client ID`.
8. Enter the Facebook `App Secret` as the `Client Secret`.
9. Click `Save` to apply your configuration.
 ## Implement Facebook login in your frontend
You can integrate Facebook authentication using either:
* Pre-built UI components from [`@teamhanko/hanko-elements`](https://www.npmjs.com/package/@teamhanko/hanko-elements)
* Custom implementation with [`@teamhanko/hanko-frontend-sdk`](https://www.npmjs.com/package/@teamhanko/hanko-frontend-sdk)
Follow our [quickstart guides](https://docs.hanko.io/quickstarts) to integrate the `` component from `@teamhanko/hanko-elements` into your application. Once configured, the component will automatically display a Facebook sign-in button in the login interface.
Make sure to configure the page the web component is embedded on as your `error redirect URL` as well as an
`allowed redirect URL` (see the [previous step](#configure-facebook-credentials-in-hanko)).
After successful Facebook authentication, Hanko issues a session cookie and the component continues its normal flow. Authentication errors are automatically captured and displayed within the component.
For custom UI implementations, use the `@teamhanko/hanko-frontend-sdk` to handle Facebook authentication.
Create a [`Hanko` client](https://teamhanko.github.io/hanko/jsdoc/hanko-frontend-sdk/Client.html) instance and call the
`thirdParty.auth` method with `facebook` as the provider.
```js theme={null}
import { Hanko } from "@teamhanko/hanko-frontend-sdk";
// you can find the Hanko API URL on the dashboard of your project
// in the Hanko Cloud Console
const hanko = new Hanko("");
async function signInWithFacebook() {
try {
// the redirect url argument must be one of the allowed redirect URLs
// configured in the previous step.
await hanko.thirdParty.auth("facebook", "");
} catch (error) {
// handle error
}
}
```
After successful authentication, the API redirects to your specified URL with a one-time token in the query parameters. Exchange this token for a JWT using the `token.validate` method:
```js theme={null}
import { Hanko } from "@teamhanko/hanko-frontend-sdk";
const hanko = new Hanko("");
async function onLoad() {
try {
await hanko.token.validate();
} catch (error) {
// handle error
}
// you should now have a JWT cookie set
}
```
On successful validation, the SDK sets a JWT cookie (hanko) that enables authenticated API requests for all other SDK methods.
## Publish your app
After following this guide, your Facebook app will have an `Unpublished` status, which limits its usage to developers and testers. To allow all users to authenticate with Facebook, you must submit your app for Facebook's [App Review](https://developers.facebook.com/docs/resp-plat-initiatives/individual-processes/app-review) process and get it approved for public use.
## Implement Facebook login in your frontend
You can integrate Facebook authentication using either:
* Pre-built UI components from [`@teamhanko/hanko-elements`](https://www.npmjs.com/package/@teamhanko/hanko-elements)
* Custom implementation with [`@teamhanko/hanko-frontend-sdk`](https://www.npmjs.com/package/@teamhanko/hanko-frontend-sdk)
Follow our [quickstart guides](https://docs.hanko.io/quickstarts) to integrate the `` component from `@teamhanko/hanko-elements` into your application. Once configured, the component will automatically display a Facebook sign-in button in the login interface.
Make sure to configure the page the web component is embedded on as your `error redirect URL` as well as an
`allowed redirect URL` (see the [previous step](#configure-facebook-credentials-in-hanko)).
After successful Facebook authentication, Hanko issues a session cookie and the component continues its normal flow. Authentication errors are automatically captured and displayed within the component.
For custom UI implementations, use the `@teamhanko/hanko-frontend-sdk` to handle Facebook authentication.
Create a [`Hanko` client](https://teamhanko.github.io/hanko/jsdoc/hanko-frontend-sdk/Client.html) instance and call the
`thirdParty.auth` method with `facebook` as the provider.
```js theme={null}
import { Hanko } from "@teamhanko/hanko-frontend-sdk";
// you can find the Hanko API URL on the dashboard of your project
// in the Hanko Cloud Console
const hanko = new Hanko("");
async function signInWithFacebook() {
try {
// the redirect url argument must be one of the allowed redirect URLs
// configured in the previous step.
await hanko.thirdParty.auth("facebook", "");
} catch (error) {
// handle error
}
}
```
After successful authentication, the API redirects to your specified URL with a one-time token in the query parameters. Exchange this token for a JWT using the `token.validate` method:
```js theme={null}
import { Hanko } from "@teamhanko/hanko-frontend-sdk";
const hanko = new Hanko("");
async function onLoad() {
try {
await hanko.token.validate();
} catch (error) {
// handle error
}
// you should now have a JWT cookie set
}
```
On successful validation, the SDK sets a JWT cookie (hanko) that enables authenticated API requests for all other SDK methods.
## Publish your app
After following this guide, your Facebook app will have an `Unpublished` status, which limits its usage to developers and testers. To allow all users to authenticate with Facebook, you must submit your app for Facebook's [App Review](https://developers.facebook.com/docs/resp-plat-initiatives/individual-processes/app-review) process and get it approved for public use.