> ## Documentation Index
> Fetch the complete documentation index at: https://docs.hanko.io/llms.txt
> Use this file to discover all available pages before exploring further.
# Sign in with Apple
> Step-by-step guide to integrating Sign in with Apple using Hanko. Enable secure authentication and seamless onboarding for your app's users.
**Hanko Apple OAuth Integration Guide**:
**About Hanko**:
Hanko is a modern open source authentication solution and the fastest way you integrate passkeys, 2FA, SSO, and more—with full control over your data. Move between self-hosted and Hanko Cloud anytime. No lock-in. Just Auth how it should be: secure, user friendly, and fully yours.
**What This Guide Covers**: This guide demonstrates how to integrate Apple's "Sign in with Apple" OAuth service with Hanko, allowing users to authenticate using their Apple ID accounts. You'll learn to configure Apple's developer console, set up OAuth credentials, and implement Apple login in your application.
**Key Technologies**:
* OAuth 2.0 and OpenID Connect protocols
* Apple Sign In OAuth provider
* JWT (JSON Web Tokens) for secure authentication
* Apple's private email relay service
* ECDSA cryptographic signing for client secrets
**Prerequisites**:
* Active Hanko Cloud account with a configured project
* Apple Developer account with appropriate permissions
* Basic understanding of OAuth 2.0 flow
* Docker installed for client secret generation
**Tasks You'll Complete**:
* Register and configure Apple App ID and Services ID
* Generate required cryptographic keys and client secrets
* Configure Apple OAuth credentials in Hanko Console
* Implement Apple authentication in your frontend application
* Handle Apple's private email relay service (optional)
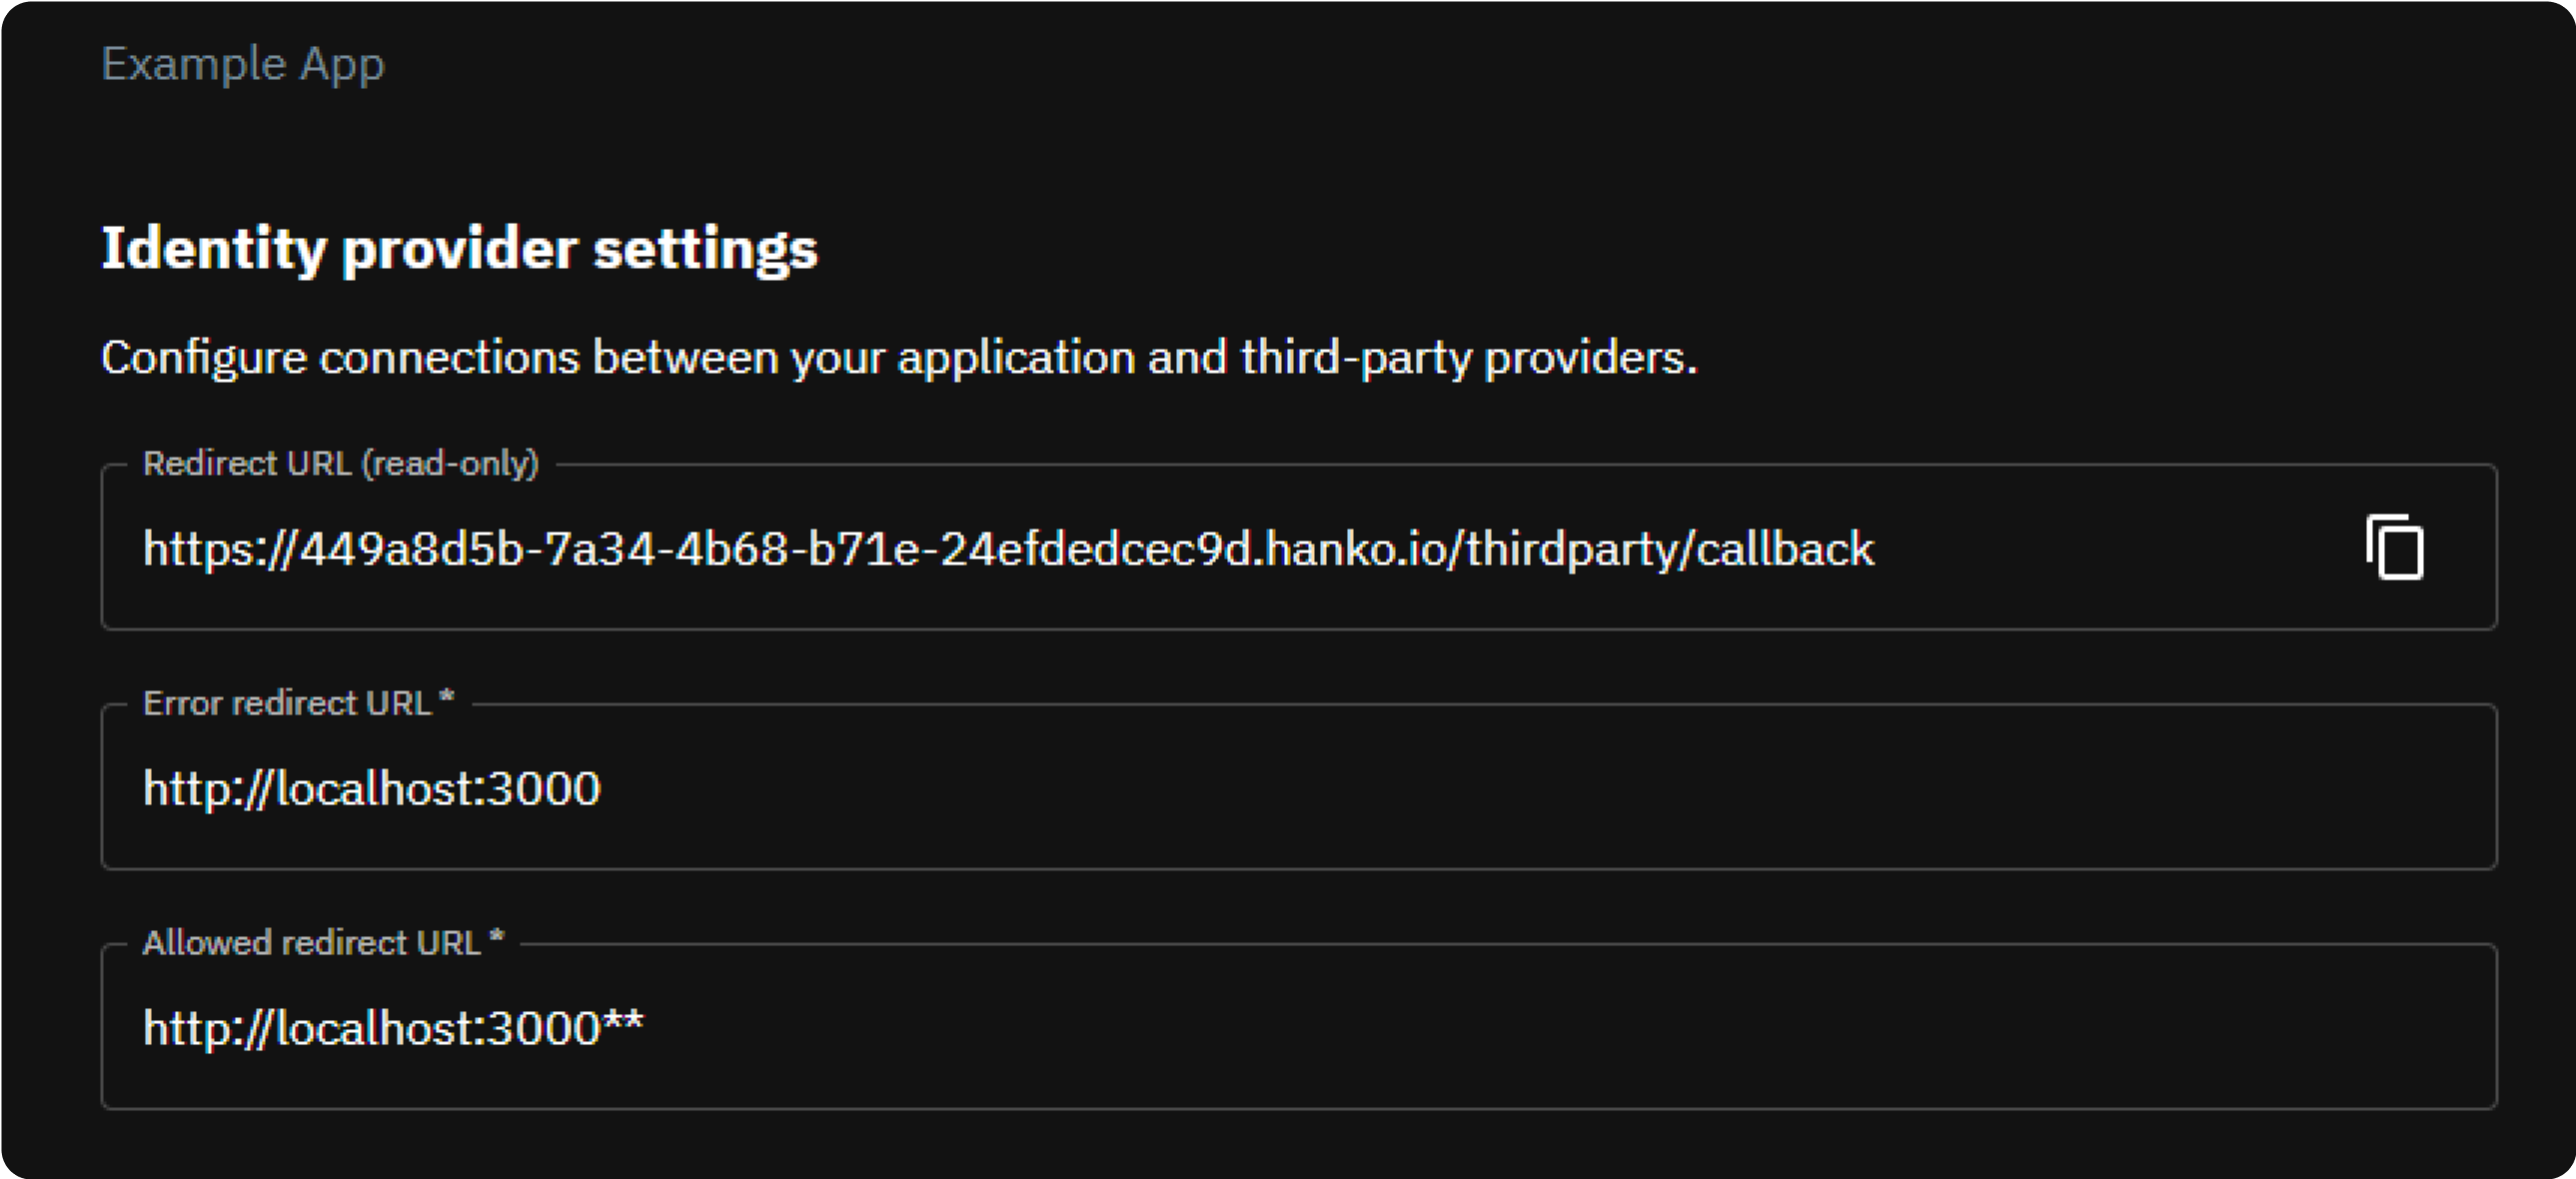
1. Let's get the redirect url first from [Hanko Console](https://cloud.hanko.io/), as you'll need it in a moment. To do so, sign in to Hanko and select your project. Navigate to 'Settings' in the left sidebar and then to 'Identity Providers'. Copy the 'Redirect URL' from here.
 ## Register App ID and Services ID
* To get started you need an [Apple developer account](https://developer.apple.com/help/account/get-started/about-your-developer-account) and after you sign in, you'll need to [register an App ID](https://developer.apple.com/help/account/manage-identifiers/register-an-app-id).
* In [Certificates, Identifiers & Profiles](https://developer.apple.com/account/resources), click 'Identifiers' in the sidebar, then click the add button (+) on the top left.
* Select 'App IDs' from the list of options and click 'Continue'. Then 'Select App' as the type and click 'Continue'.
* Provide your app information: App 'Description' and 'Bundle ID' (Apple recommends using a reverse-domain name style string i.e., `com.domainname.appname`).
* In the 'Capabilities' tab below, check 'Sign in with Apple' and Click 'Continue', then review the registration information, then click 'Register'.
* Now, you also need to register a 'Services ID'. Go to [Certificates, Identifiers & Profiles](https://developer.apple.com/account/resources), click 'Identifiers' in the
sidebar, then click the add button (`+`) on the top.
* Select `Services IDs` from the list of options and click 'Continue' and then provide your app information.
* Click 'Continue', then 'Register'.
## Configure your Services ID
* On [Certificates, Identifiers & Profiles](https://developer.apple.com/account/resources), click `Identifiers` in the
sidebar, then select `Services IDs` from the dropdown menu on the right.
* Select the `Services ID` you created in the previous step.
* Enable `Sign In With Apple` for the `Services ID` by clicking the checkbox next to it.
* Click `Configure`.
* Select your [previously registered](#register-an-app-id) `App ID` as your `Primary App ID`.
* In the shown modal, click the add button (`+`) next to `Website URLs`.
* Add the *domain* of your [redirect URL](#redirect-url) to the `Domains and Subdomains` input (do not add a scheme,
e.g. `https://`, or path information).
* In the `Return URLs` input, enter the complete [redirect URL](#redirect-url) of your app which you found in the
previous step.
* Click `Next` at the bottom right.
* Click `Done` at the bottom to close the modal.
* Back on the `Edit your Services ID Configuration` view, click `Continue` at the top right, then click `Save`.
## Create key and download key file
Next, you need to create a `Key` and download a `Key` file. You need this file to
generate your client secret in the [next step](#generate-secret).
* On [Certificates, Identifiers & Profiles](https://developer.apple.com/account/resources), click `Keys` in the sidebar,
then click the add button (`+`) next to the `Keys` heading.
* Enter a `Key Name`.
* In the options table below the `Key Name` input, check `Sign in with Apple`.
* In the same table row, click `Configure` to the right.
* In the `Configure Key` view, select your [previously registered](#register-an-app-id) `App ID` in the`Primary App ID` dropdown.
* Click `Save` on the top right.
* Back on the `Register a New Key` view, click `Continue`, then click `Register` on the top right.
* On the `Download Your Key` view, click `Download` on the top right to save the key file.
* Click `Done` on the top right.
## Generate a client secret
Sign in with Apple requires a client secret to authorize API requests. The secret must be a JSON Web
Token (JWT) signed with the Elliptic Curve Digital Signature Algorithm (ECDSA) with the P-256 curve and the SHA-256
hash algorithm.
To make secret generation as easy as possible, we provide a script that can be executed using
[Docker](https://docker.com). If you do not have Docker installed, see the
[official installation instructions](https://docs.docker.com/get-docker/).
The script requires the following information:
* `private_key`: This is the path to the key file you downloaded in the [previous step](#create-key-and-download-key-file).
Per default the key file name should look like this: `AuthKey_XXXXXXXXXX.p8`. Because we use Docker in this case, we
will use the path to the key file on your filesystem to mount the file into the Docker container (we'll get to this,
see the command below).
* `team_id`: This is the Team ID your Apple Developer account is associated with.
* See [Locate your Team ID](https://developer.apple.com/help/account/manage-your-team/locate-your-team-id/#:~:text=In%20the%20top%20navigation%20of,to%20view%20your%20Team%20ID.)
in the official Apple documentation.
* `services_id`: This is `Services ID` you created in the [Register a Services ID](#register-a-services-id) step. You
can always review this ID in the Apple Developer console:
* On [Certificates, Identifiers & Profiles](https://developer.apple.com/account/resources), click `Identifiers` in the sidebar,
then select `Services IDs` from the dropdown menu on the right.
* Find the relevant entry in the list (the required value is the value in the `Identifier` column).
* `key_id`: This is the ID of the private key from the [previous step](#create-key-and-download-key-file).
The `XXXXXXXXXX` part of the default `AuthKey_XXXXXXXXXX.p8` filename is the key ID. You can
also review this ID in the Apple Developer console:
* On [Certificates, Identifiers & Profiles](https://developer.apple.com/account/resources), click `Keys` in the sidebar,
then select `Services IDs`.
* Select your key in the list.
* The ID can be found under `View Key Details` > `Key ID`
As previously mentioned, we will mount the `private_key` to the container by mapping the path on your filesystem to
a path on the container filesystem, e.g. `~/Downloads/AuthKey_XXXXXXXXXX.p8:/tmp/AuthKey_XXXXXXXXXX.p8`.
From the command line, run (replace `<...>` placeholders with your data):
```shell theme={null}
docker run -v : ghcr.io/teamhanko/hanko siwa \
--private_key \
--team_id \
--services_id \
--key_id > client_secret.txt
```
The command will save the client secret in a file `client_secret.txt`.
Secrets expire after 6 months and must be regenerated before the expiration.
1. Head back to Identity providers in Hanko and under 'Identity provider settings' configure the following:
* **Error Redirect URL**: This URL, on your frontend, is where the Hanko API redirects if an error occurs during third-party sign-in. With hanko-elements web components, it should link to the page embedding the web component to process errors correctly.
* **Allowed Redirect URL**: A URL on your frontend that the Hanko API can redirect to after a successful third-party authentication. Using hanko-elements web components? Make it the URL of the embedding page.
Supports wildcard matching through globbing:
* `https://*.example.com` matches `https://foo.example.com` and `https://bar.example.com`.
* `https://foo.example.com/*` matches URLs like `https://foo.example.com/page1` and `https://foo.example.com/page2`.
* Use \*\* to act as a super-wildcard/match-all.
2. In the 'Providers' section, select Apple and enable its toggle switch.
3. Input the earlier noted 'Services ID' and 'Secret Key', then click 'Save'.
## Register App ID and Services ID
* To get started you need an [Apple developer account](https://developer.apple.com/help/account/get-started/about-your-developer-account) and after you sign in, you'll need to [register an App ID](https://developer.apple.com/help/account/manage-identifiers/register-an-app-id).
* In [Certificates, Identifiers & Profiles](https://developer.apple.com/account/resources), click 'Identifiers' in the sidebar, then click the add button (+) on the top left.
* Select 'App IDs' from the list of options and click 'Continue'. Then 'Select App' as the type and click 'Continue'.
* Provide your app information: App 'Description' and 'Bundle ID' (Apple recommends using a reverse-domain name style string i.e., `com.domainname.appname`).
* In the 'Capabilities' tab below, check 'Sign in with Apple' and Click 'Continue', then review the registration information, then click 'Register'.
* Now, you also need to register a 'Services ID'. Go to [Certificates, Identifiers & Profiles](https://developer.apple.com/account/resources), click 'Identifiers' in the
sidebar, then click the add button (`+`) on the top.
* Select `Services IDs` from the list of options and click 'Continue' and then provide your app information.
* Click 'Continue', then 'Register'.
## Configure your Services ID
* On [Certificates, Identifiers & Profiles](https://developer.apple.com/account/resources), click `Identifiers` in the
sidebar, then select `Services IDs` from the dropdown menu on the right.
* Select the `Services ID` you created in the previous step.
* Enable `Sign In With Apple` for the `Services ID` by clicking the checkbox next to it.
* Click `Configure`.
* Select your [previously registered](#register-an-app-id) `App ID` as your `Primary App ID`.
* In the shown modal, click the add button (`+`) next to `Website URLs`.
* Add the *domain* of your [redirect URL](#redirect-url) to the `Domains and Subdomains` input (do not add a scheme,
e.g. `https://`, or path information).
* In the `Return URLs` input, enter the complete [redirect URL](#redirect-url) of your app which you found in the
previous step.
* Click `Next` at the bottom right.
* Click `Done` at the bottom to close the modal.
* Back on the `Edit your Services ID Configuration` view, click `Continue` at the top right, then click `Save`.
## Create key and download key file
Next, you need to create a `Key` and download a `Key` file. You need this file to
generate your client secret in the [next step](#generate-secret).
* On [Certificates, Identifiers & Profiles](https://developer.apple.com/account/resources), click `Keys` in the sidebar,
then click the add button (`+`) next to the `Keys` heading.
* Enter a `Key Name`.
* In the options table below the `Key Name` input, check `Sign in with Apple`.
* In the same table row, click `Configure` to the right.
* In the `Configure Key` view, select your [previously registered](#register-an-app-id) `App ID` in the`Primary App ID` dropdown.
* Click `Save` on the top right.
* Back on the `Register a New Key` view, click `Continue`, then click `Register` on the top right.
* On the `Download Your Key` view, click `Download` on the top right to save the key file.
* Click `Done` on the top right.
## Generate a client secret
Sign in with Apple requires a client secret to authorize API requests. The secret must be a JSON Web
Token (JWT) signed with the Elliptic Curve Digital Signature Algorithm (ECDSA) with the P-256 curve and the SHA-256
hash algorithm.
To make secret generation as easy as possible, we provide a script that can be executed using
[Docker](https://docker.com). If you do not have Docker installed, see the
[official installation instructions](https://docs.docker.com/get-docker/).
The script requires the following information:
* `private_key`: This is the path to the key file you downloaded in the [previous step](#create-key-and-download-key-file).
Per default the key file name should look like this: `AuthKey_XXXXXXXXXX.p8`. Because we use Docker in this case, we
will use the path to the key file on your filesystem to mount the file into the Docker container (we'll get to this,
see the command below).
* `team_id`: This is the Team ID your Apple Developer account is associated with.
* See [Locate your Team ID](https://developer.apple.com/help/account/manage-your-team/locate-your-team-id/#:~:text=In%20the%20top%20navigation%20of,to%20view%20your%20Team%20ID.)
in the official Apple documentation.
* `services_id`: This is `Services ID` you created in the [Register a Services ID](#register-a-services-id) step. You
can always review this ID in the Apple Developer console:
* On [Certificates, Identifiers & Profiles](https://developer.apple.com/account/resources), click `Identifiers` in the sidebar,
then select `Services IDs` from the dropdown menu on the right.
* Find the relevant entry in the list (the required value is the value in the `Identifier` column).
* `key_id`: This is the ID of the private key from the [previous step](#create-key-and-download-key-file).
The `XXXXXXXXXX` part of the default `AuthKey_XXXXXXXXXX.p8` filename is the key ID. You can
also review this ID in the Apple Developer console:
* On [Certificates, Identifiers & Profiles](https://developer.apple.com/account/resources), click `Keys` in the sidebar,
then select `Services IDs`.
* Select your key in the list.
* The ID can be found under `View Key Details` > `Key ID`
As previously mentioned, we will mount the `private_key` to the container by mapping the path on your filesystem to
a path on the container filesystem, e.g. `~/Downloads/AuthKey_XXXXXXXXXX.p8:/tmp/AuthKey_XXXXXXXXXX.p8`.
From the command line, run (replace `<...>` placeholders with your data):
```shell theme={null}
docker run -v : ghcr.io/teamhanko/hanko siwa \
--private_key \
--team_id \
--services_id \
--key_id > client_secret.txt
```
The command will save the client secret in a file `client_secret.txt`.
Secrets expire after 6 months and must be regenerated before the expiration.
1. Head back to Identity providers in Hanko and under 'Identity provider settings' configure the following:
* **Error Redirect URL**: This URL, on your frontend, is where the Hanko API redirects if an error occurs during third-party sign-in. With hanko-elements web components, it should link to the page embedding the web component to process errors correctly.
* **Allowed Redirect URL**: A URL on your frontend that the Hanko API can redirect to after a successful third-party authentication. Using hanko-elements web components? Make it the URL of the embedding page.
Supports wildcard matching through globbing:
* `https://*.example.com` matches `https://foo.example.com` and `https://bar.example.com`.
* `https://foo.example.com/*` matches URLs like `https://foo.example.com/page1` and `https://foo.example.com/page2`.
* Use \*\* to act as a super-wildcard/match-all.
2. In the 'Providers' section, select Apple and enable its toggle switch.
3. Input the earlier noted 'Services ID' and 'Secret Key', then click 'Save'.
 Whether you choose to use the pre-designed UI from the `@teamhanko/hanko-elements` package or opt for a custom UI with the `@teamhanko/hanko-frontend-sdk` will determine your approach to frontend integration.
1. Integrate the `` component from `hanko-elements` based on our frontend guides. If everything is configured correctly, the component will display a button for signing in with Apple in the login view.
Make sure to configure the page the web component is embedded on as your error redirect URL as well as an allowed redirect URL.
After successful Apple authentication, the backend sets a session cookie and any authentication errors are displayed within the component.
1. For a custom UI, initialize third party sign-in using `@teamhanko/hanko-frontend-sdk`.
2. Create a Hanko client instance and call `thirdParty.auth` with `apple` as the provider.
```js theme={null}
import { Hanko } from "@teamhanko/hanko-frontend-sdk";
const hanko = new Hanko("");
async function signInWithApple() {
try {
await hanko.thirdParty.auth("apple", "");
} catch (error) {
// handle error
}
}
```
3. On successful authentication, the API redirects you to the given redirect URL. The URL query includes a one time token that must be exchanged for a JWT. Use the `token.validate` method on your client to validate the token:
```js theme={null}
import { Hanko } from "@teamhanko/hanko-frontend-sdk";
const hanko = new Hanko("");
async function onLoad() {
try {
await hanko.token.validate();
} catch (error) {
// handle error
}
// you should now have a JWT cookie set
}
```
On success, the API issues a JWT which is then set by the SDK as a cookie (hanko). All other SDK methods can now use the cookie to make authenticated requests to the API.
## On using Apple's private email relay service
Sign in with Apple gives allows users to
[hide their original email address](https://developer.apple.com/documentation/sign_in_with_apple/sign_in_with_apple_js/communicating_using_the_private_email_relay_service#overview)
when authorizing your app during the authentication flow and instead use an anonymous, automatically generated
email address. Emails are then routed through Apples private relay email service. In order to
[send email messages through the relay service](https://developer.apple.com/help/account/configure-app-capabilities/configure-private-email-relay-service)
to the users' personal inboxes (Hanko sends out passcodes for email verification and account
recovery), you'll need to register your outbound email domains. All registered domains must create Sender Policy
Framework (SPF) DNS TXT records in order to transit Apple's private mail relay.
If a user signs up using `Sign in with Apple` and chooses to hide their real email address, then the
private relay address will become the primary email for the user. Should a user then choose to sign in with an email
address (and not via `Sign in with Apple`), then the private relay email address must be used, *not* the real email
address associated with her Apple account.
### Register domains with Apple
* On [Certificates, Identifiers & Profiles](https://developer.apple.com/account/resources), click `Services` in the
left sidebar.
* In the `Sign in with Apple for Email Communication` panel, click `Configure`.
* Next to the `Email Sources` heading, click the add (`+`) button.
* In the `Register your email sources` modal, enter your `Domains and Subdomains` and/or specific `Email Addresses`.
* If you use Hanko Cloud and do *not* want to use a custom SMTP server, enter `hanko.io` in
the `Domains and Subdomains` input. You do not need to provide an SPF DNS record by yourself.
* If you use Hanko Cloud and *do* want to use a [custom SMTP server](?environment=cloud#configure-smtp), enter your
custom domain in the `Domains and Subdomains` input. Remember to provide an SPF DNS record for your domain in order
to pass Apple's SPF check.
* Click `Next`, then click `Register`.
* Your domains should be listed in the `Email Sources` table. Emails are only relayed if the SPF check (see the `Status`
column) was successful.
### Configure SMTP with Hanko
If you use Hanko Cloud and are on a paid subscription tier you can configure your own SMTP server.
* Sign in to [cloud.hanko.io](https://cloud.hanko.io).
* Select your `Organization`.
* Select your `Project`.
* In the left sidebar, click `Settings`, then select `SMTP`.
* Enter your SMTP credentials and sender data.
* The domain of your `Sender email address` should be registered as an email source in the Apple developer
console to allow communication through Apple's private relay service (see the [previous step](#register-domains)).
* Click `Save`.
Whether you choose to use the pre-designed UI from the `@teamhanko/hanko-elements` package or opt for a custom UI with the `@teamhanko/hanko-frontend-sdk` will determine your approach to frontend integration.
1. Integrate the `` component from `hanko-elements` based on our frontend guides. If everything is configured correctly, the component will display a button for signing in with Apple in the login view.
Make sure to configure the page the web component is embedded on as your error redirect URL as well as an allowed redirect URL.
After successful Apple authentication, the backend sets a session cookie and any authentication errors are displayed within the component.
1. For a custom UI, initialize third party sign-in using `@teamhanko/hanko-frontend-sdk`.
2. Create a Hanko client instance and call `thirdParty.auth` with `apple` as the provider.
```js theme={null}
import { Hanko } from "@teamhanko/hanko-frontend-sdk";
const hanko = new Hanko("");
async function signInWithApple() {
try {
await hanko.thirdParty.auth("apple", "");
} catch (error) {
// handle error
}
}
```
3. On successful authentication, the API redirects you to the given redirect URL. The URL query includes a one time token that must be exchanged for a JWT. Use the `token.validate` method on your client to validate the token:
```js theme={null}
import { Hanko } from "@teamhanko/hanko-frontend-sdk";
const hanko = new Hanko("");
async function onLoad() {
try {
await hanko.token.validate();
} catch (error) {
// handle error
}
// you should now have a JWT cookie set
}
```
On success, the API issues a JWT which is then set by the SDK as a cookie (hanko). All other SDK methods can now use the cookie to make authenticated requests to the API.
## On using Apple's private email relay service
Sign in with Apple gives allows users to
[hide their original email address](https://developer.apple.com/documentation/sign_in_with_apple/sign_in_with_apple_js/communicating_using_the_private_email_relay_service#overview)
when authorizing your app during the authentication flow and instead use an anonymous, automatically generated
email address. Emails are then routed through Apples private relay email service. In order to
[send email messages through the relay service](https://developer.apple.com/help/account/configure-app-capabilities/configure-private-email-relay-service)
to the users' personal inboxes (Hanko sends out passcodes for email verification and account
recovery), you'll need to register your outbound email domains. All registered domains must create Sender Policy
Framework (SPF) DNS TXT records in order to transit Apple's private mail relay.
If a user signs up using `Sign in with Apple` and chooses to hide their real email address, then the
private relay address will become the primary email for the user. Should a user then choose to sign in with an email
address (and not via `Sign in with Apple`), then the private relay email address must be used, *not* the real email
address associated with her Apple account.
### Register domains with Apple
* On [Certificates, Identifiers & Profiles](https://developer.apple.com/account/resources), click `Services` in the
left sidebar.
* In the `Sign in with Apple for Email Communication` panel, click `Configure`.
* Next to the `Email Sources` heading, click the add (`+`) button.
* In the `Register your email sources` modal, enter your `Domains and Subdomains` and/or specific `Email Addresses`.
* If you use Hanko Cloud and do *not* want to use a custom SMTP server, enter `hanko.io` in
the `Domains and Subdomains` input. You do not need to provide an SPF DNS record by yourself.
* If you use Hanko Cloud and *do* want to use a [custom SMTP server](?environment=cloud#configure-smtp), enter your
custom domain in the `Domains and Subdomains` input. Remember to provide an SPF DNS record for your domain in order
to pass Apple's SPF check.
* Click `Next`, then click `Register`.
* Your domains should be listed in the `Email Sources` table. Emails are only relayed if the SPF check (see the `Status`
column) was successful.
### Configure SMTP with Hanko
If you use Hanko Cloud and are on a paid subscription tier you can configure your own SMTP server.
* Sign in to [cloud.hanko.io](https://cloud.hanko.io).
* Select your `Organization`.
* Select your `Project`.
* In the left sidebar, click `Settings`, then select `SMTP`.
* Enter your SMTP credentials and sender data.
* The domain of your `Sender email address` should be registered as an email source in the Apple developer
console to allow communication through Apple's private relay service (see the [previous step](#register-domains)).
* Click `Save`.