> ## Documentation Index
> Fetch the complete documentation index at: https://docs.hanko.io/llms.txt
> Use this file to discover all available pages before exploring further.
# Set up SAML SSO with Auth0
> Learn how to set up enterprise connections in Hanko for customers using Auth0 as SAML identity provider.
**Hanko Auth0 SAML Integration Guide**:
**About Hanko**:
Hanko is a modern open source authentication solution and the fastest way you integrate passkeys, 2FA, SSO, and more—with full control over your data. Move between self-hosted and Hanko Cloud anytime. No lock-in. Just Auth how it should be: secure, user friendly, and fully yours.
**What This Guide Covers**: This guide demonstrates how to configure Auth0 as a SAML identity provider for your Hanko project, enabling secure single sign-on authentication for enterprise users.
**Key Technologies**:
* SAML 2.0
* XML digital signatures
* Auth0 identity provider
* SAML assertions
**Prerequisites**:
* Active Auth0 account
* Hanko Cloud project
* Basic understanding of SAML authentication protocols
* Admin access to both Auth0 and Hanko Cloud dashboards
**Tasks You'll Complete**:
* Set up SAML application in Auth0 dashboard
* Configure SAML addon with proper ACS URL and settings
* Set up attribute mapping for email claims
* Create enterprise connection in Hanko Cloud
* Test integration using IdP-initiated flow
* Verify authentication workflow functions properly
## Prerequisites
You need your project's SAML Assertion Consumer Service (ACS) URL.
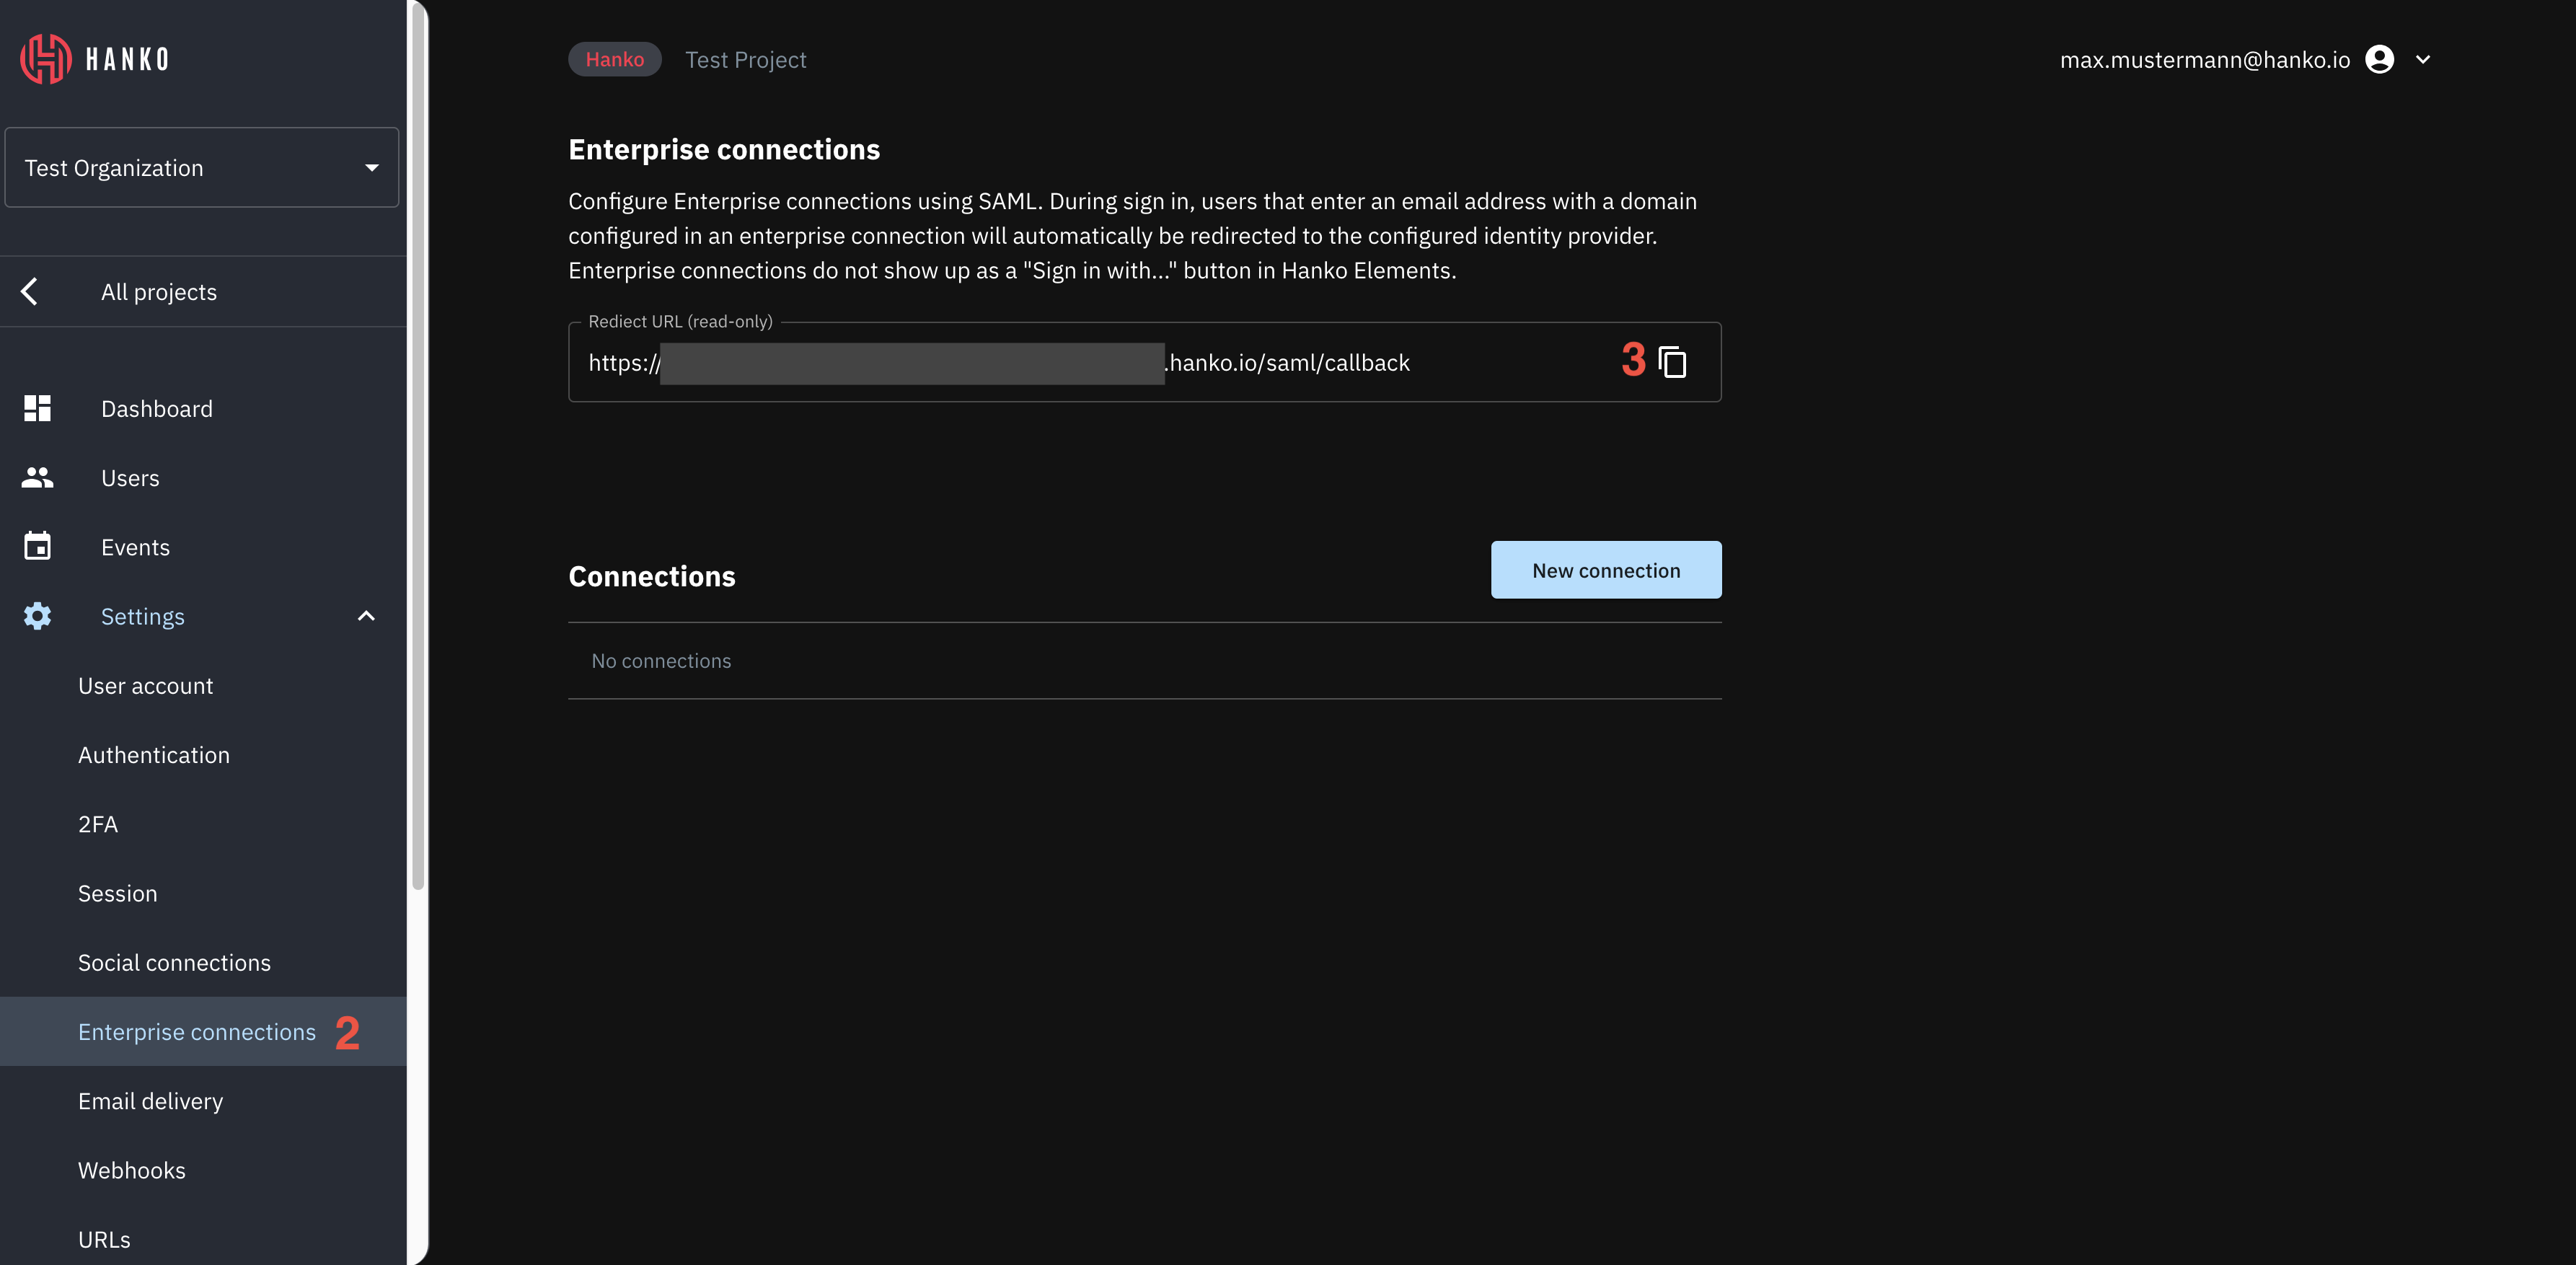
### Service Provider ACS URL
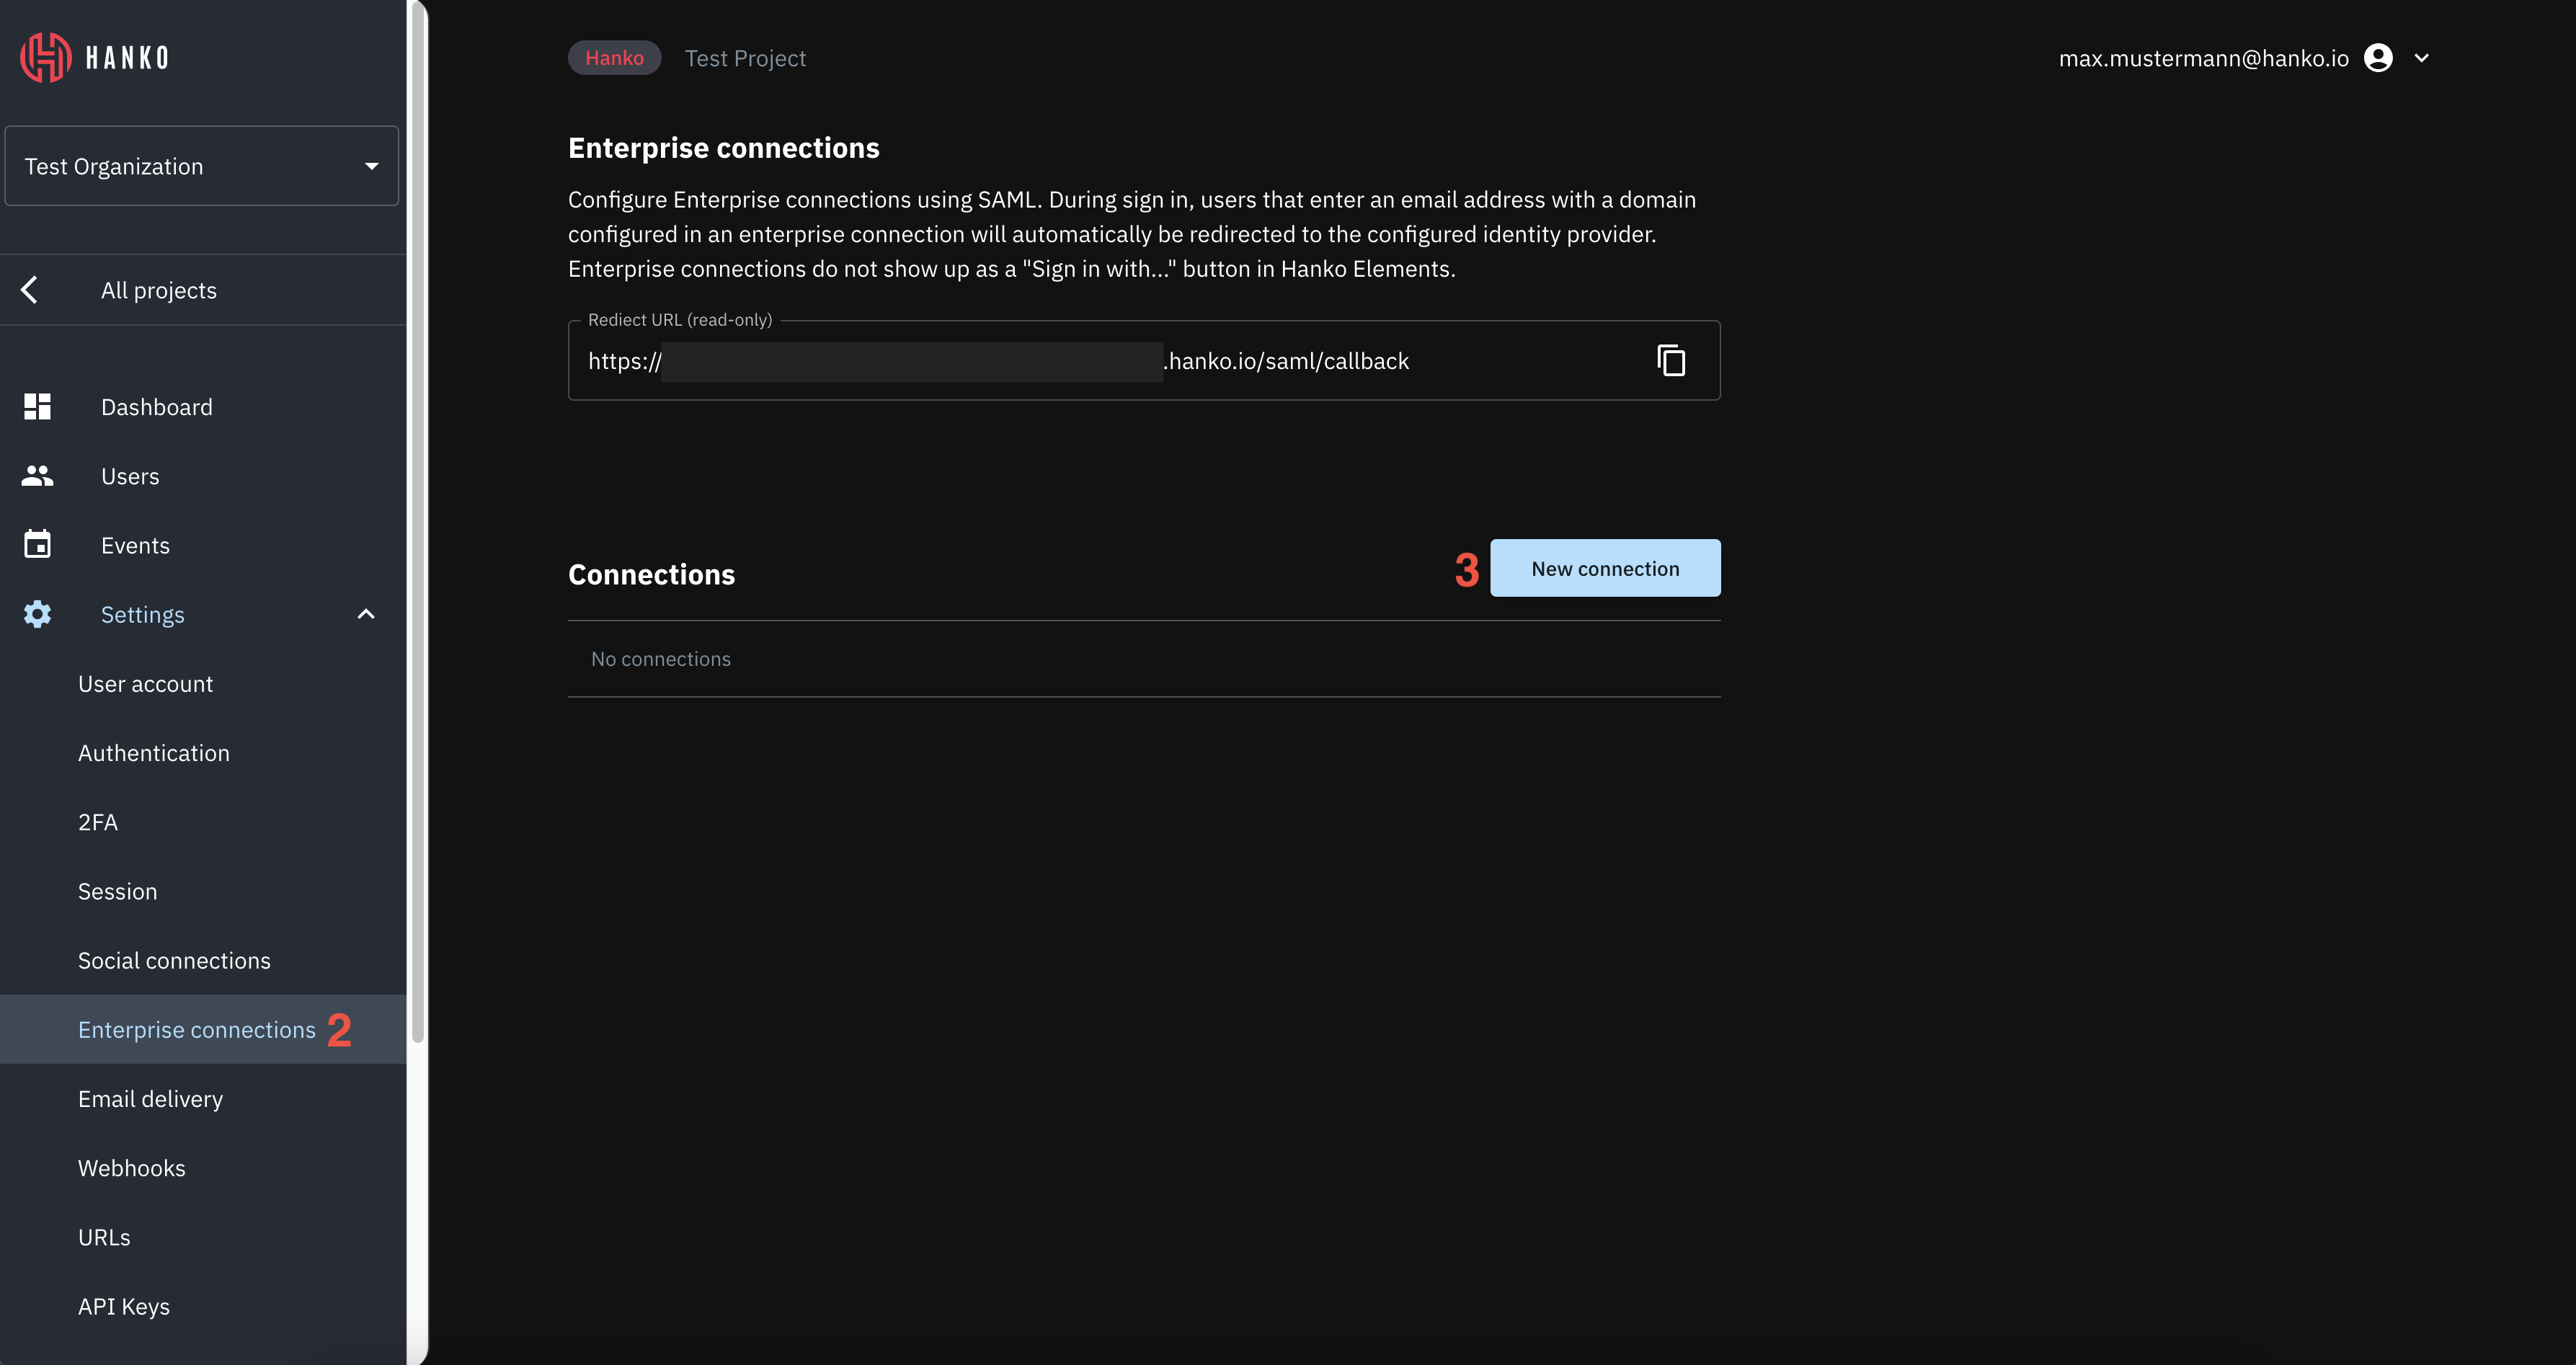
To find the Assertion Consumer Service (ACS) URL for your project:
1. Log in to [Hanko Cloud](https://cloud.hanko.io) and select your project.
2. Navigate to `Settings > Enterprise connections`.
3. Under `Enterprise connections` find the `Redirect URL` panel.
4. Copy and save the URL.
 ## Create an Auth0 application
1. Sign up for an [Auth0 account](https://auth0.com/signup) or [sign in](https://manage.auth0.com/) to access your dashboard.
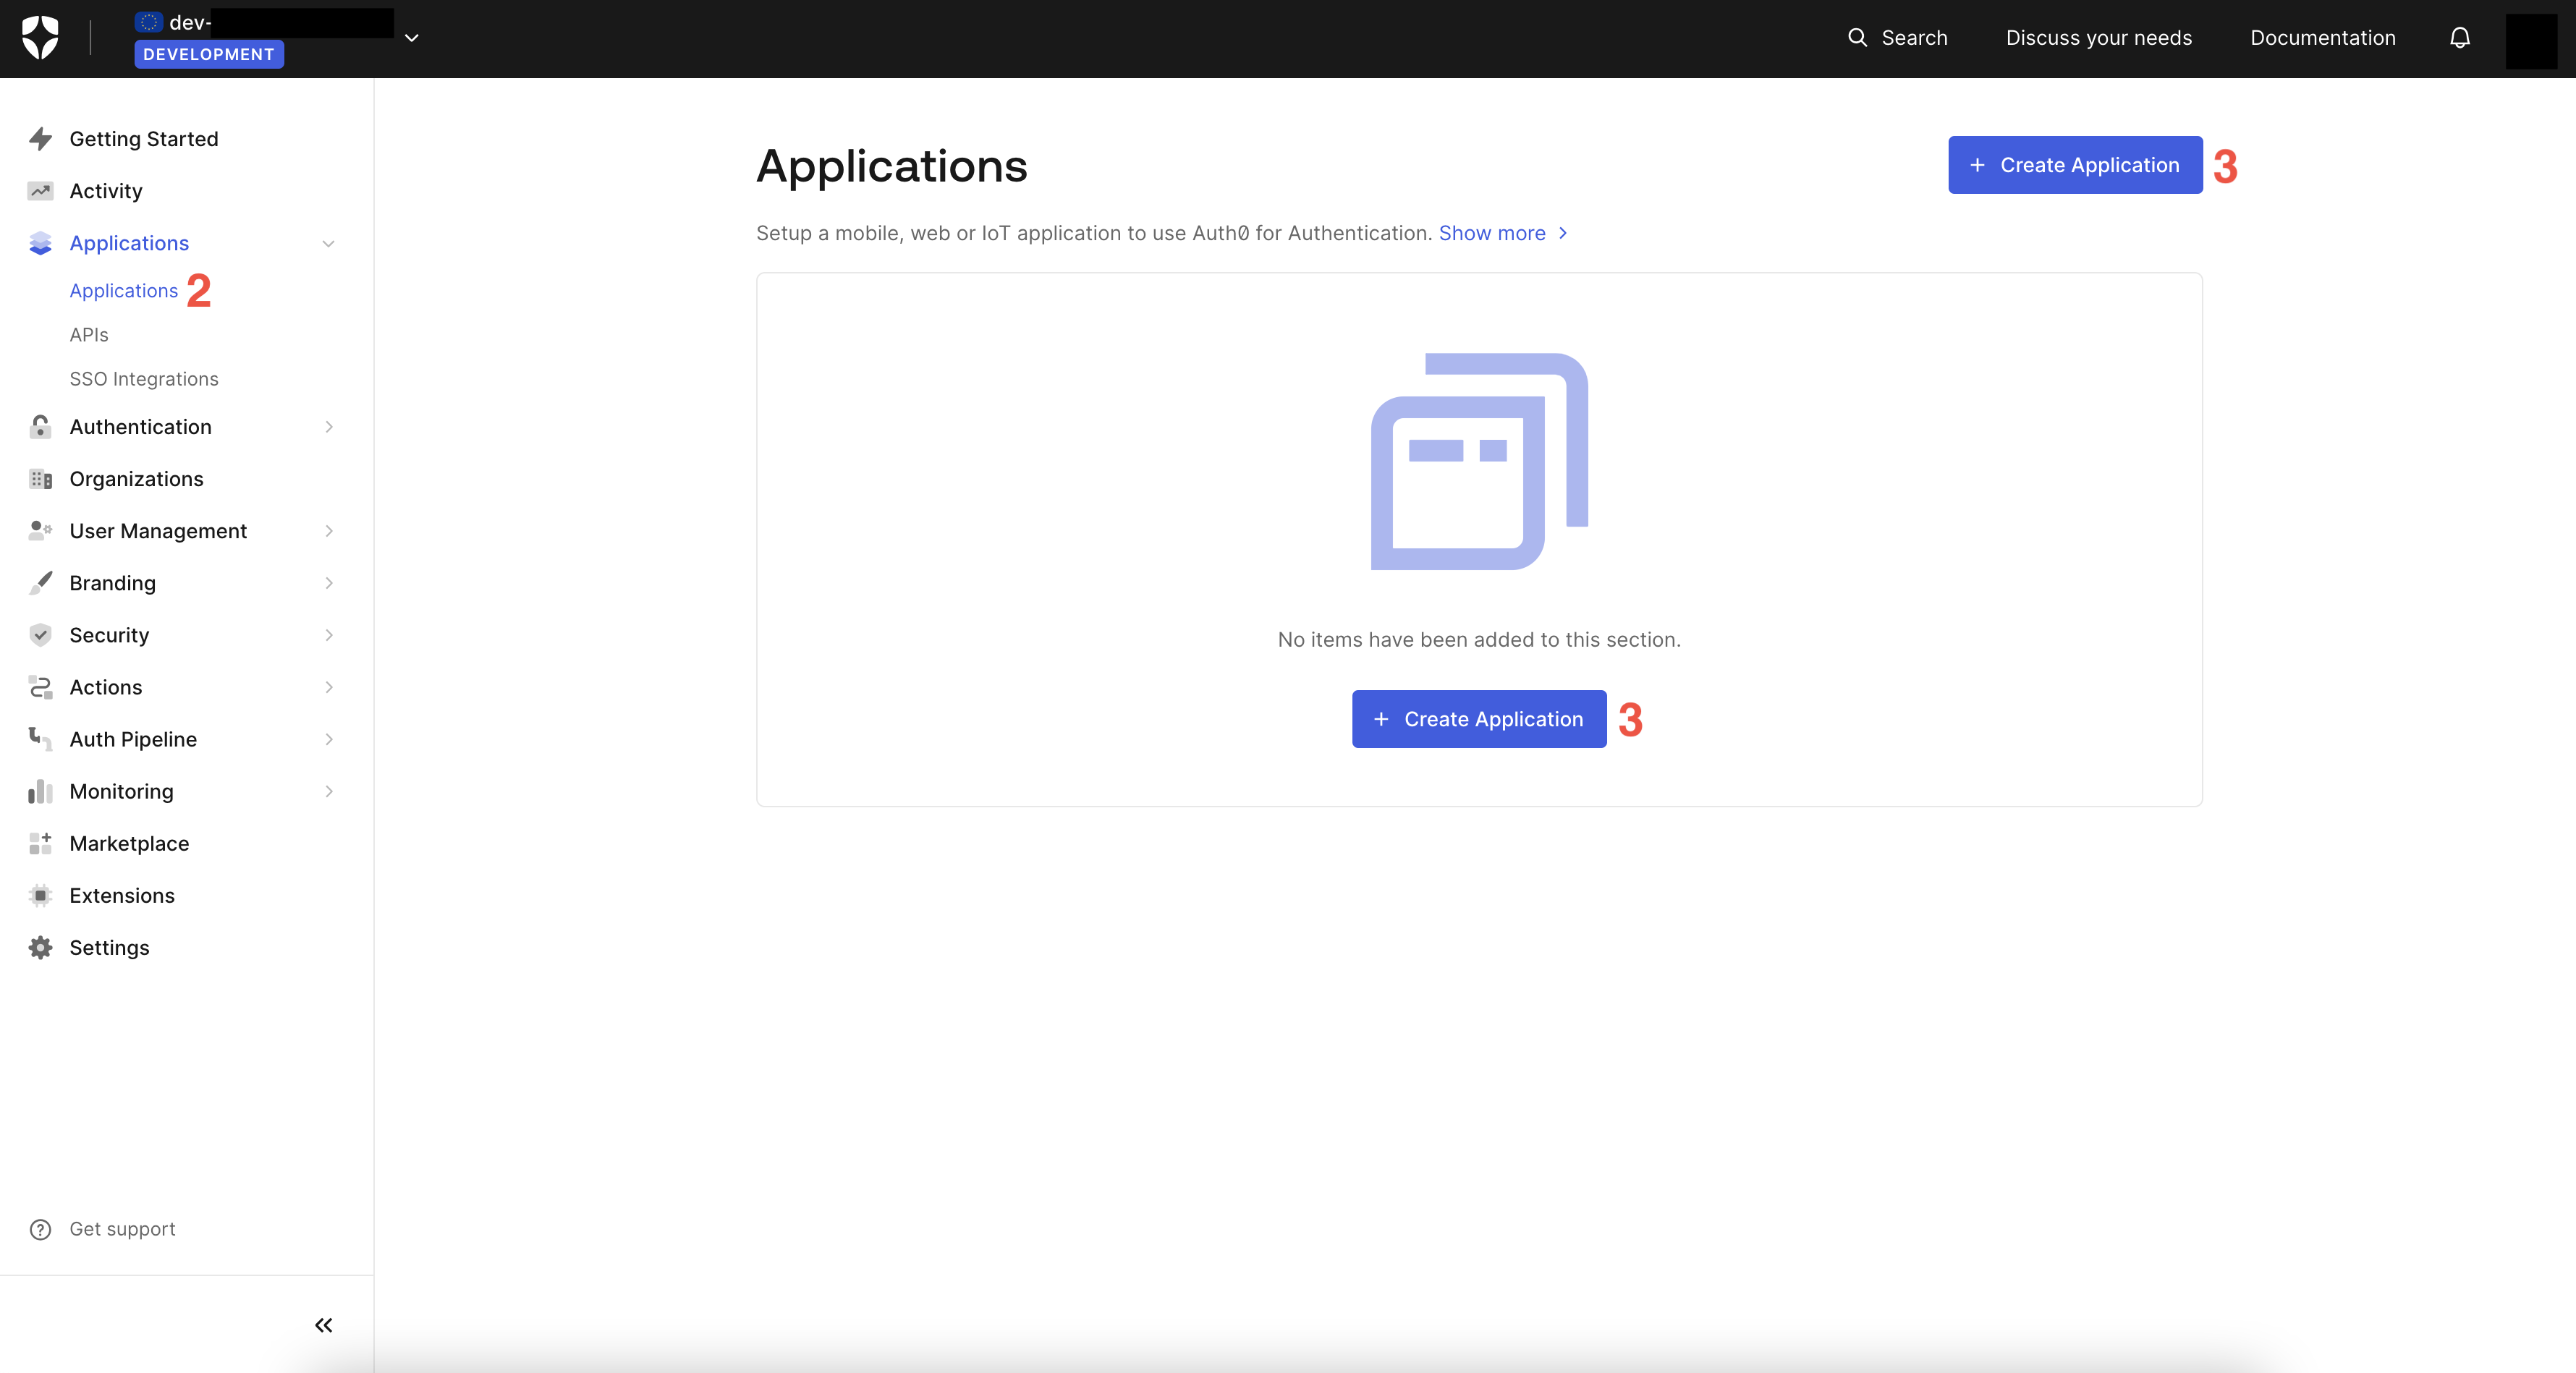
2. On your dashboard, select `Applications > Applications` in the left sidebar.
3. Click `Create application` to create an application.
## Create an Auth0 application
1. Sign up for an [Auth0 account](https://auth0.com/signup) or [sign in](https://manage.auth0.com/) to access your dashboard.
2. On your dashboard, select `Applications > Applications` in the left sidebar.
3. Click `Create application` to create an application.
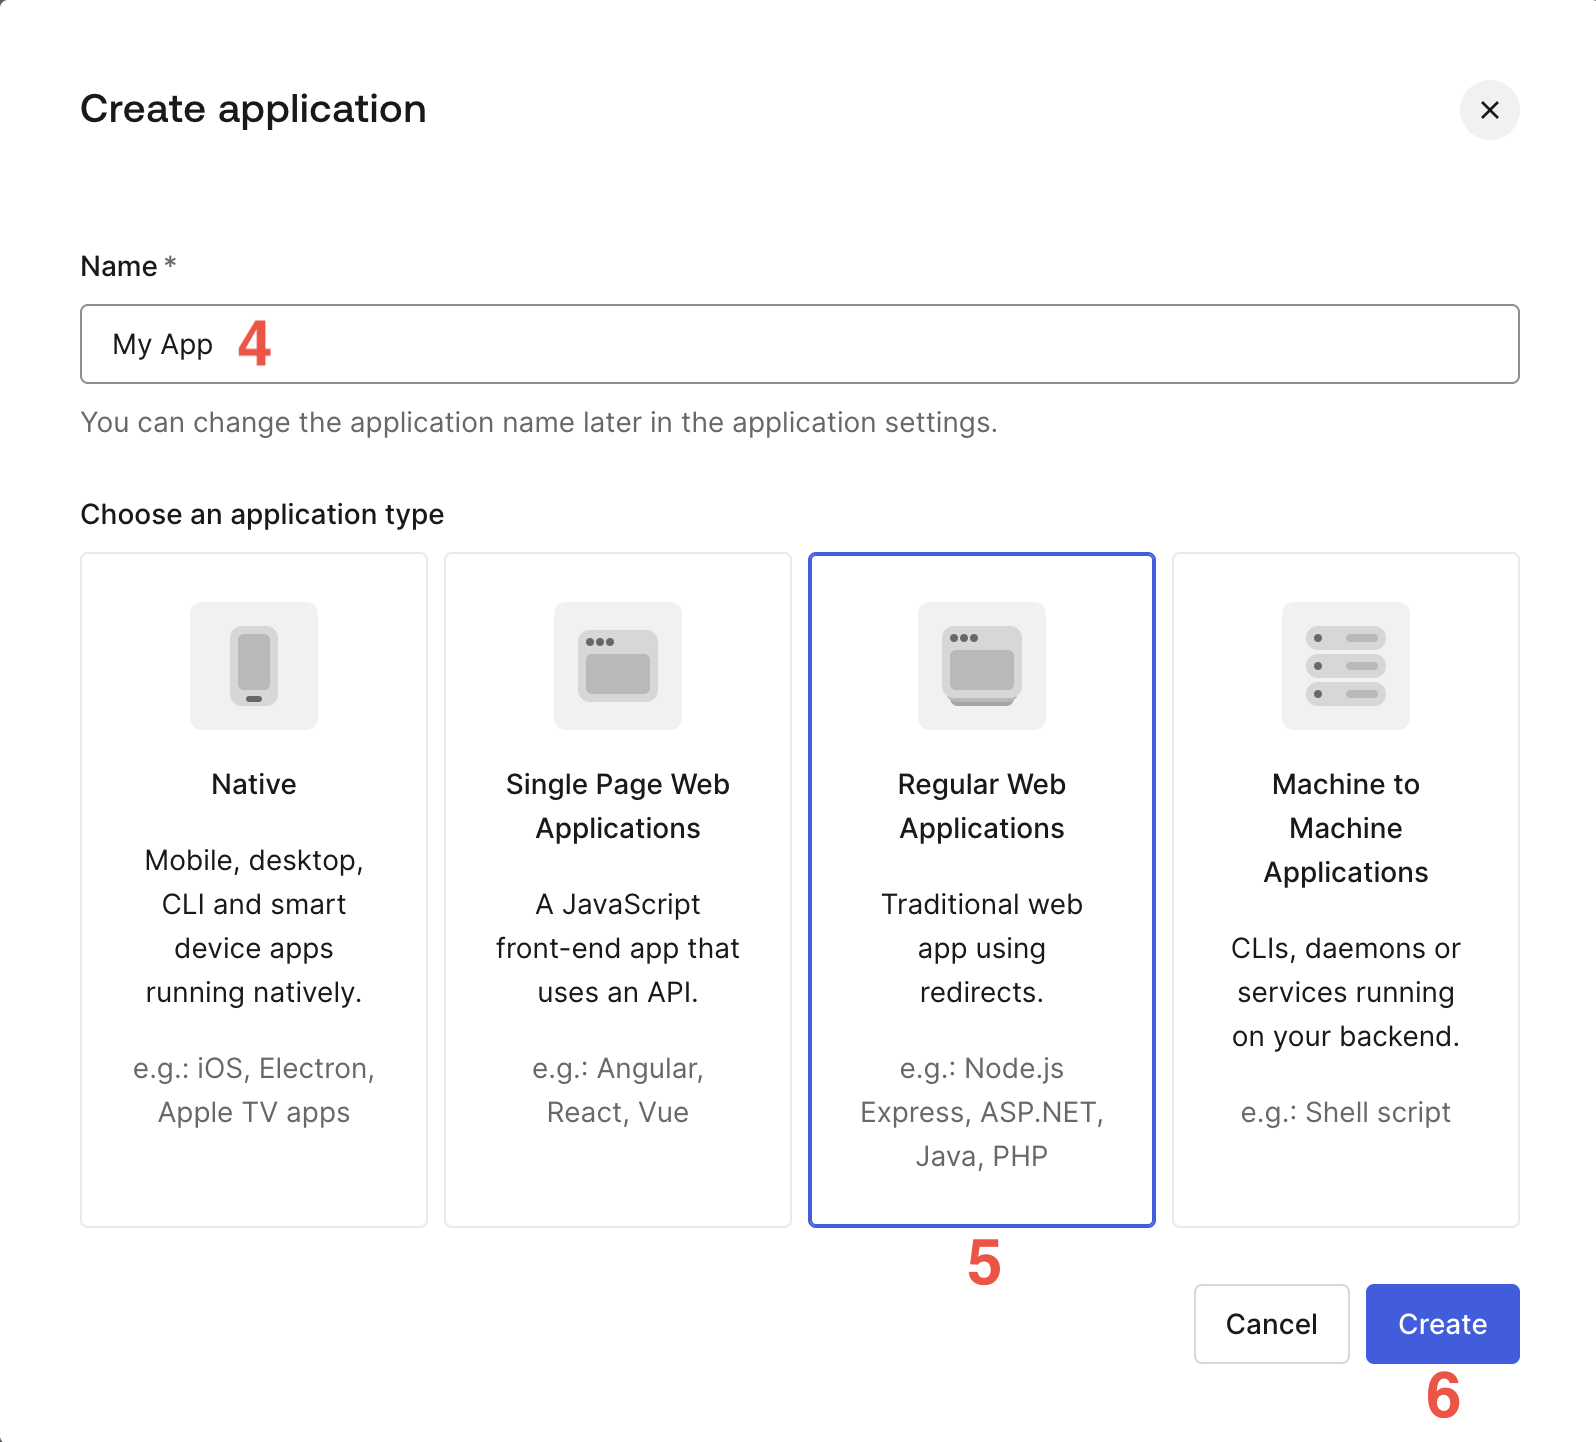
 4. In the shown modal, enter a name for your application.
5. Select `Regular Web Applications` as the application type.
6. Click `Create` to create the application. You should be redirected to the application's dashboard.
4. In the shown modal, enter a name for your application.
5. Select `Regular Web Applications` as the application type.
6. Click `Create` to create the application. You should be redirected to the application's dashboard.
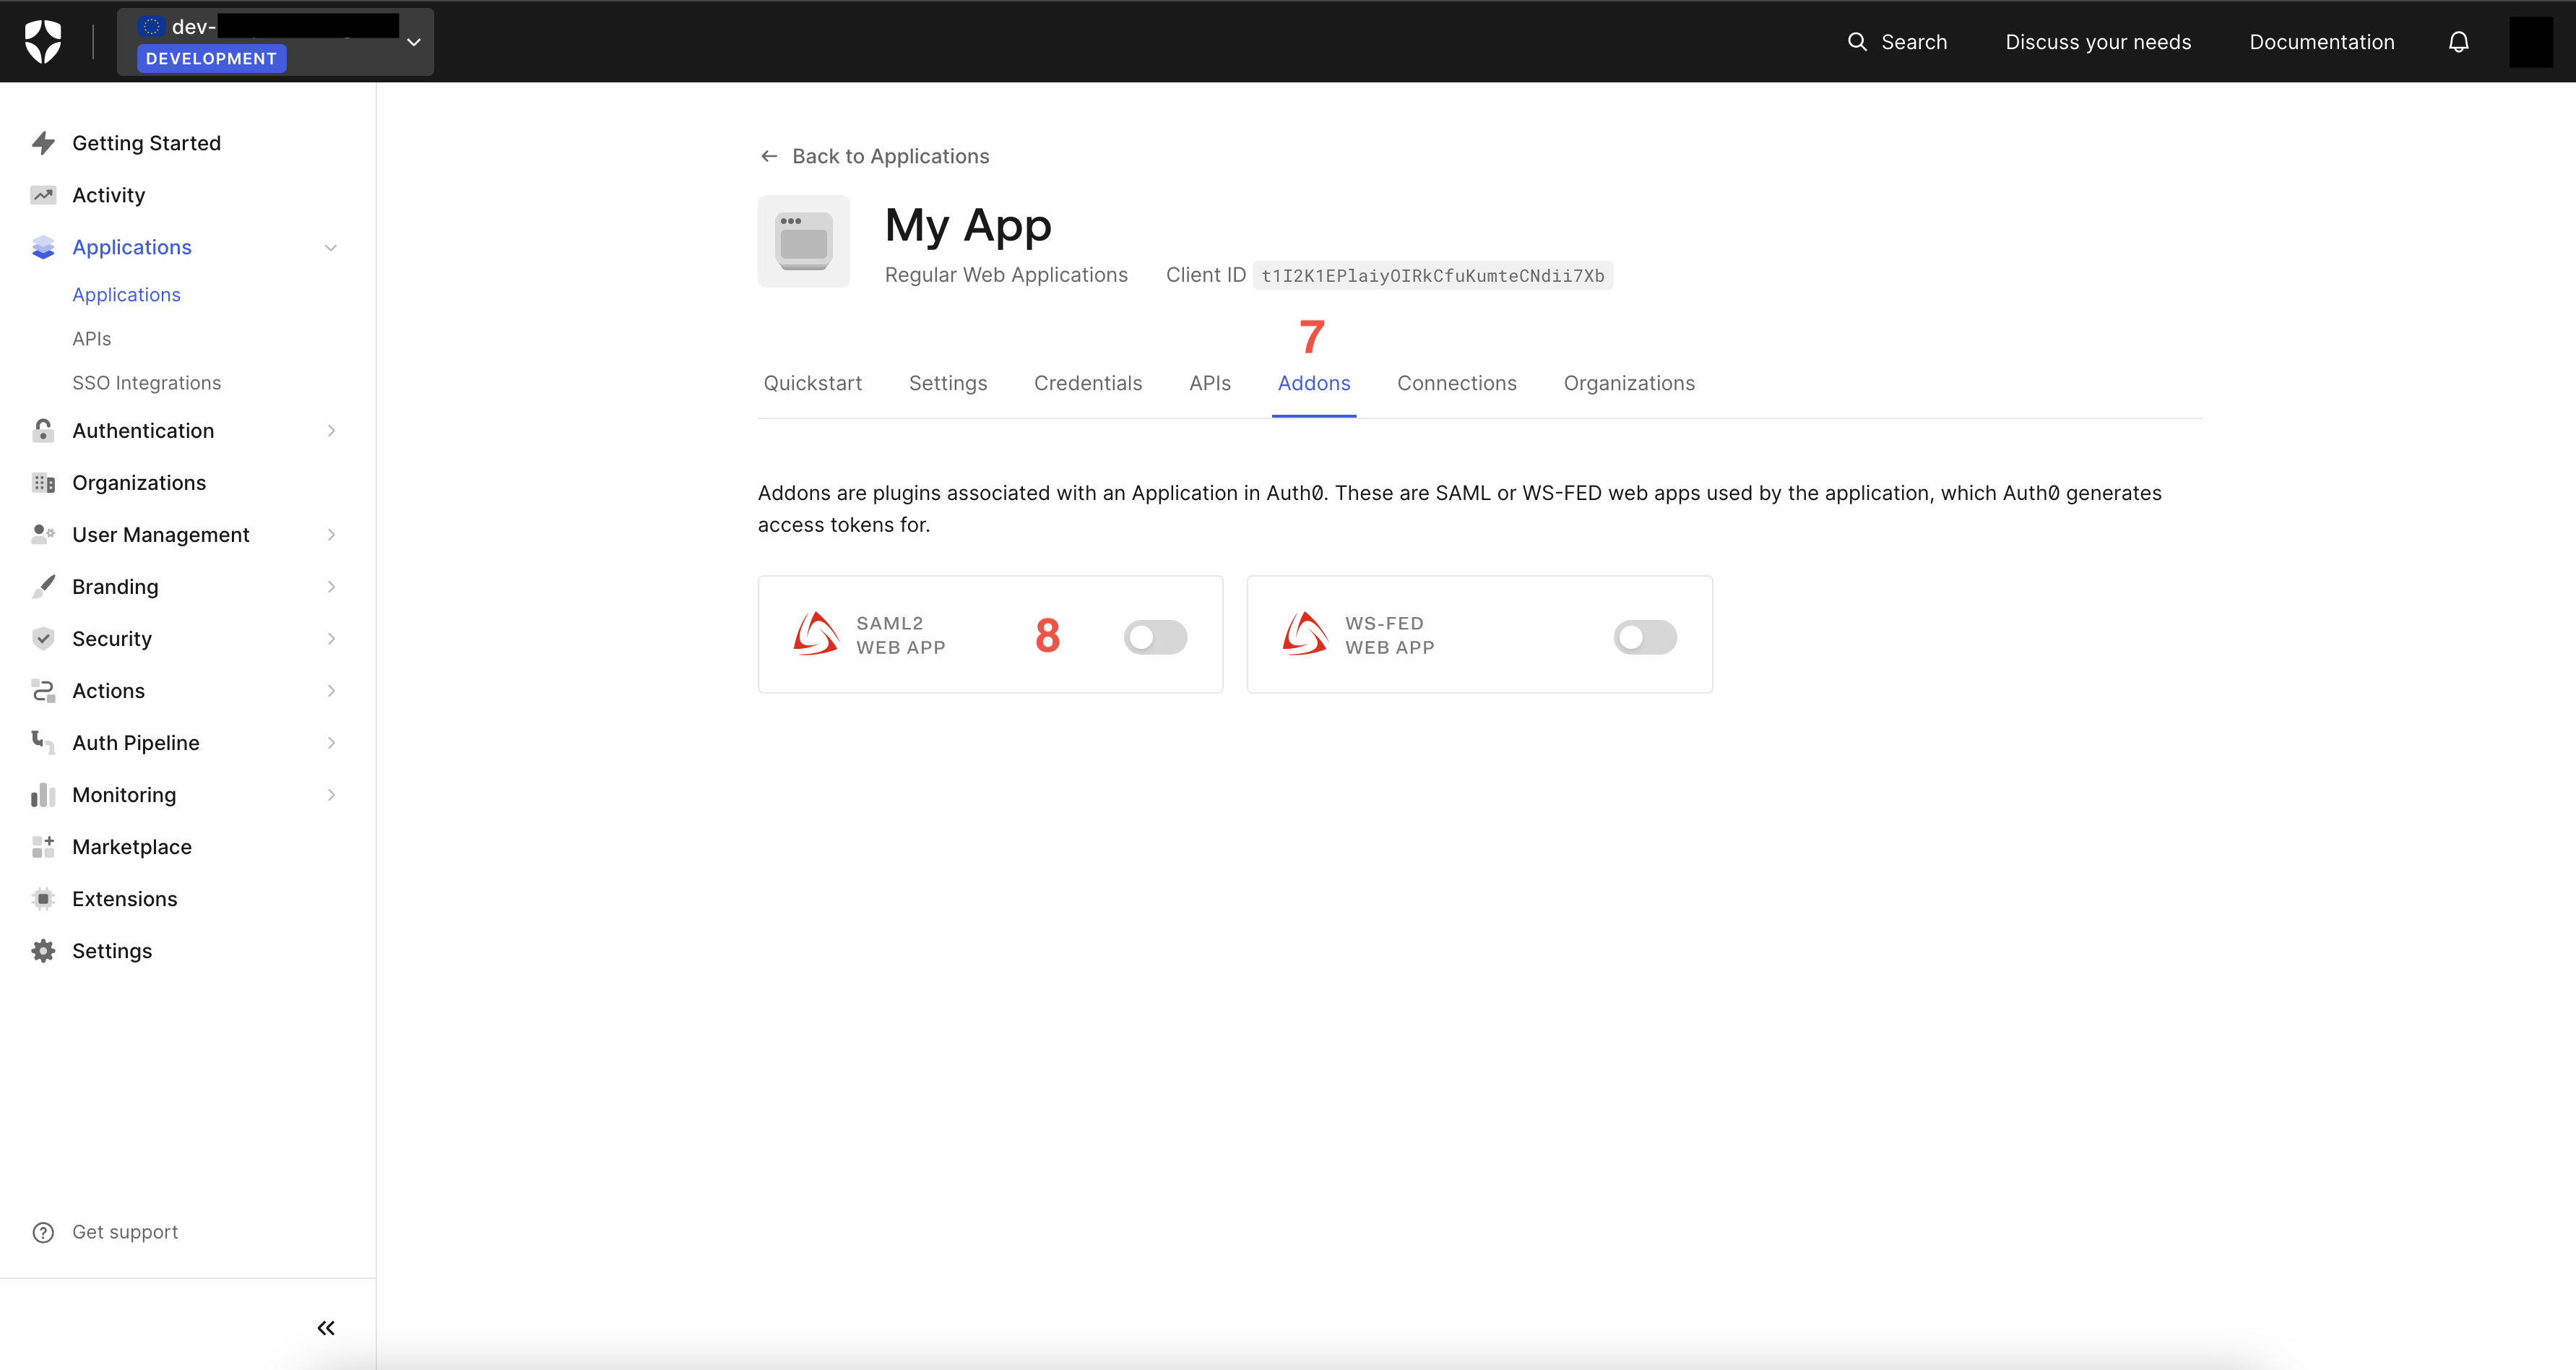
 7. On the application's dashboard, select `Addons` in the top tab navigation.
8. Click on the `SAML2 Web App` panel.
7. On the application's dashboard, select `Addons` in the top tab navigation.
8. Click on the `SAML2 Web App` panel.
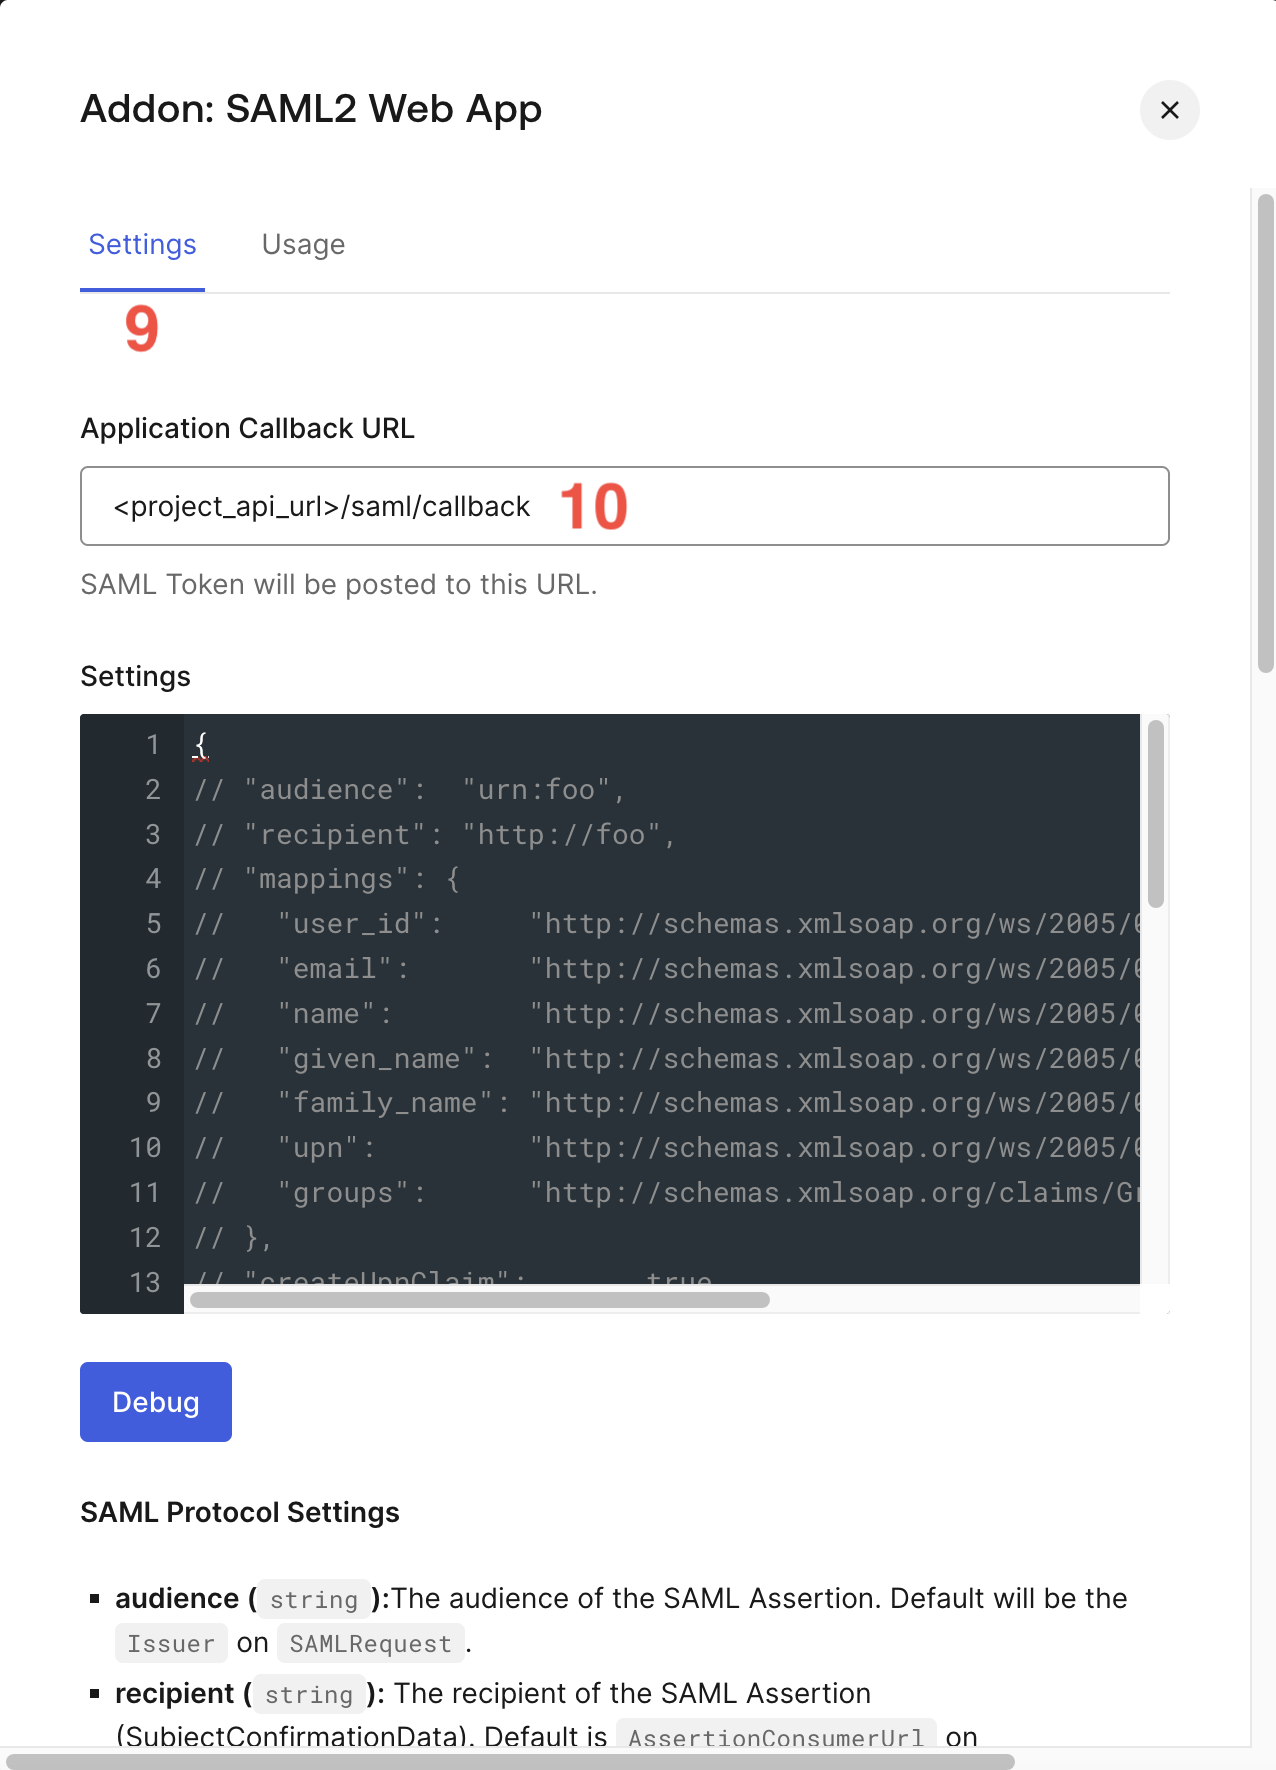
 9. In the shown modal, select `Settings` in the top tab navigation.
10. In the `Application Callback URL` input provide the ACS URL you obtained as described in
[Prerequisites - Service Provider ACS URL](#service-provider-acs-url).
9. In the shown modal, select `Settings` in the top tab navigation.
10. In the `Application Callback URL` input provide the ACS URL you obtained as described in
[Prerequisites - Service Provider ACS URL](#service-provider-acs-url).
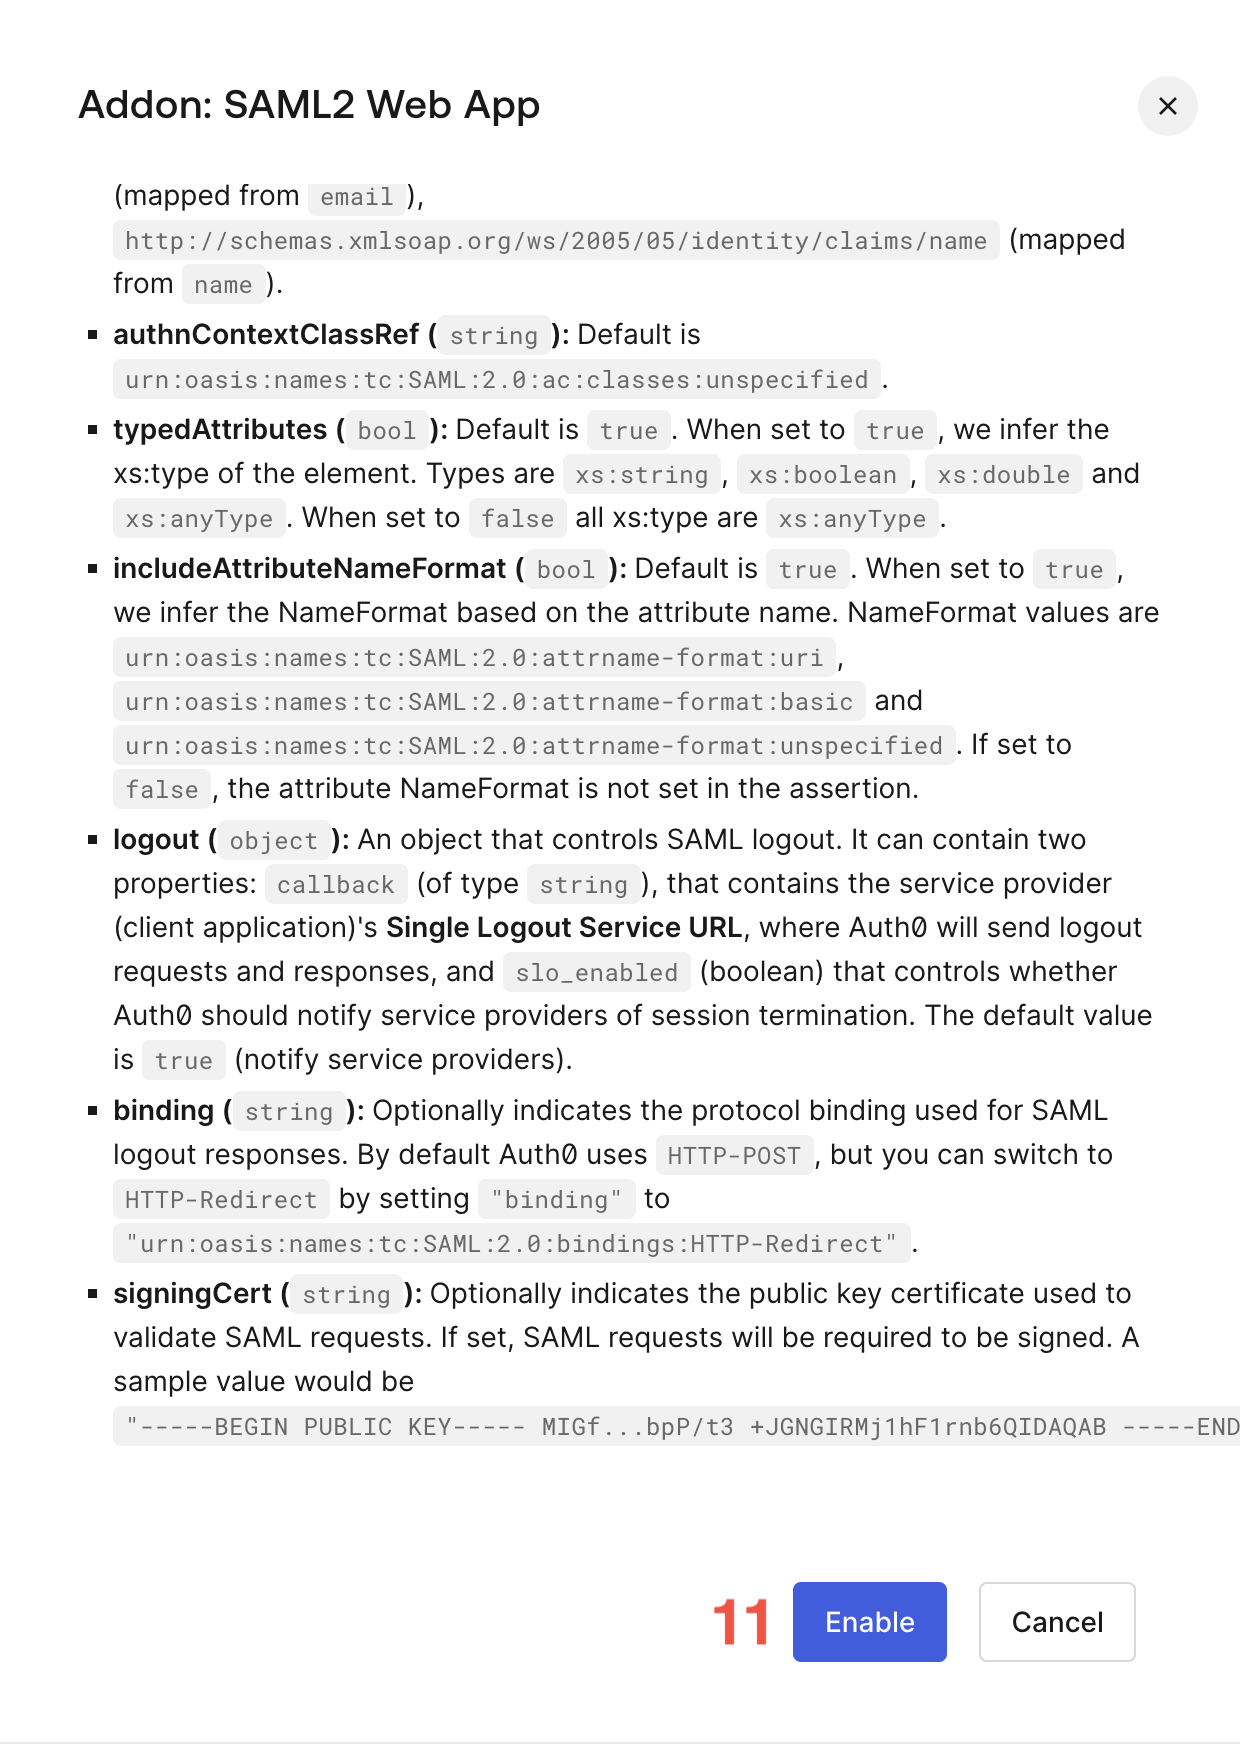
 11. Scroll down and select `Enable` to enable the configured SAML addon.
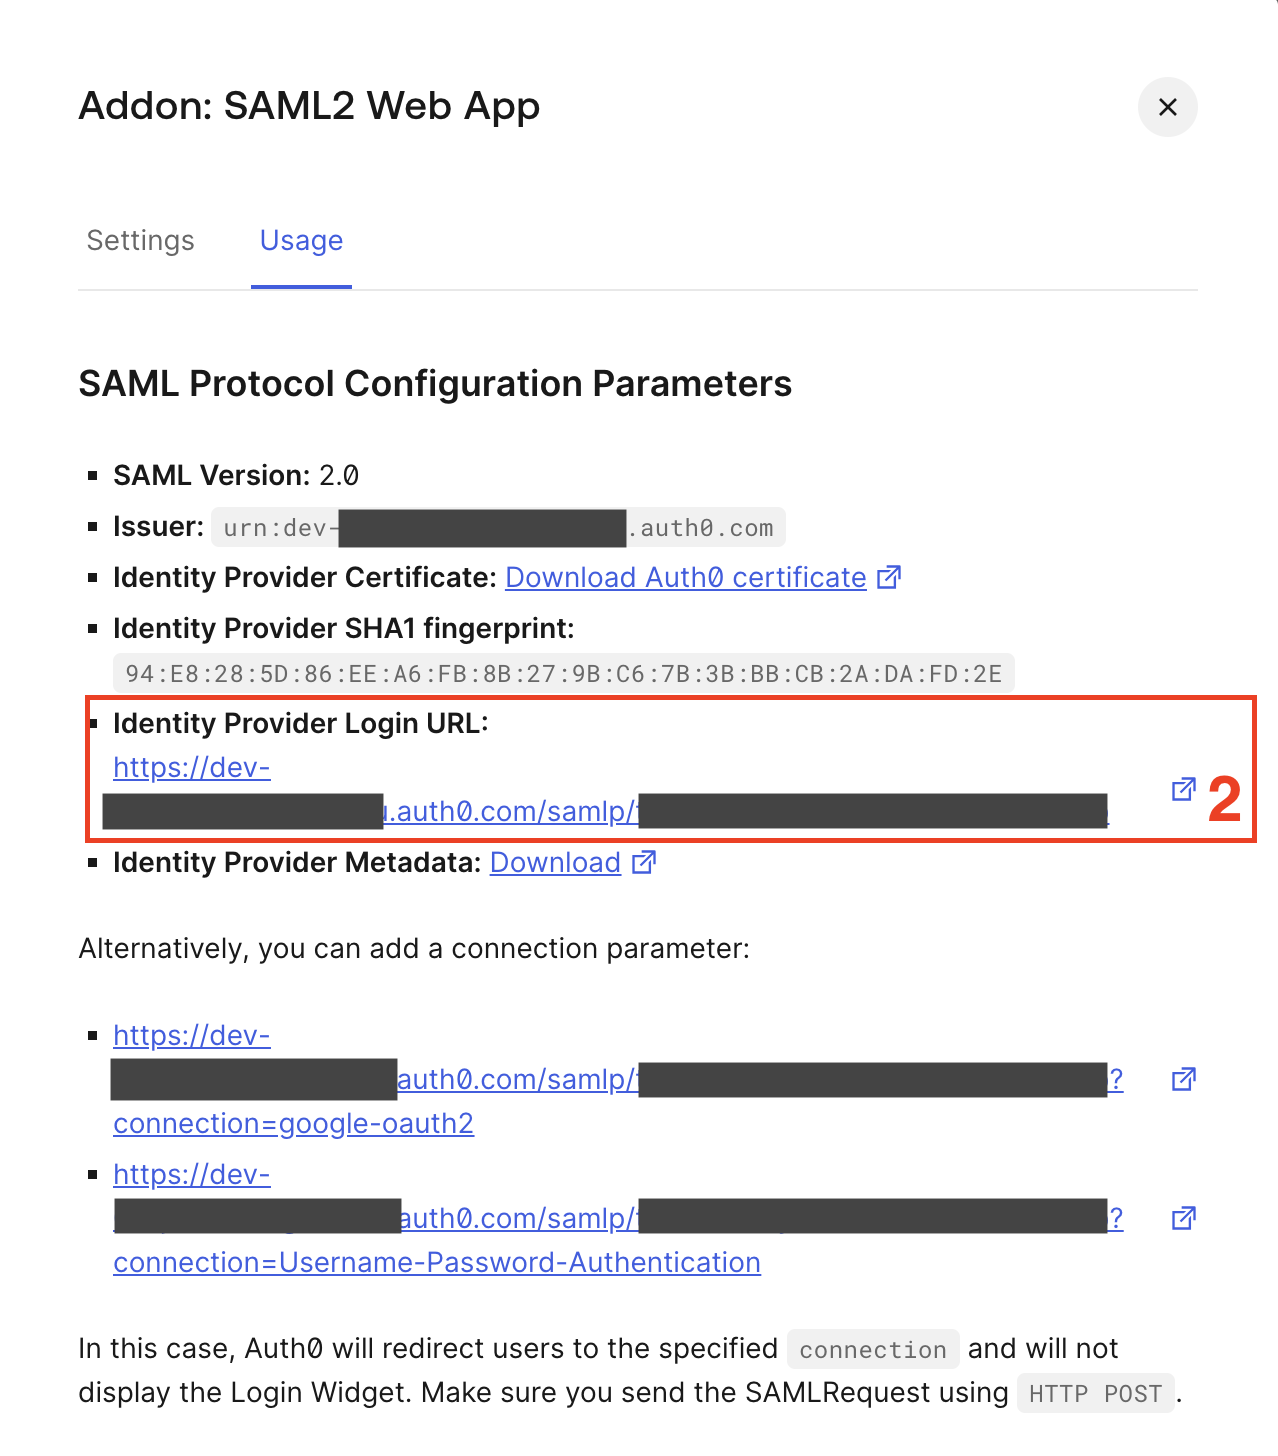
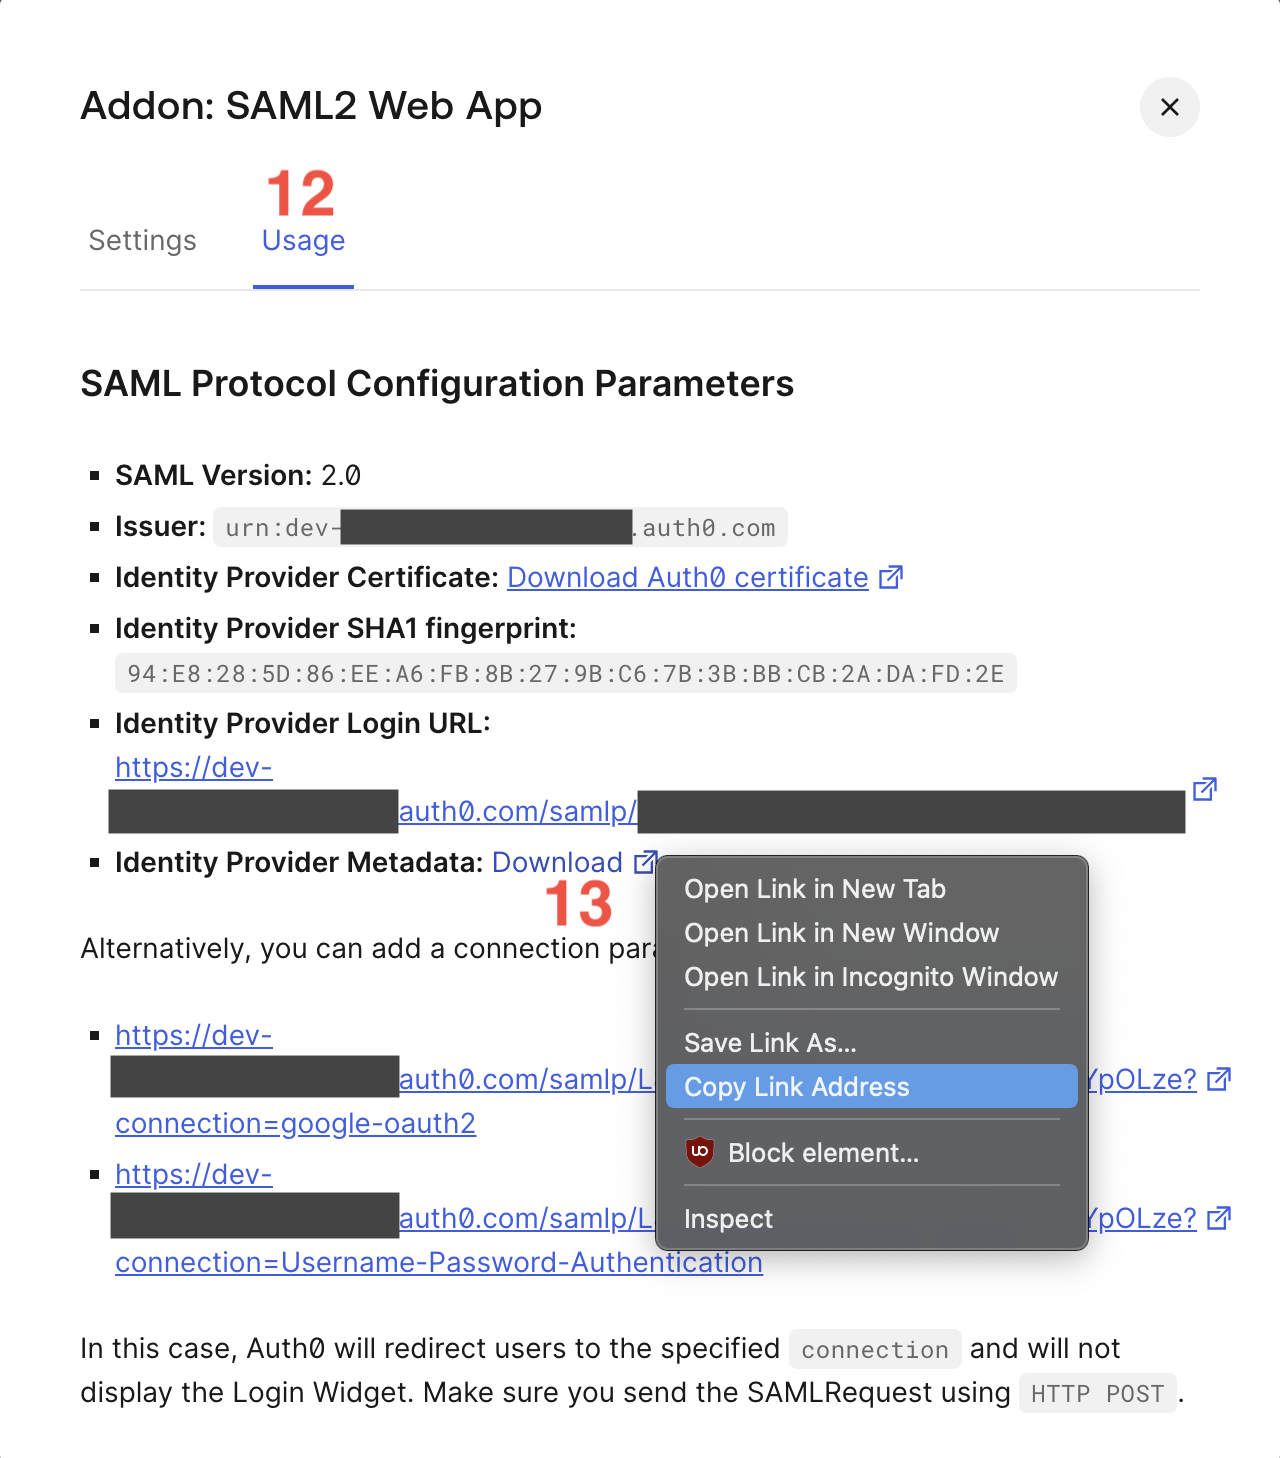
 12. Select the `Usage` tab in the top tab navigation.
13. Find `Identity Provider Metadata` and copy the address of `Download` link. You need this for configuring the
enterprise connection with Hanko in the next section.
12. Select the `Usage` tab in the top tab navigation.
13. Find `Identity Provider Metadata` and copy the address of `Download` link. You need this for configuring the
enterprise connection with Hanko in the next section.
 ### Attribute mapping
SAML SSO integration with Hanko requires an email address attribute in the IdP's SAML response. The attribute must be available under the name `http://schemas.xmlsoap.org/ws/2005/05/identity/claims/emailaddress`. Auth0 uses this name by default for the `emailaddress` attribute, so no additional configuration is required.
## Configure an enterprise connection
1. Log in to [Hanko Cloud](https://cloud.hanko.io) and select your project.
2. Navigate to `Settings > Enterprise connections`.
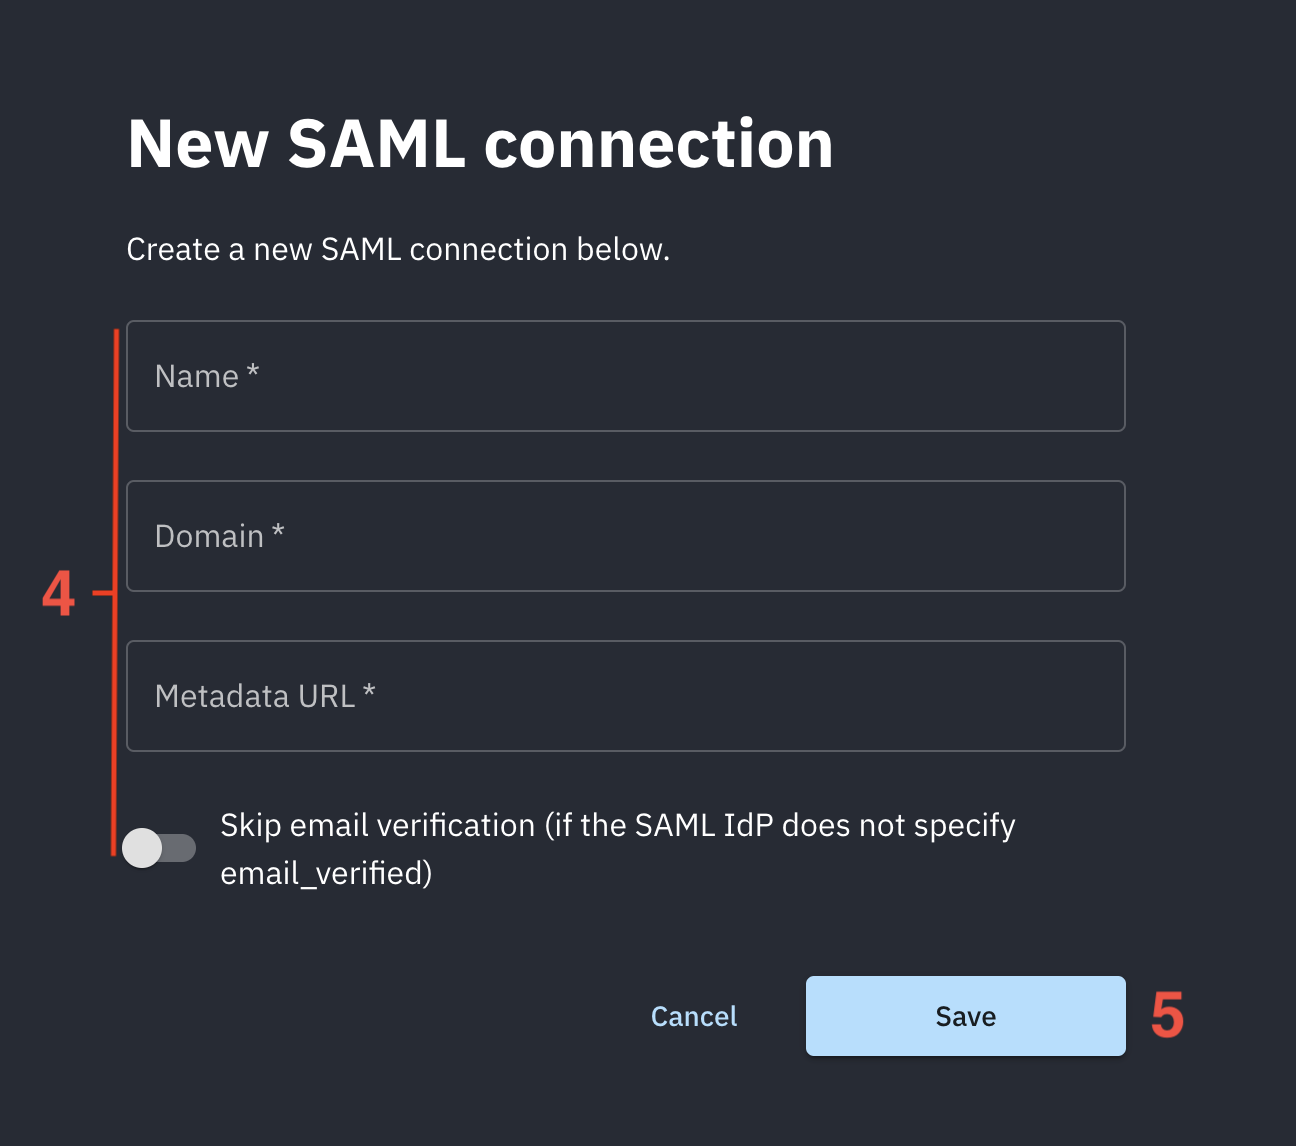
3. Under `Connections`, click `New connection`.
### Attribute mapping
SAML SSO integration with Hanko requires an email address attribute in the IdP's SAML response. The attribute must be available under the name `http://schemas.xmlsoap.org/ws/2005/05/identity/claims/emailaddress`. Auth0 uses this name by default for the `emailaddress` attribute, so no additional configuration is required.
## Configure an enterprise connection
1. Log in to [Hanko Cloud](https://cloud.hanko.io) and select your project.
2. Navigate to `Settings > Enterprise connections`.
3. Under `Connections`, click `New connection`.
 4. In the shown modal provide the following data:
* A `Name` for the connection.
* A `Domain` for the connection. When users authenticate via SAML SSO, the domain of the email
address provided as an identifier at the start of an authentication flow must match the domain configured here.
* A `Metadata URL`. This is the URL you copied in step 13 in [Create an Auth0 application](#create-an-auth0-application).
* Select whether you want skip email verification for this provider.
5. Click `Save` to create the connection.
4. In the shown modal provide the following data:
* A `Name` for the connection.
* A `Domain` for the connection. When users authenticate via SAML SSO, the domain of the email
address provided as an identifier at the start of an authentication flow must match the domain configured here.
* A `Metadata URL`. This is the URL you copied in step 13 in [Create an Auth0 application](#create-an-auth0-application).
* Select whether you want skip email verification for this provider.
5. Click `Save` to create the connection.
 ## Testing your integration
To test your integration via [IdP-initiated](/guides/enterprise-sso/introduction#identity-provider-initiated-sso) flow:
1. Navigate to the SAML Addon configuration for your application (see step 8 in [Create an Auth0 application](#create-an-auth0-application)).
2. In the `Usage` tab, find the `Identity Provider Login URL` and click the link.
## Testing your integration
To test your integration via [IdP-initiated](/guides/enterprise-sso/introduction#identity-provider-initiated-sso) flow:
1. Navigate to the SAML Addon configuration for your application (see step 8 in [Create an Auth0 application](#create-an-auth0-application)).
2. In the `Usage` tab, find the `Identity Provider Login URL` and click the link.